Building Your Store
Product Page Creation
The anatomy of a product page that converts — what goes where, why it works, and how it maps to the Theme Editor.
Watch the Video
Opens in Skool community
- Your product page is your salesperson — it has to answer every question, handle every objection, and close the sale
- Every element exists for a reason — nothing is decorative. If it doesn't sell, it shouldn't be there.
- The order matters — customers scroll in a predictable pattern. Put the right thing at the right moment.
- This guide teaches the structure — the actual building happens in the Theme Editor using what you learned in the Theme Editor 2.0 guide
Why this matters
90% of customers who visit your product page leave without buying. The ones who stay make a decision in seconds — based on images, price, trust signals, and how the page FEELS. A well-structured product page doesn't just display a product. It tells a story, overcomes doubt, and makes buying feel obvious.
1
The Template — What Goes Where
- Every high-converting product page follows the same structure. The products change — the layout doesn't.
- This is your template. Every label below shows exactly what goes in that slot.
Hero Image
Product in use — lifestyle shot or GIF
Angle 1
Angle 2
In Use
Close-up
Scale
Offer Badge
Product Title
★★★★★ Rating (Review Count)
Sale Price
Compare Price
Save %
Free Shipping
COD Available
Easy Returns
Secure Payment
Buy Button — Order Now
UPI
Google Pay
PhonePe
COD
Feature Headline 1
Benefit description — what this feature means for the customer. Not specs, benefits.
Product Image or GIF
Product Image or GIF
Feature Headline 2
Another benefit — alternate image side for visual rhythm. 3-5 features is the sweet spot.
Customer Reviews
Photo reviews from real customers. Installed via review app (Loox, Judge.me).
FAQ — Common Questions
Last objection handler. Size? Returns? Delivery time? Answer it or lose the sale.
This is your blueprint. Every product page you build should follow this exact structure. The products change — the layout stays the same. Now let's see it executed on a real store.
2
A Live Product Page — Executed
- Here's a real product page from a live Indian D2C store that follows this exact anatomy
- Notice how each element from Step 1 appears in the same order — hero image, title + price + offer, trust signals, buy button, rich description, reviews
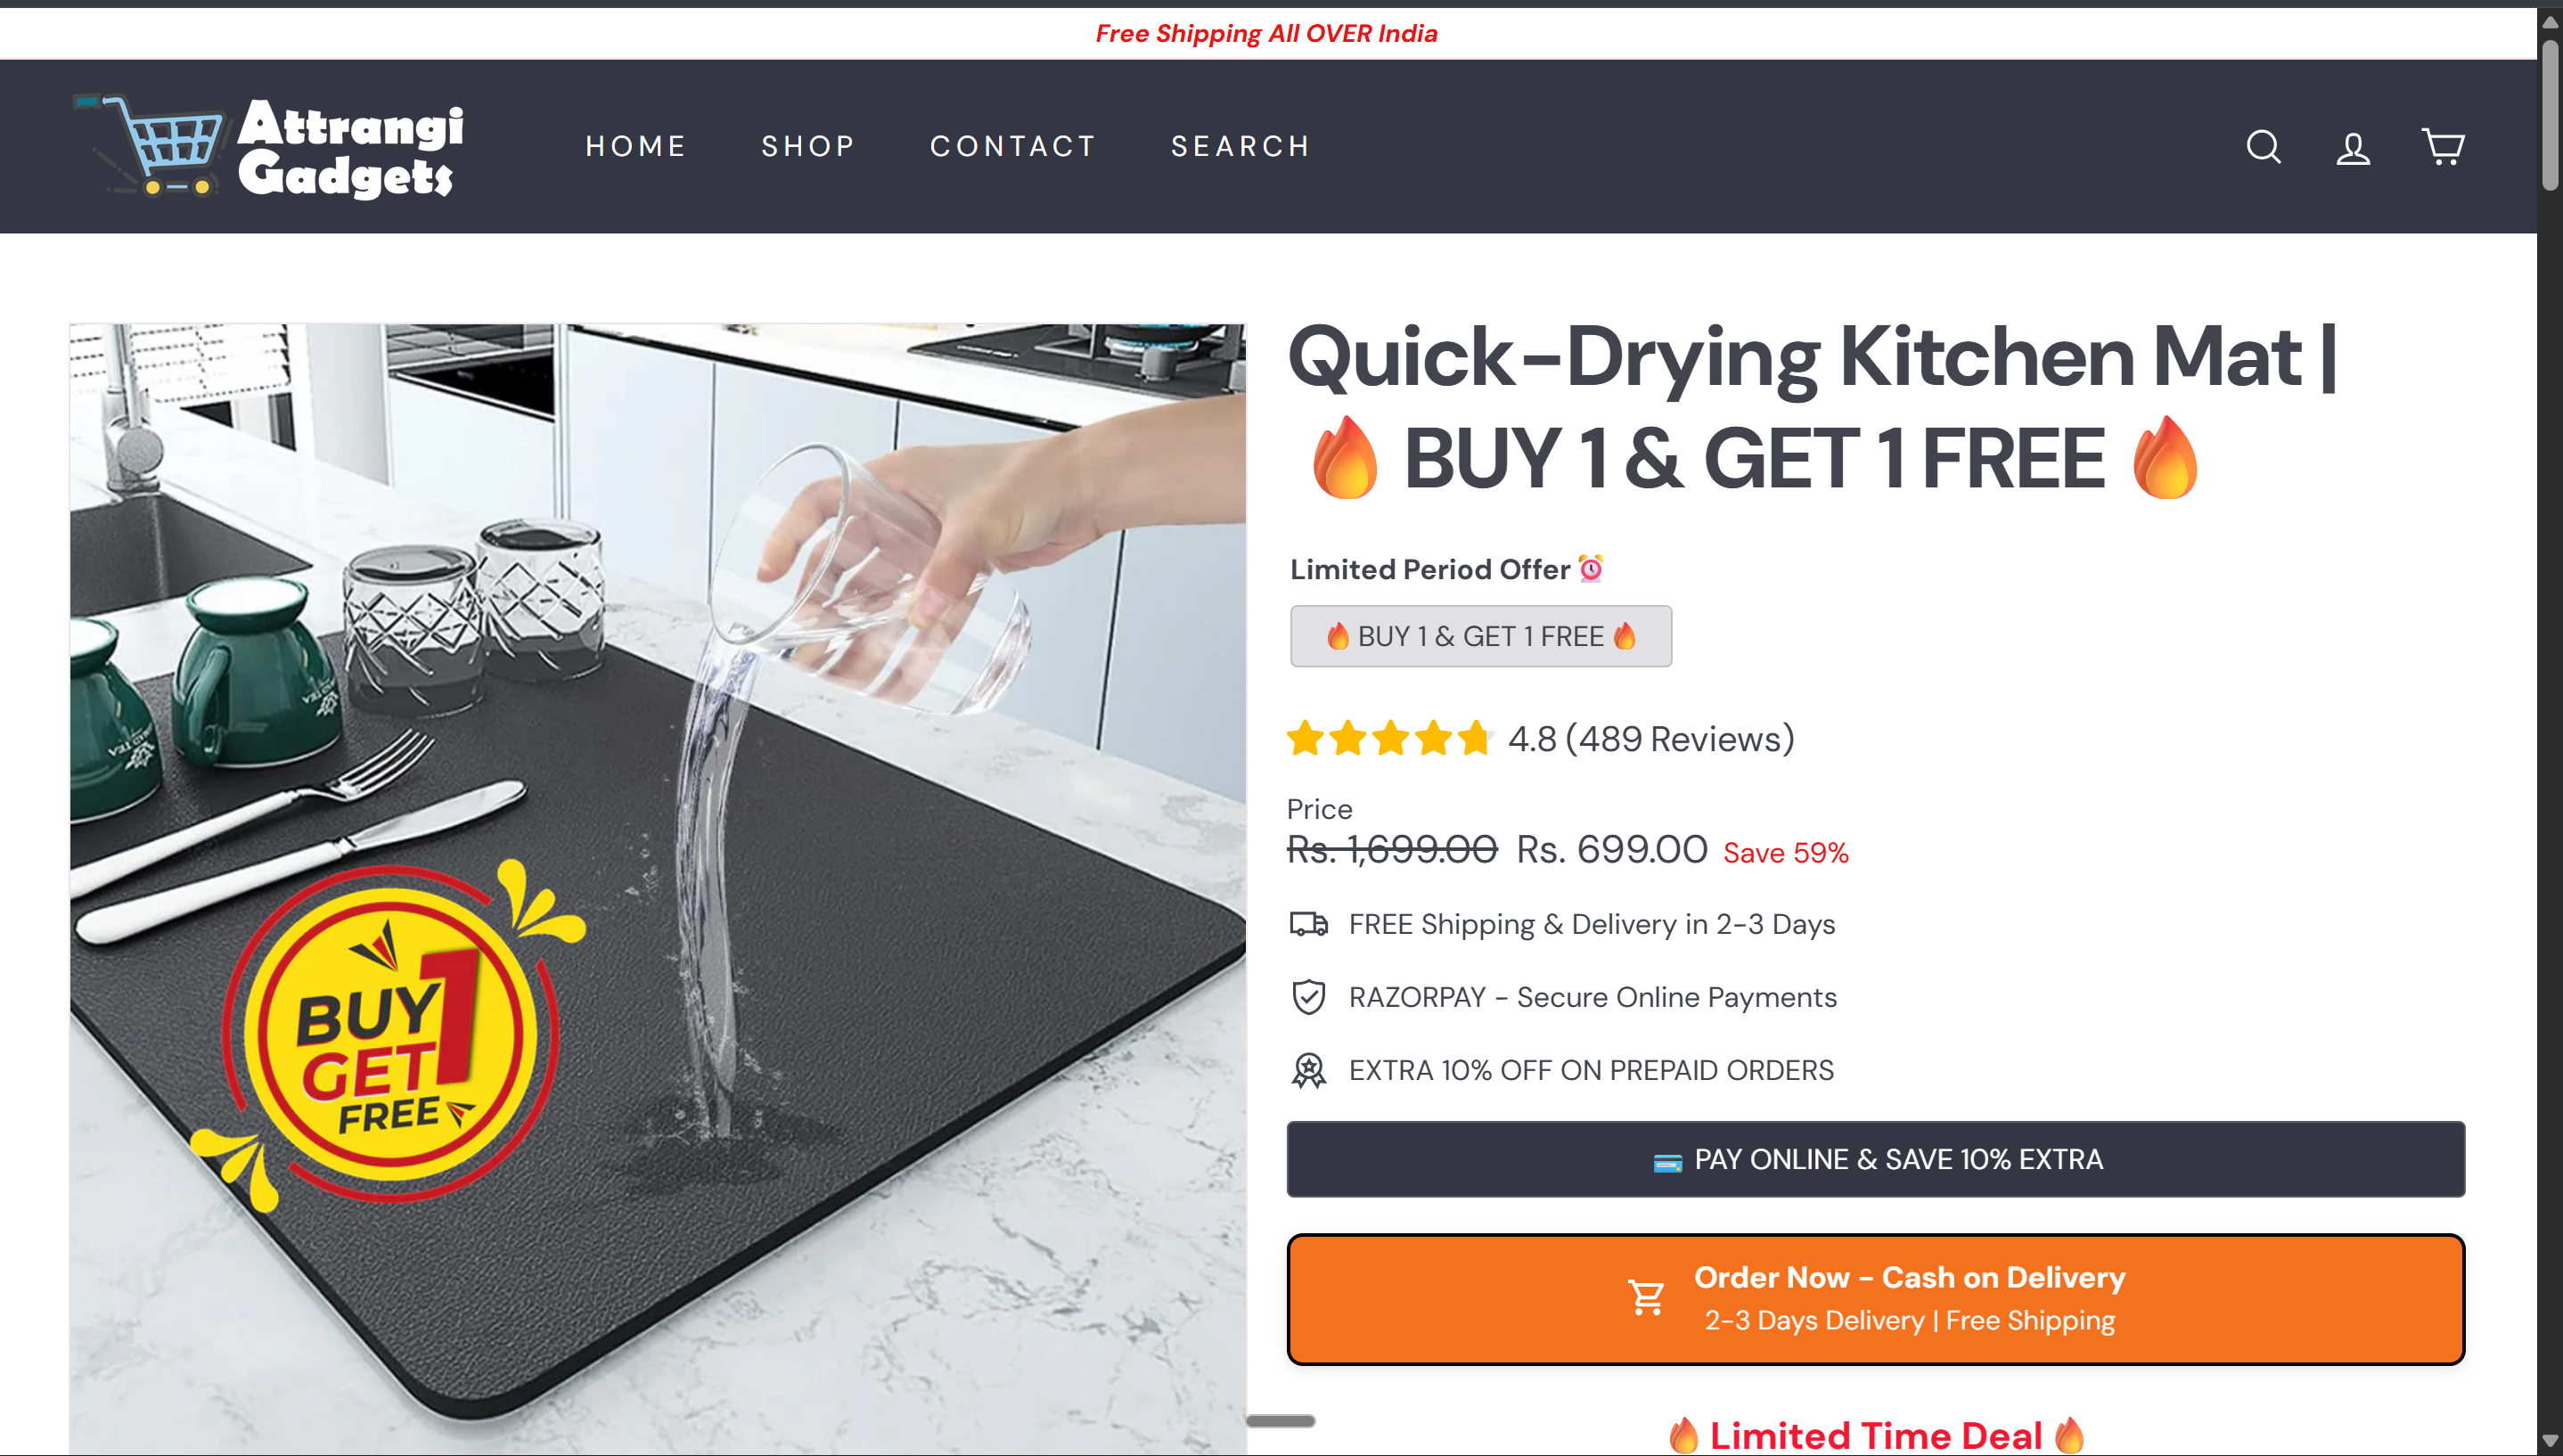
Above the fold — hero image, title, price with strikethrough, offer badge, trust signals, buy button
Live Store
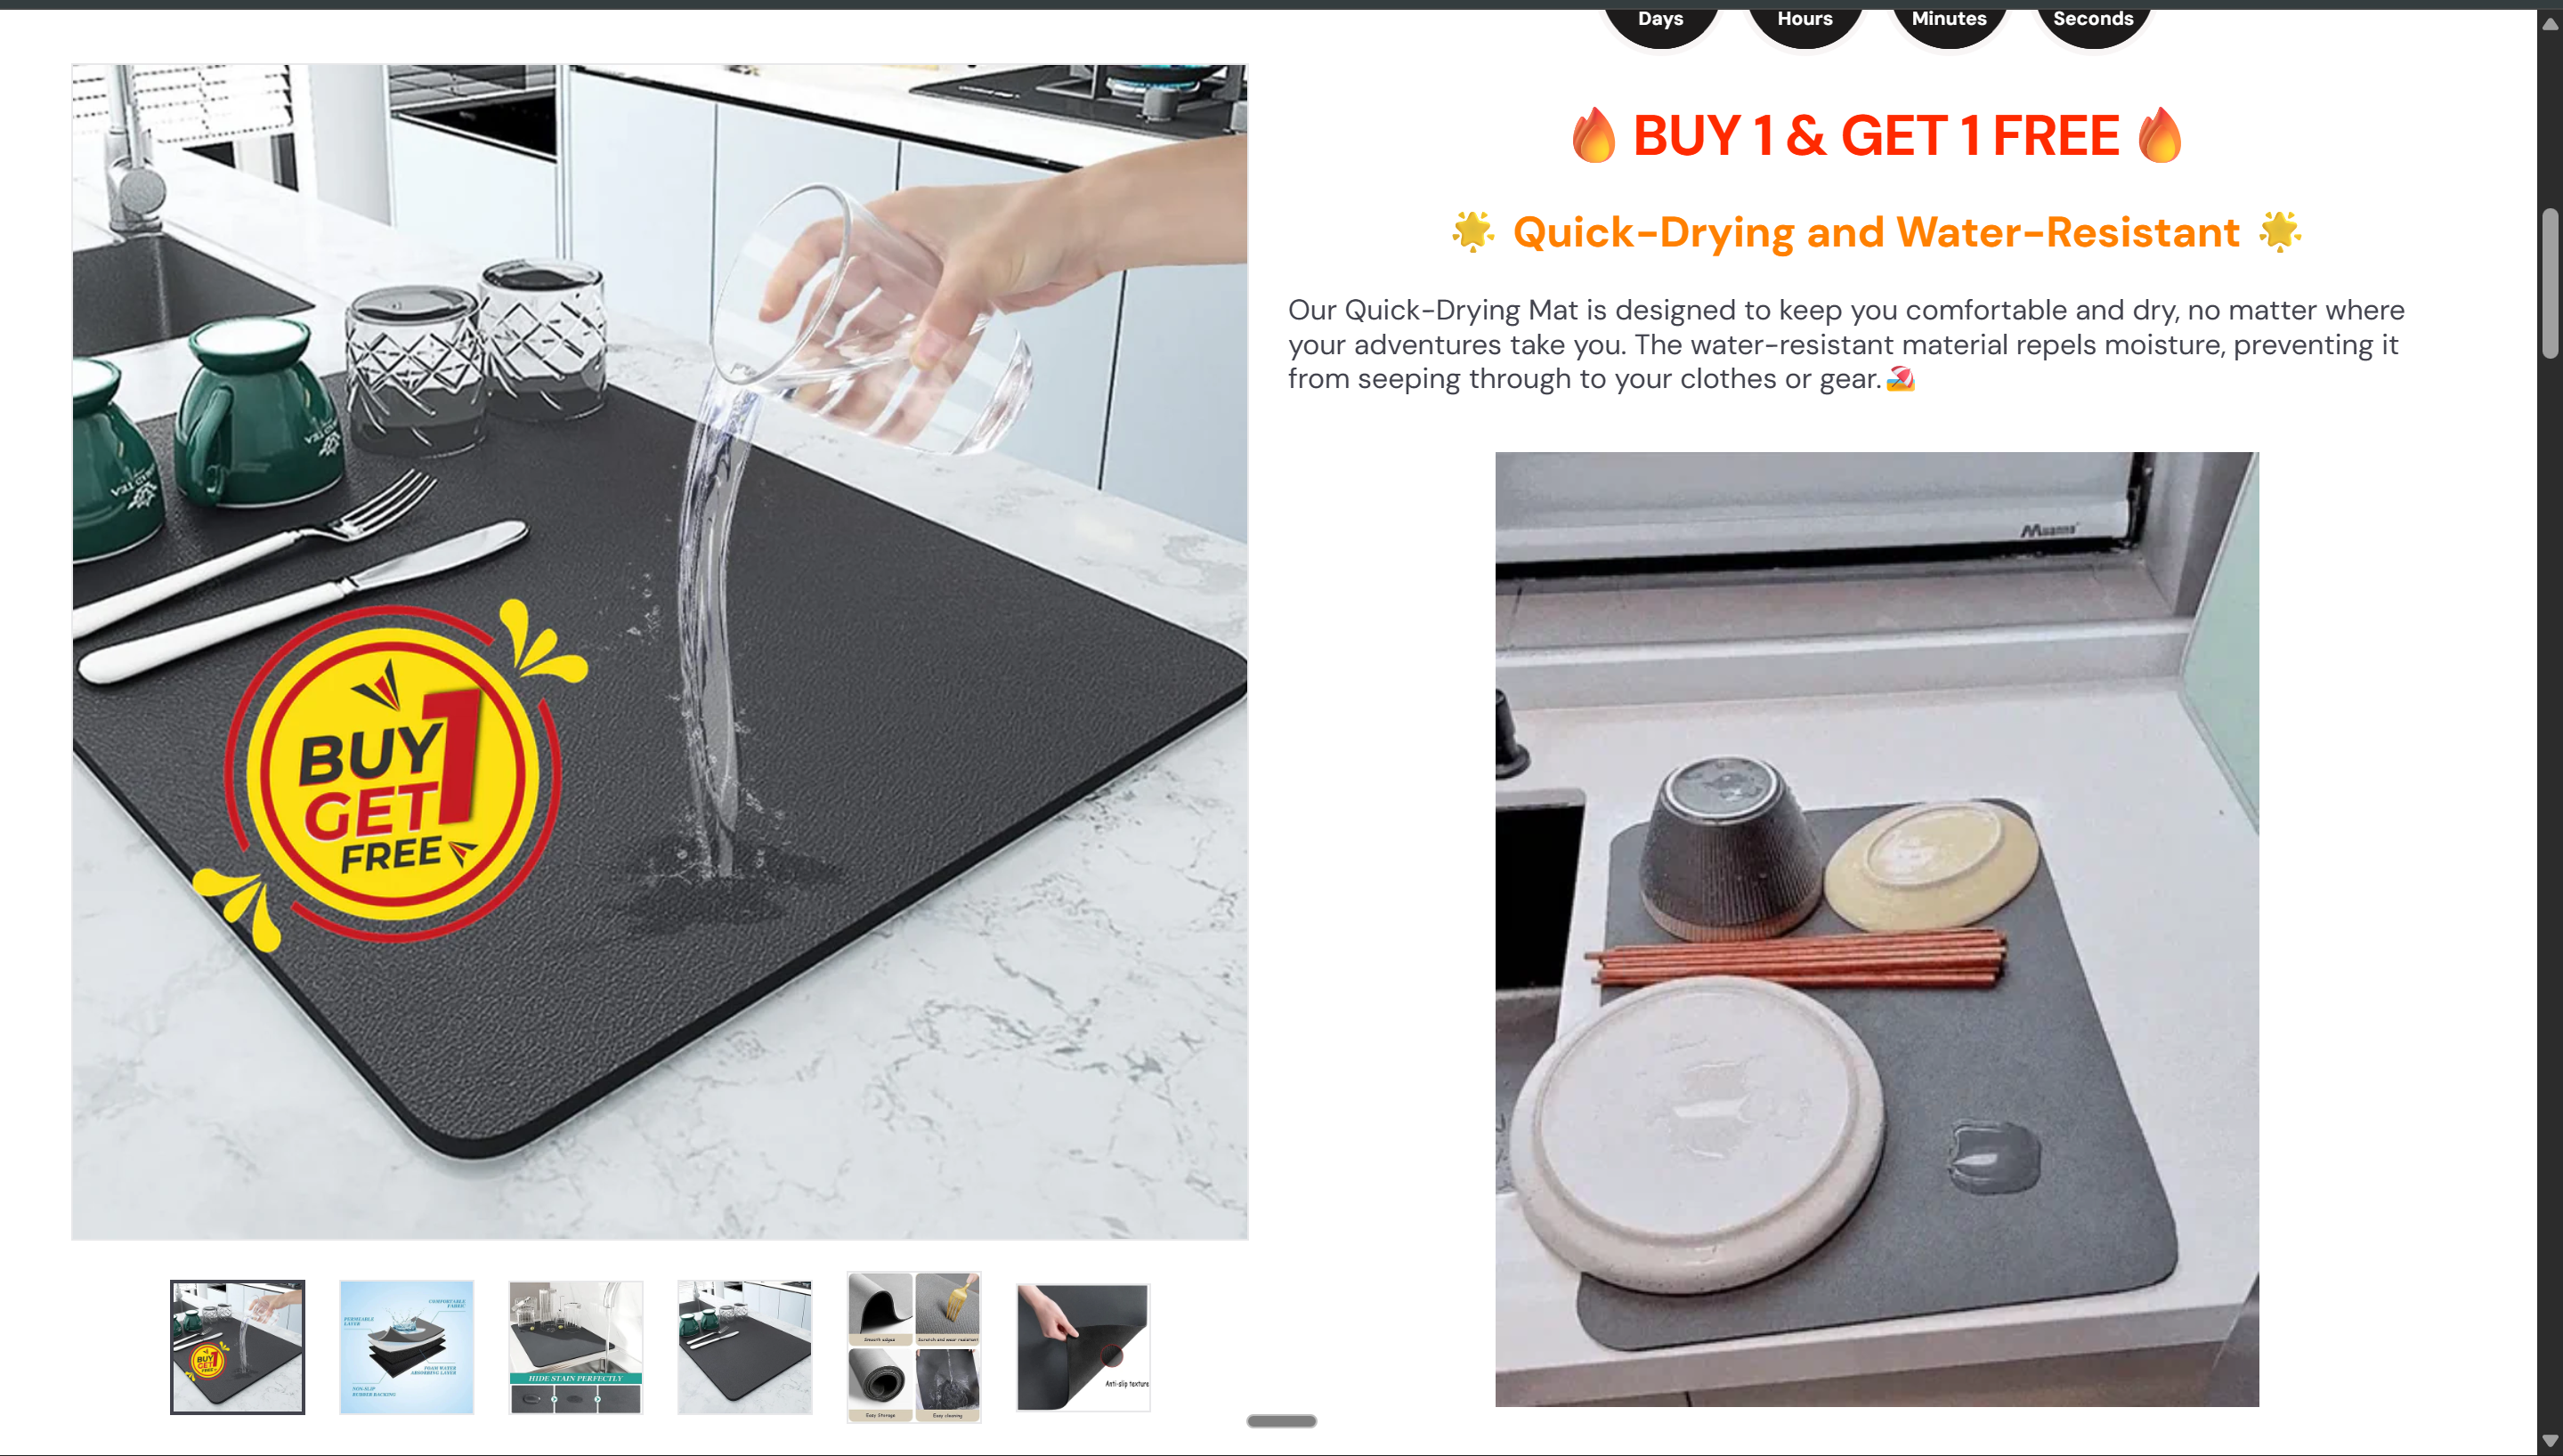
Description area — not plain text. Formatted features with images, benefit headlines, and visual proof
Live Store
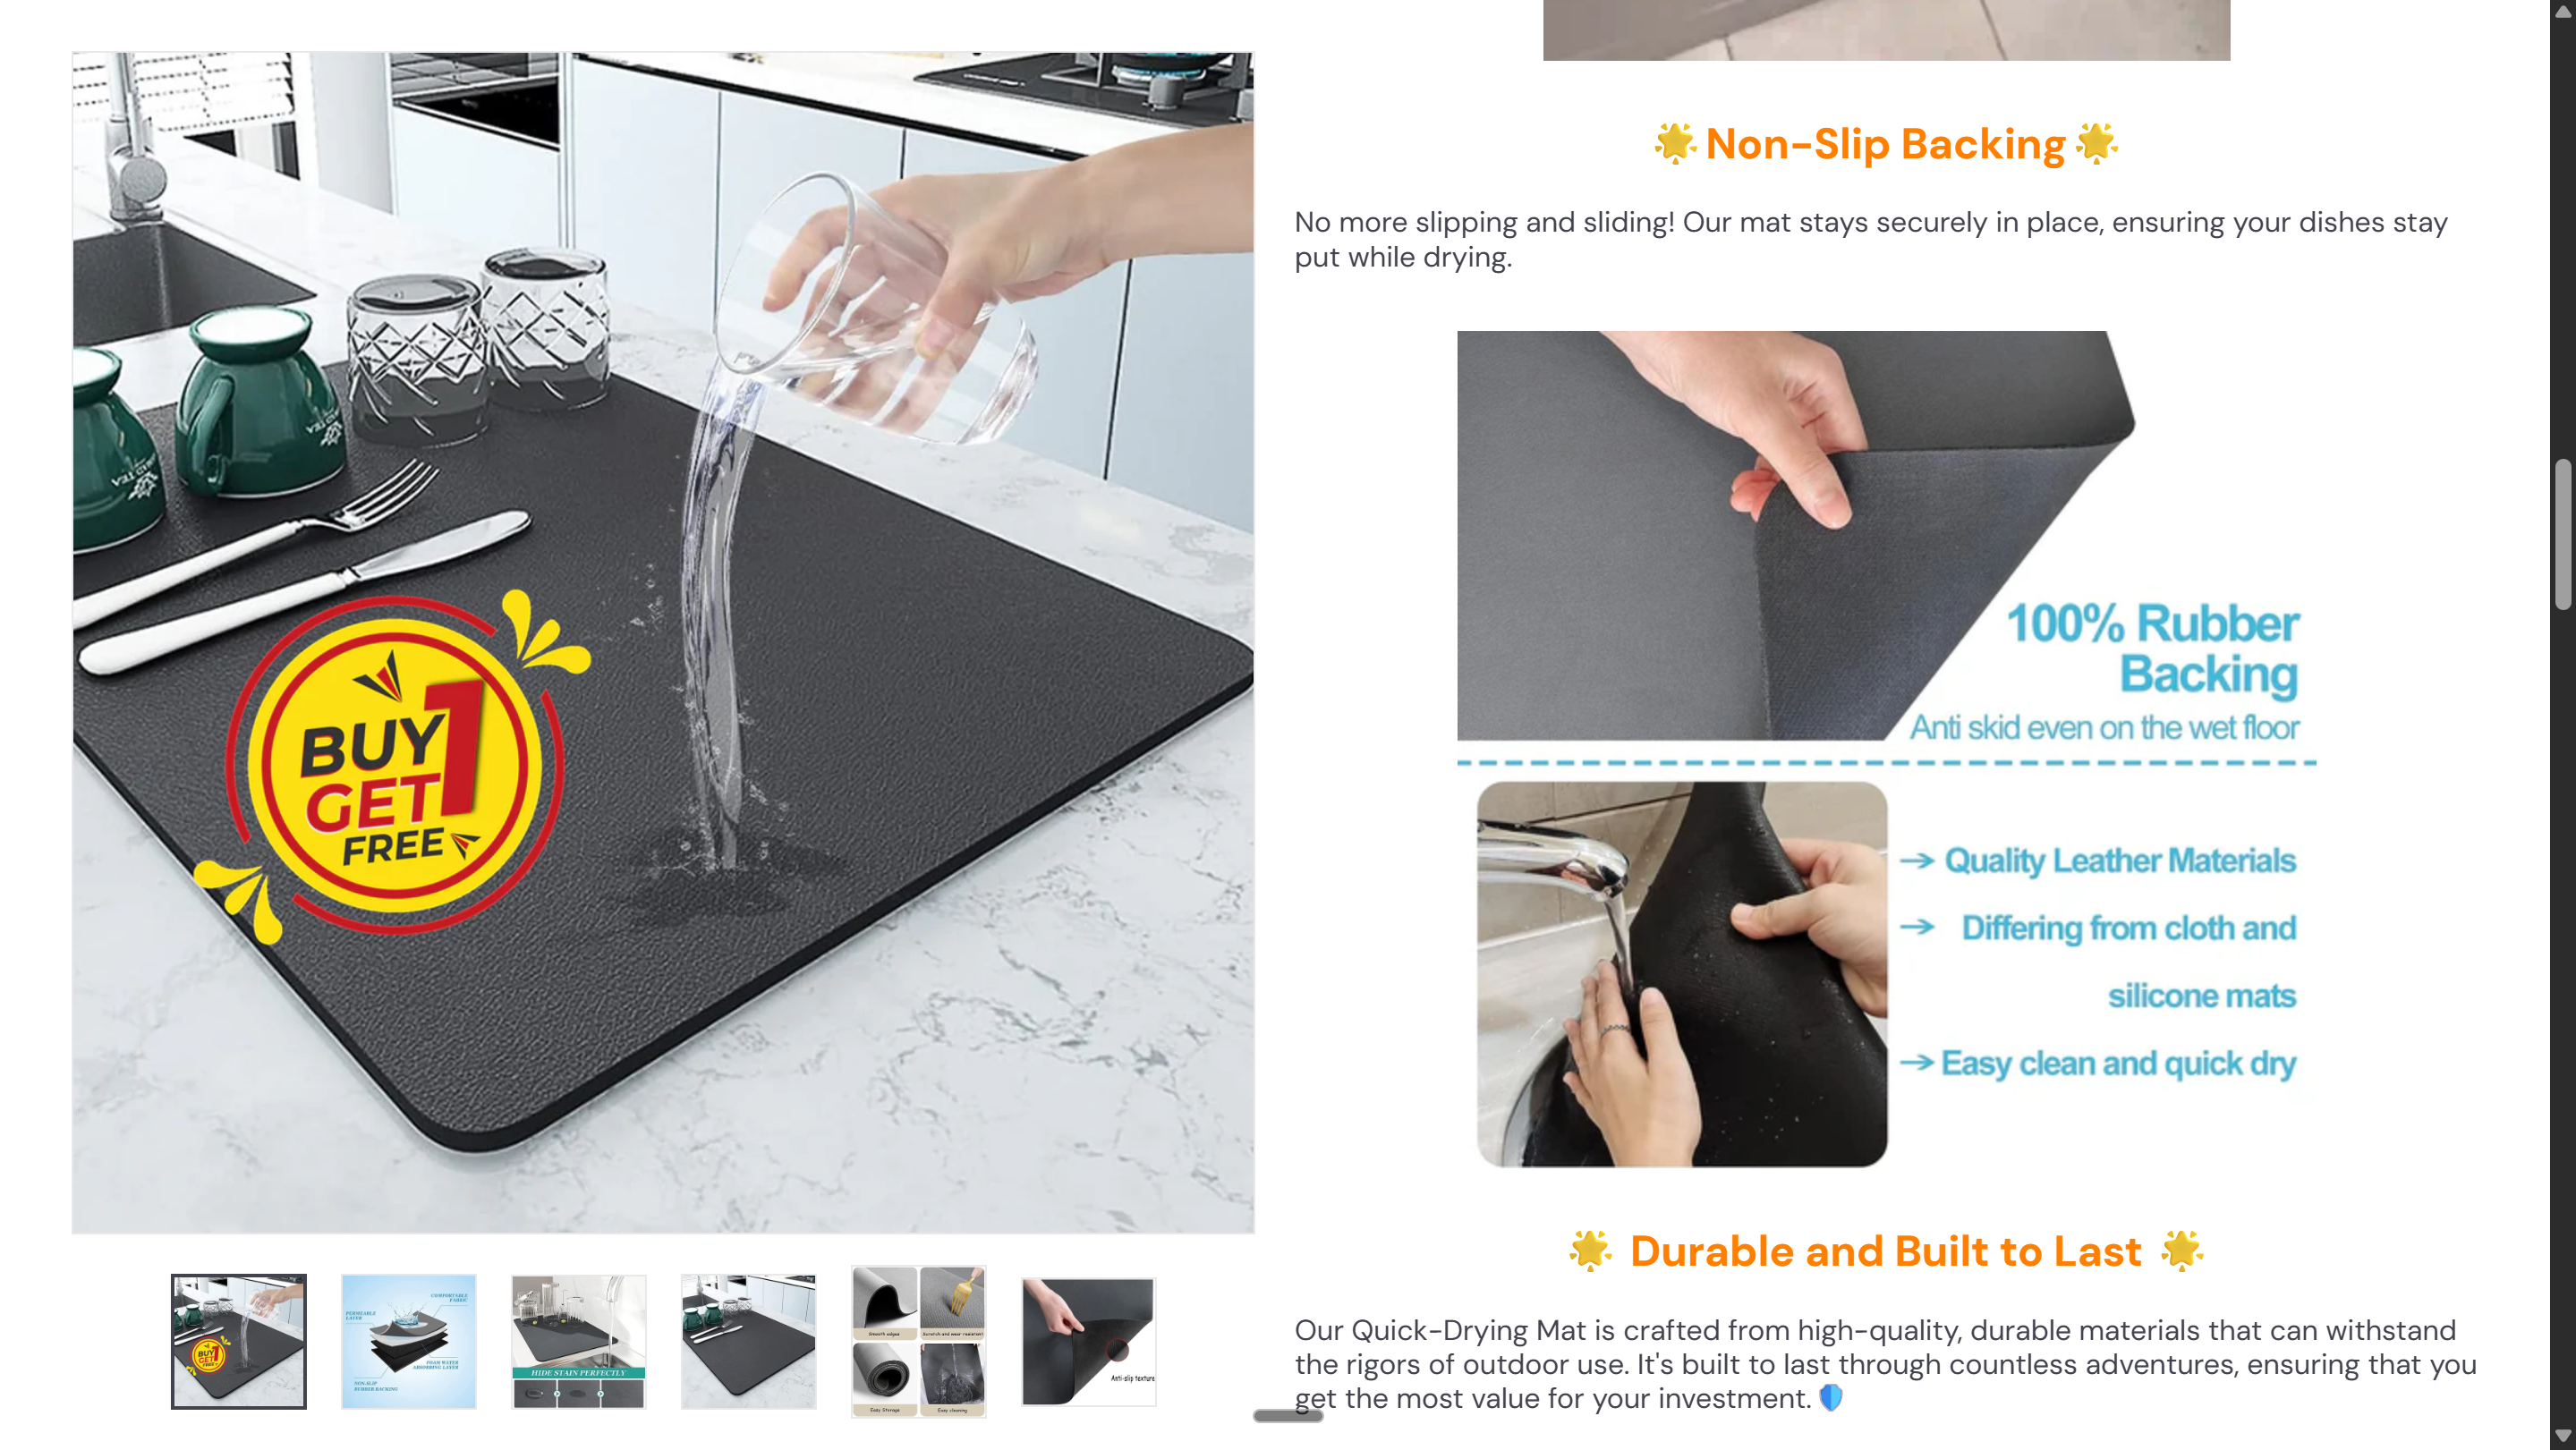
Each feature gets its own mini-section — headline + image + description. The customer SEES the product working.
Live Store
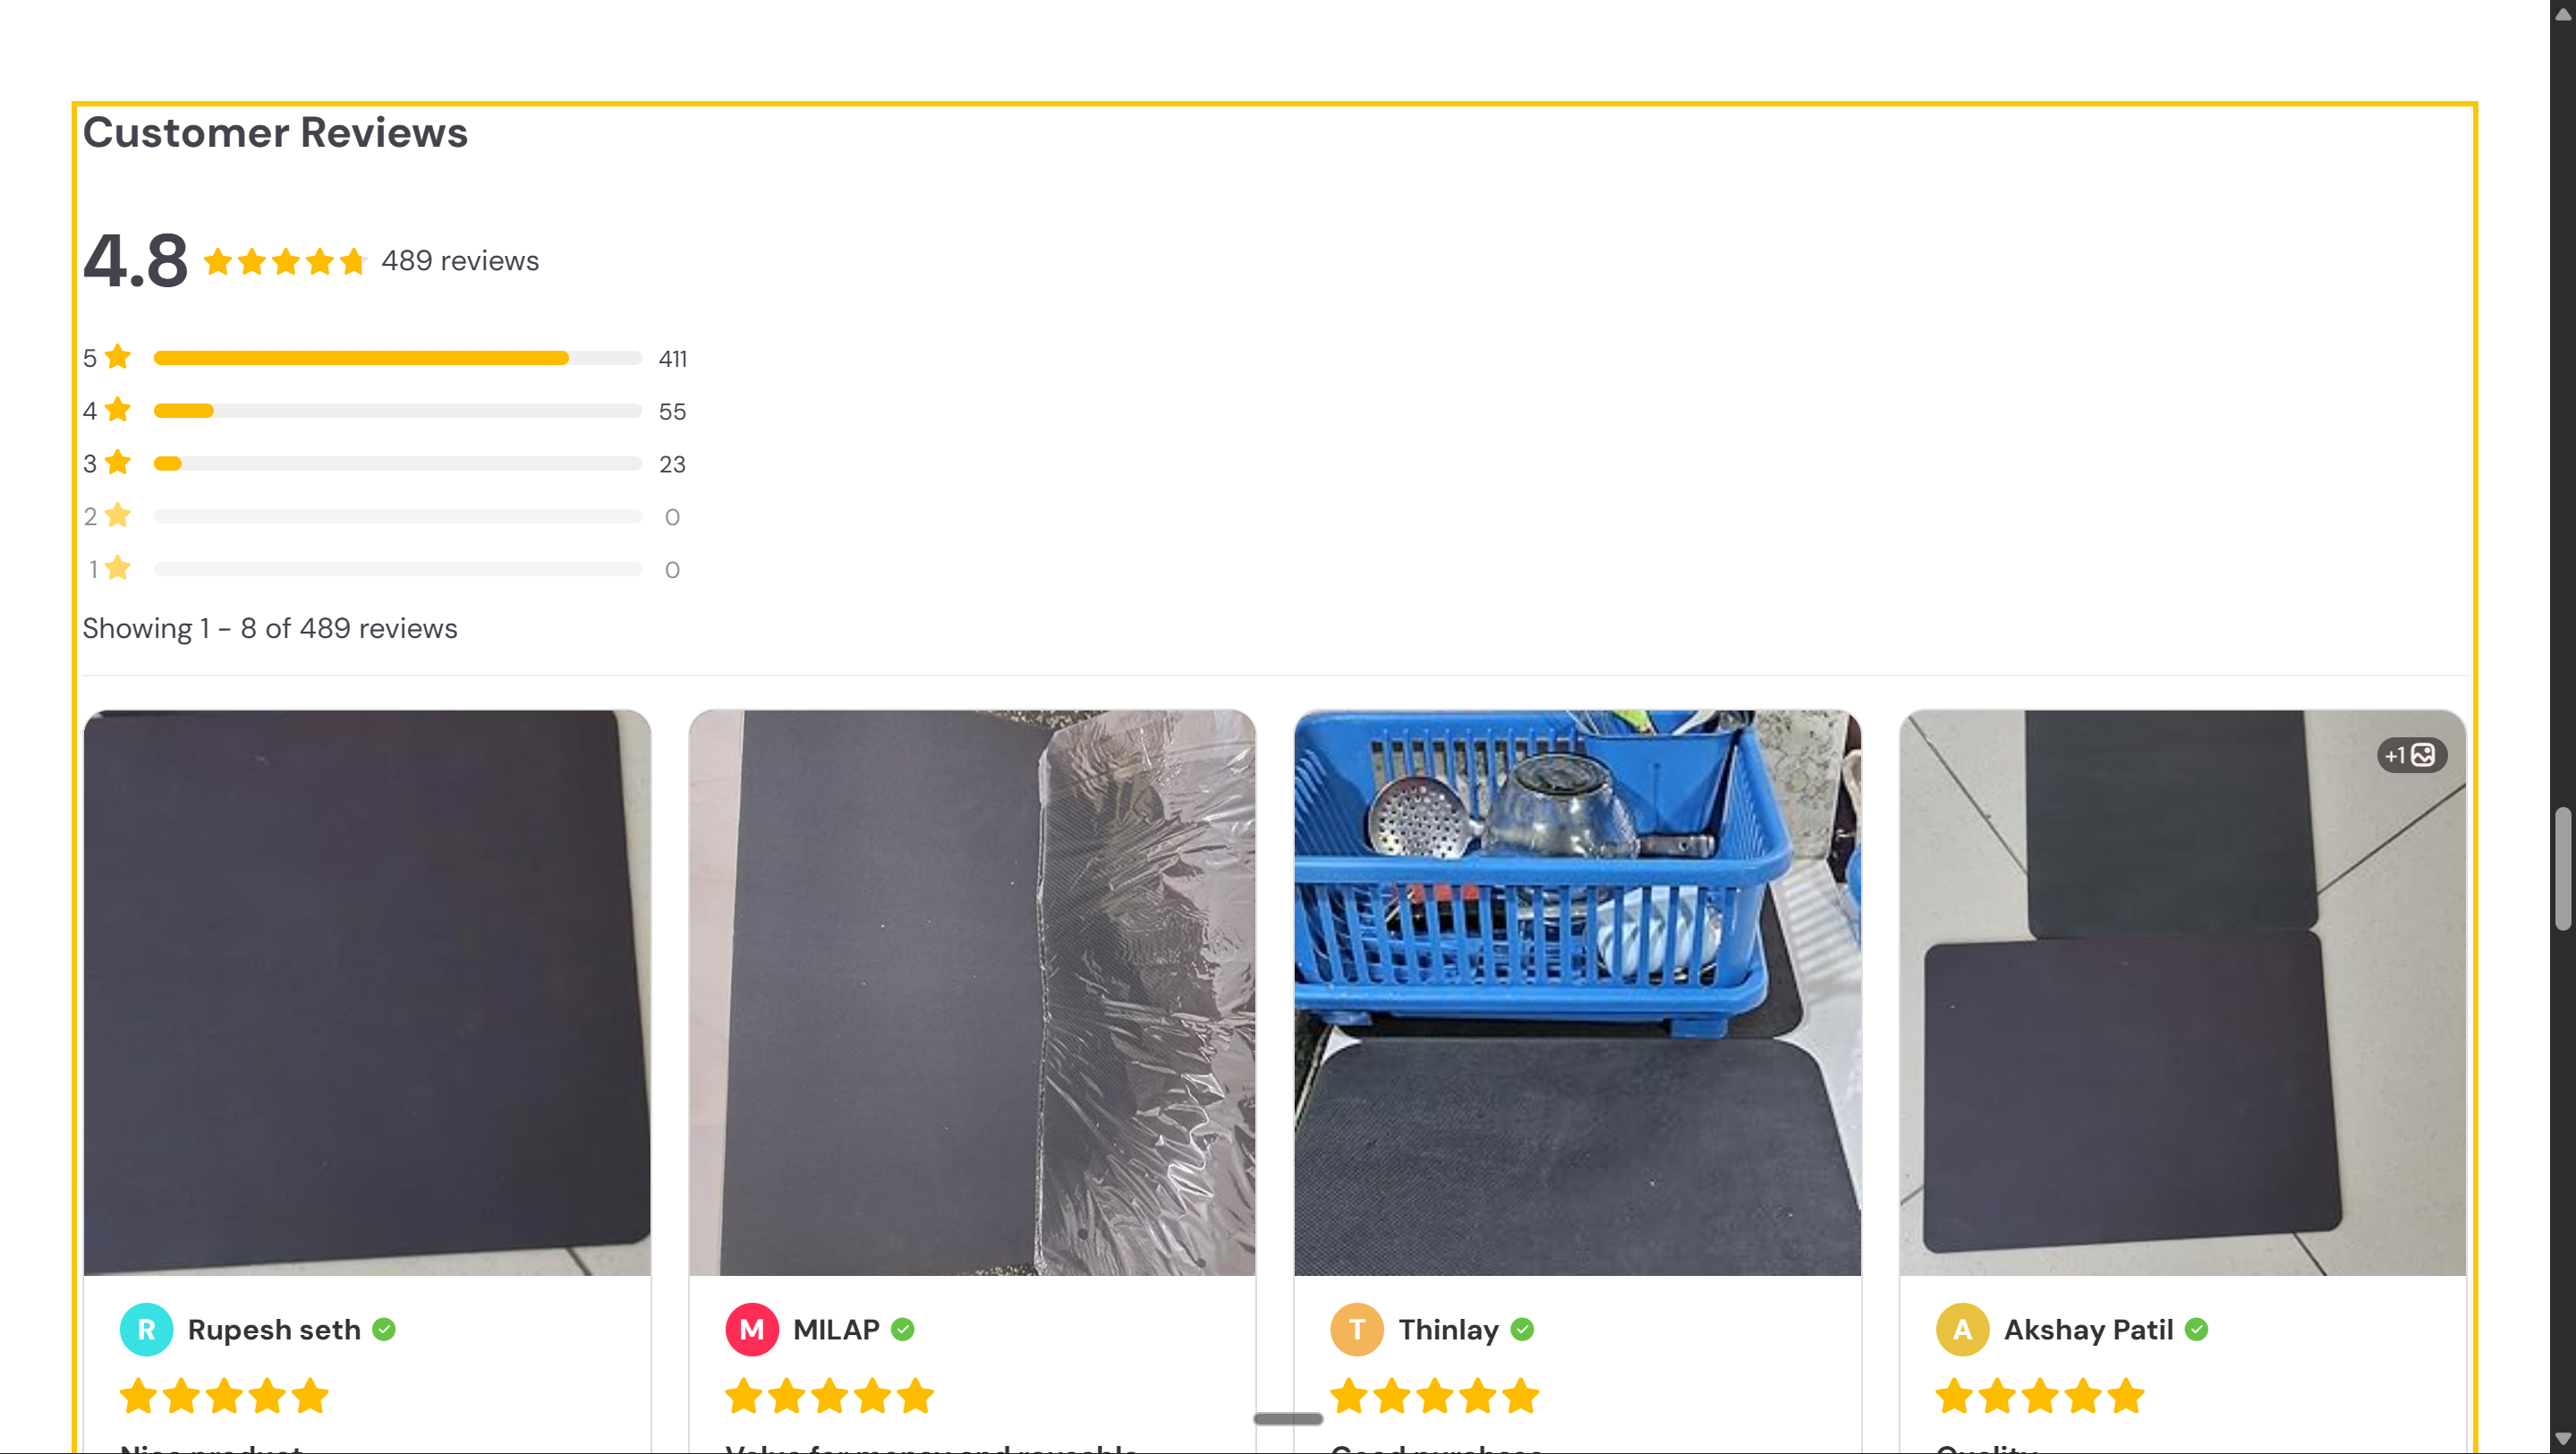
Customer reviews with real photos — 4.8 stars, 489 reviews. The most powerful trust signal on the page.
Live Store
The description is NOT typed in the Theme Editor
The rich description (features, images, GIFs) is created in the product description field in Shopify Admin > Products > [your product] > Description. The Theme Editor just displays it via the Description block. We'll cover how to create rich descriptions below.
3
Where It Lives in the Theme Editor
- Open the Theme Editor and switch to the Products page using the dropdown at the top
- You'll see the Product Information section in the left sidebar — this contains all the blocks that build your product page
- Each block in the sidebar maps to an element from the anatomy above
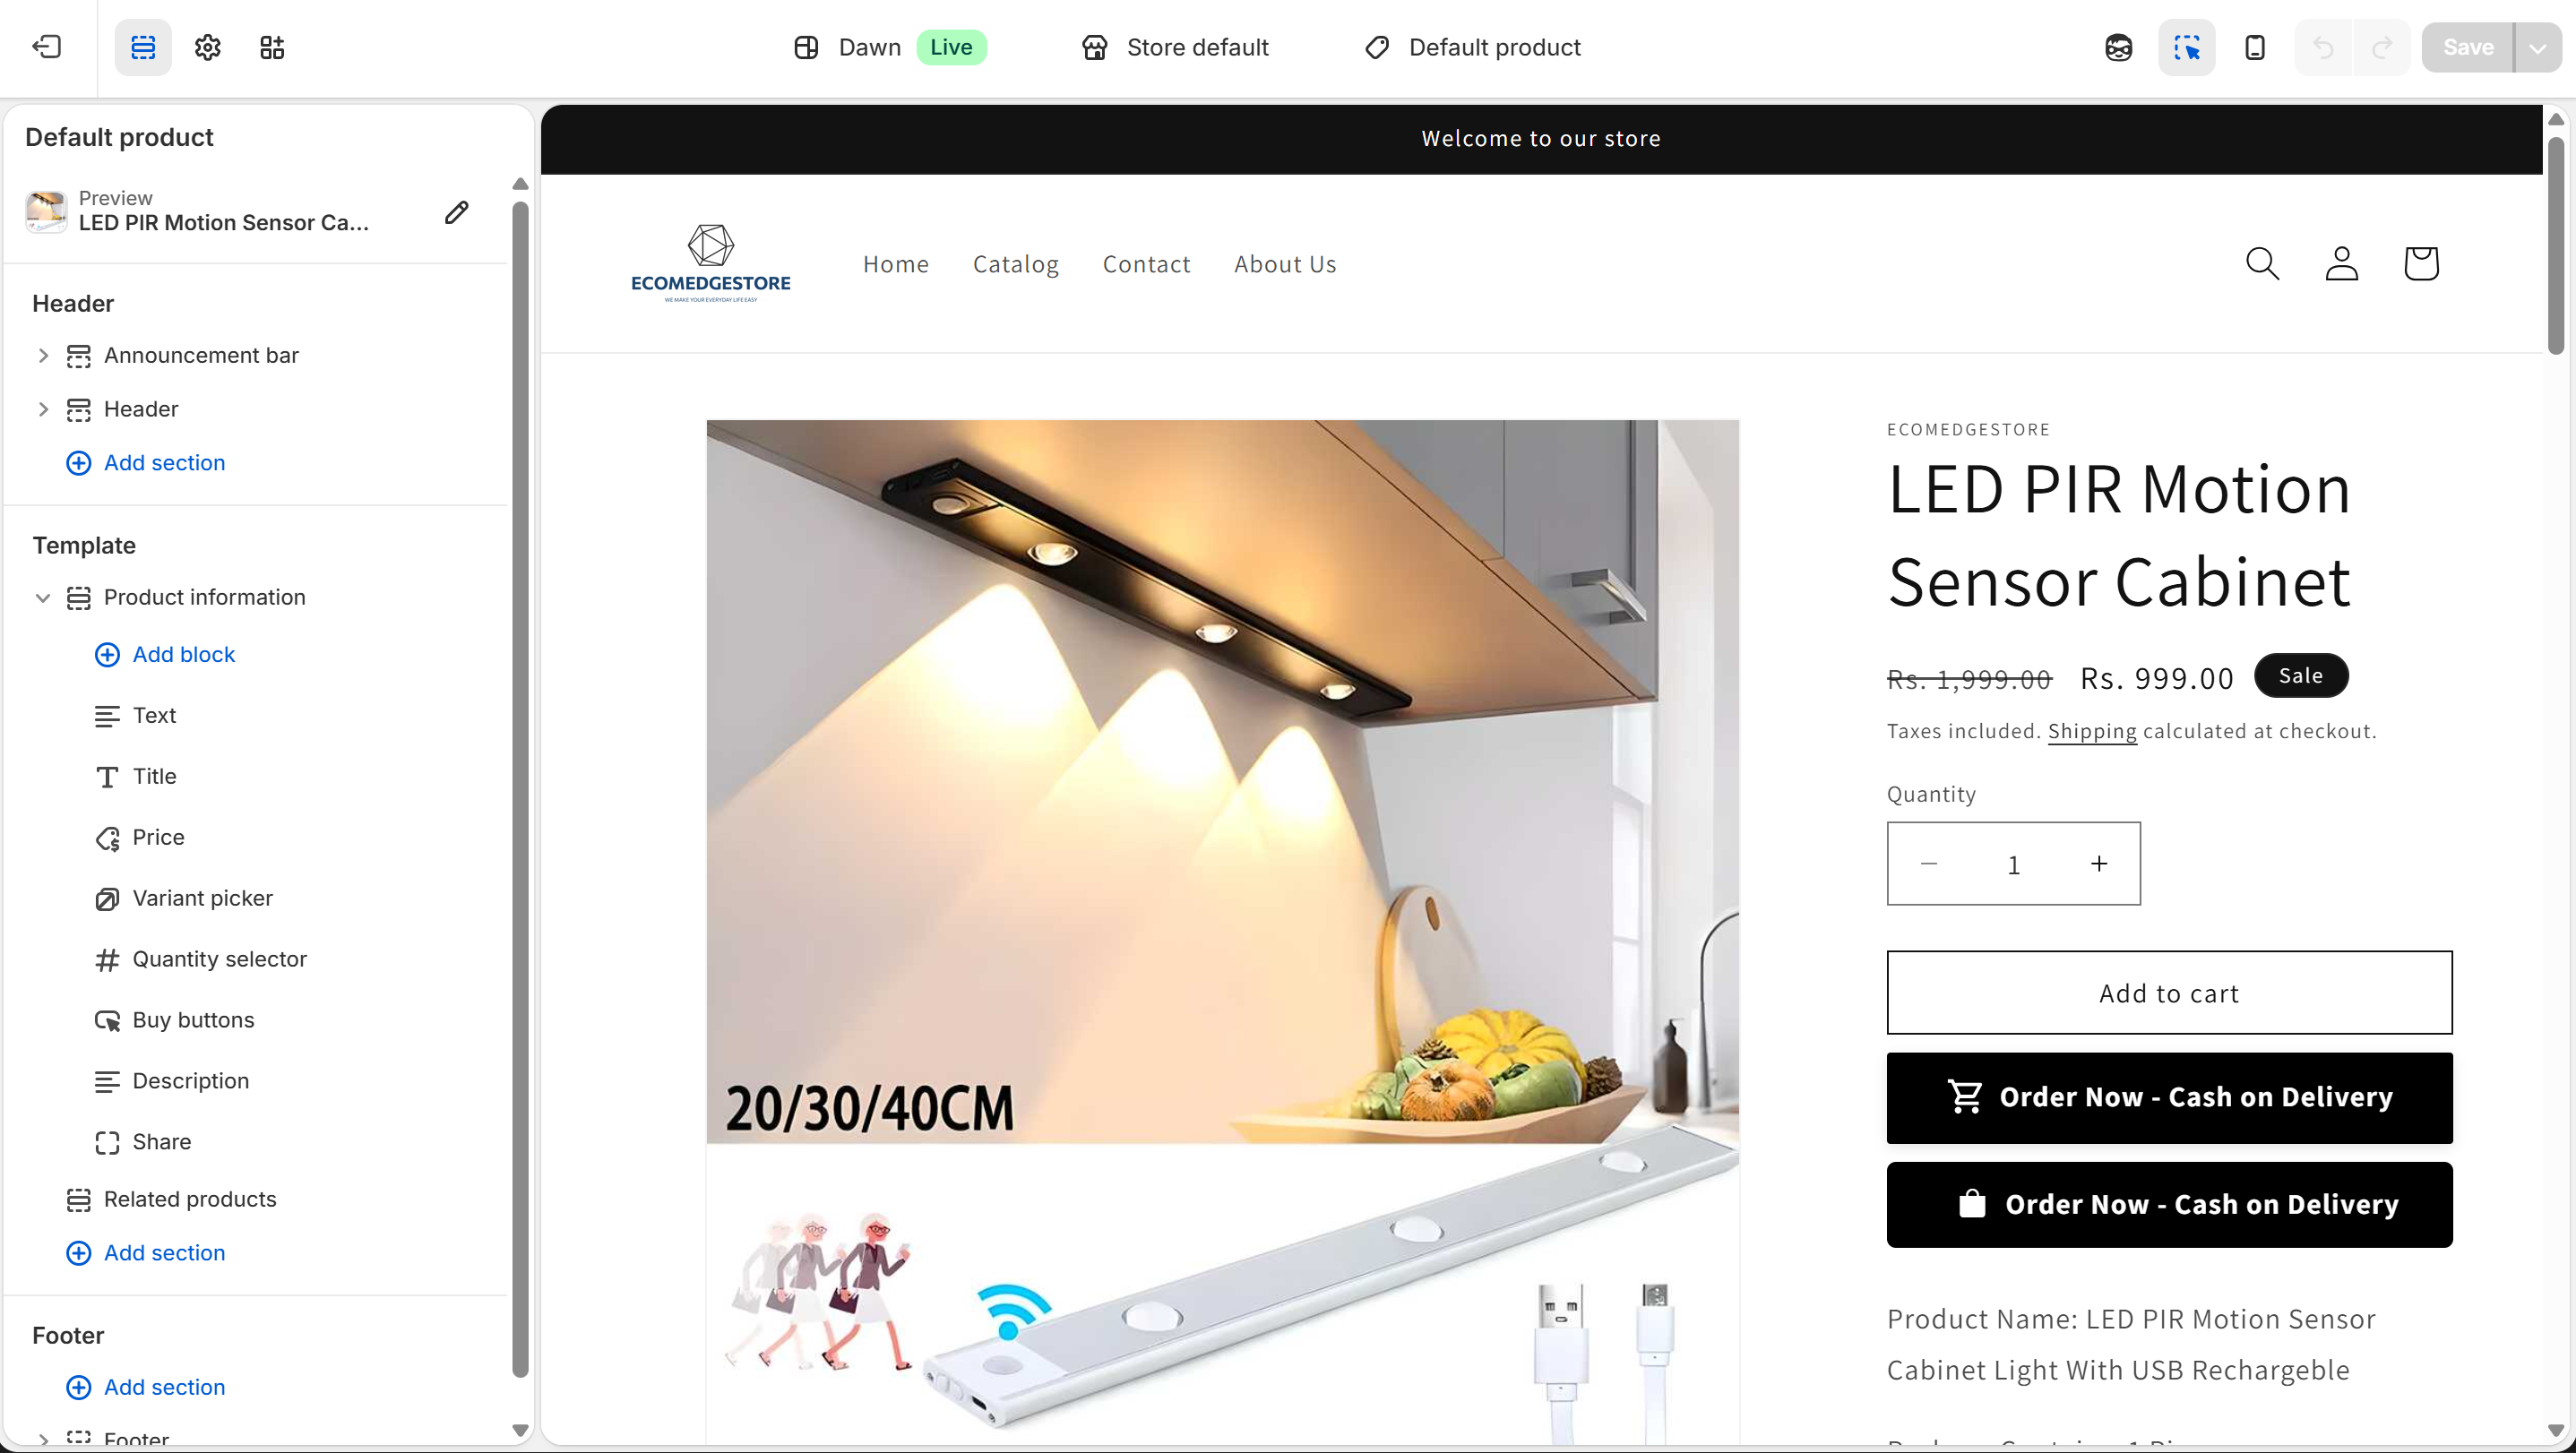
Product template in the Theme Editor — each block on the left maps to an element on the right
Theme Editor
Blocks you'll see
Text, Title, Price, Variant picker, Quantity selector, Buy buttons, Description, Share. Each block = one element on the product page. Reorder them by dragging.
Adding more blocks
Click "Add block" inside the Product Information section. You can add Custom liquid, Rich text, Collapsible tabs, and more — this is how you add trust signals, size charts, or custom content.
The Product Information section controls the top half. For reviews, FAQ, and related products — add NEW sections below Product Information using "Add section." Your review app (Loox, Judge.me) adds its own section automatically once installed.
4
Creating Rich Descriptions
- Go to Shopify Admin > Products > click your product > Description field
- This is a rich text editor — you can format text, add images, embed GIFs, and create structured content
- Don't write a plain paragraph. Structure it like a mini landing page inside the description field:
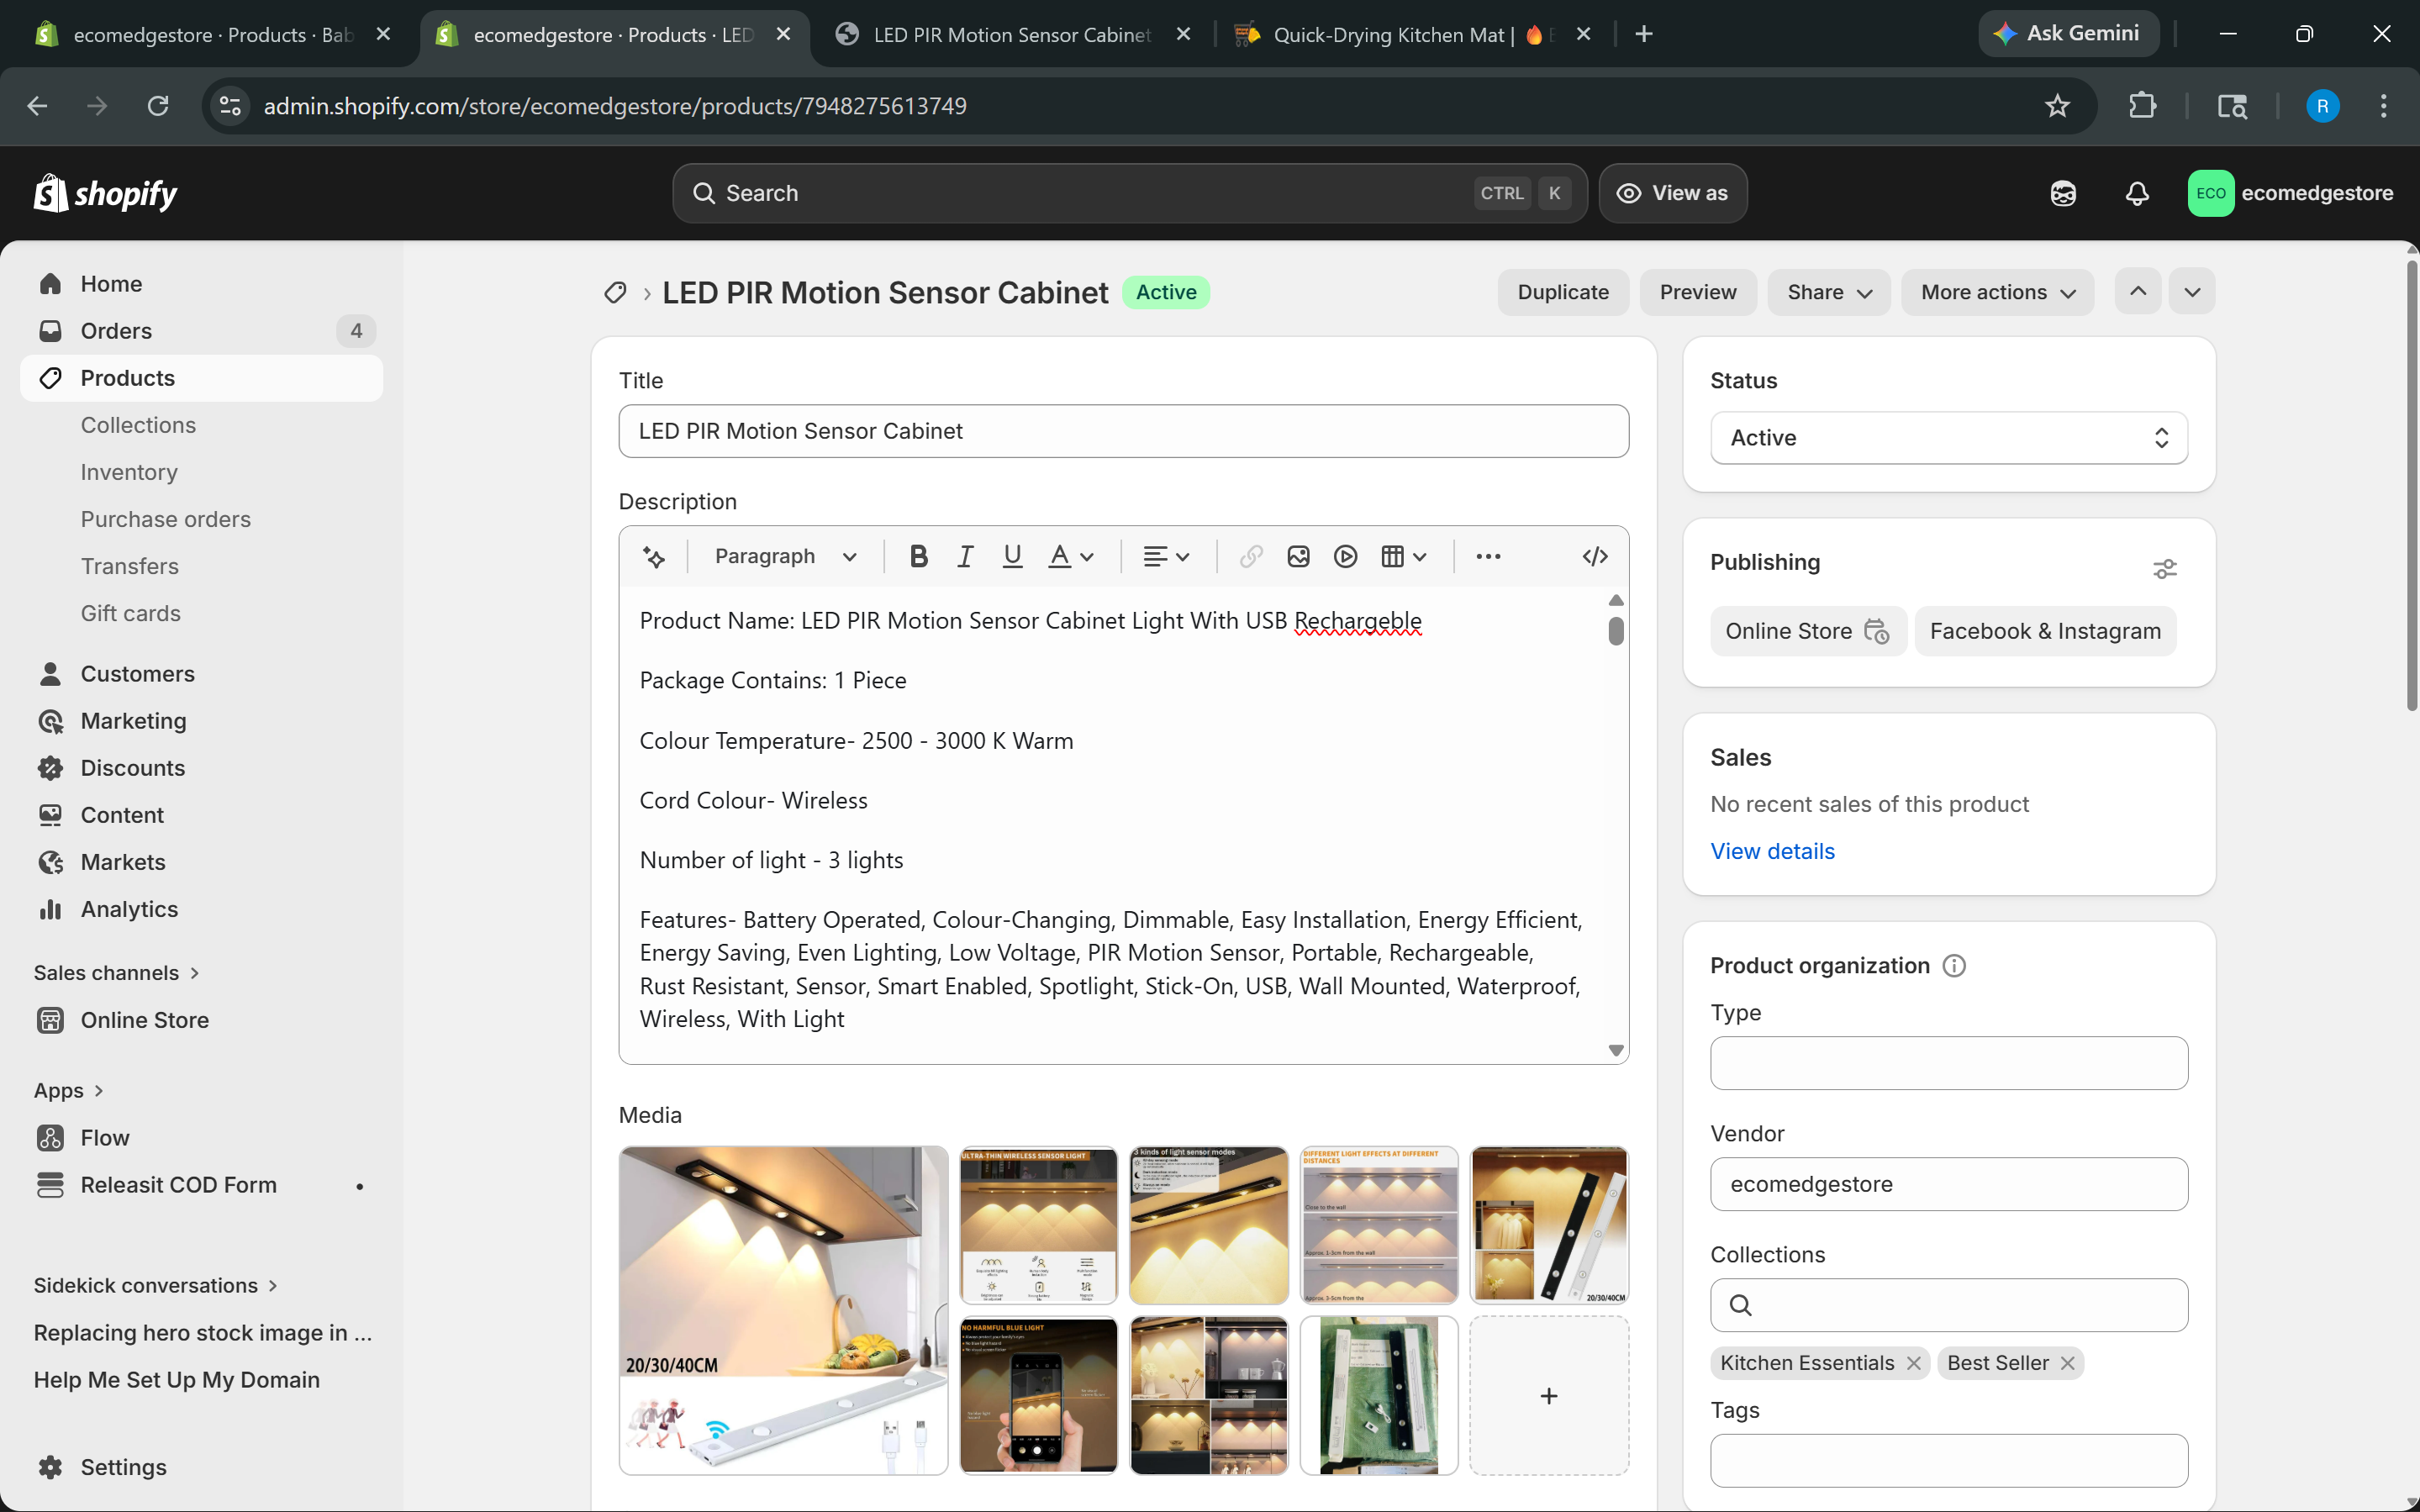
Products > [product] > Description — the rich text editor where your product story lives
Shopify Admin
- Feature headline — bold, clear, benefit-driven ("Quick-Drying and Water-Resistant")
- 1-2 lines of description — explain what the feature means for the customer, not the product
- Image or GIF — showing the feature in action. Upload images via the editor toolbar. For GIFs: search on Giphy.com or Tenor.com, download the file, upload to the description.
- Repeat for each feature — 3-5 features is the sweet spot. More than that and nobody reads it.
Where to Find Product Images
- Your vendor / supplier — the first source. Ask for high-resolution product images and lifestyle shots. Most suppliers have a media kit or product gallery.
- Meta Ads Library (facebook.com/ads/library) — search for your product or competitor brands. Ads often use the best product images and GIFs. Save what works.
- Amazon / Flipkart listings — the original product listing usually has multiple angles, infographics, and lifestyle images. These are the same images your supplier uses.
- The source where you found the product — wherever you discovered the winning product (ads, TikTok, competitor store), that's where the best creatives already exist.
Where to Find GIFs
TikTok / Instagram Reels
Search for your product on TikTok — creators post short demo videos daily. Screen-record the best 3-5 second clip. Convert to GIF using ezgif.com. Upload to description.
Competitor product pages
If a competitor already has GIFs showing the product in use, right-click and save. They sourced it from the same supplier — it's the same product.
Giphy / Tenor
Search for your product type ("kitchen cleaning", "water resistant"). Generic but works for common product categories.
Amazon / AliExpress video reviews
Customer video reviews are gold. Screen-record the best ones, convert to GIF. Real usage footage is more convincing than any studio shot.
ezgif.com is your best friend. Upload any video clip → crop to 3-5 seconds → convert to GIF → download → upload to Shopify description. The whole process takes 2 minutes. Keep GIFs under 5MB for fast page loading.
Description content lives in the product, not the theme
If you switch themes, your product descriptions come with you — they're stored with the product, not the theme. So invest time in creating great descriptions. They survive theme changes.
5
Product Setup — Pricing, Inventory & Shipping
- Go to Products in your Shopify sidebar — this is where you create and manage every product in your store
- Each product has fields beyond the description — pricing, inventory, shipping, and SEO. Getting these right affects your margins and operations.
- Price — what the customer pays. This is your selling price.
- Compare at price — the original/MRP price shown with a strikethrough. This creates the anchoring effect. If your price is Rs 899 and compare at is Rs 1,999, the customer sees "Save 55%."
- Cost per item — what YOU pay the supplier. Shopify calculates your profit and margin automatically. This number is private — customers never see it.
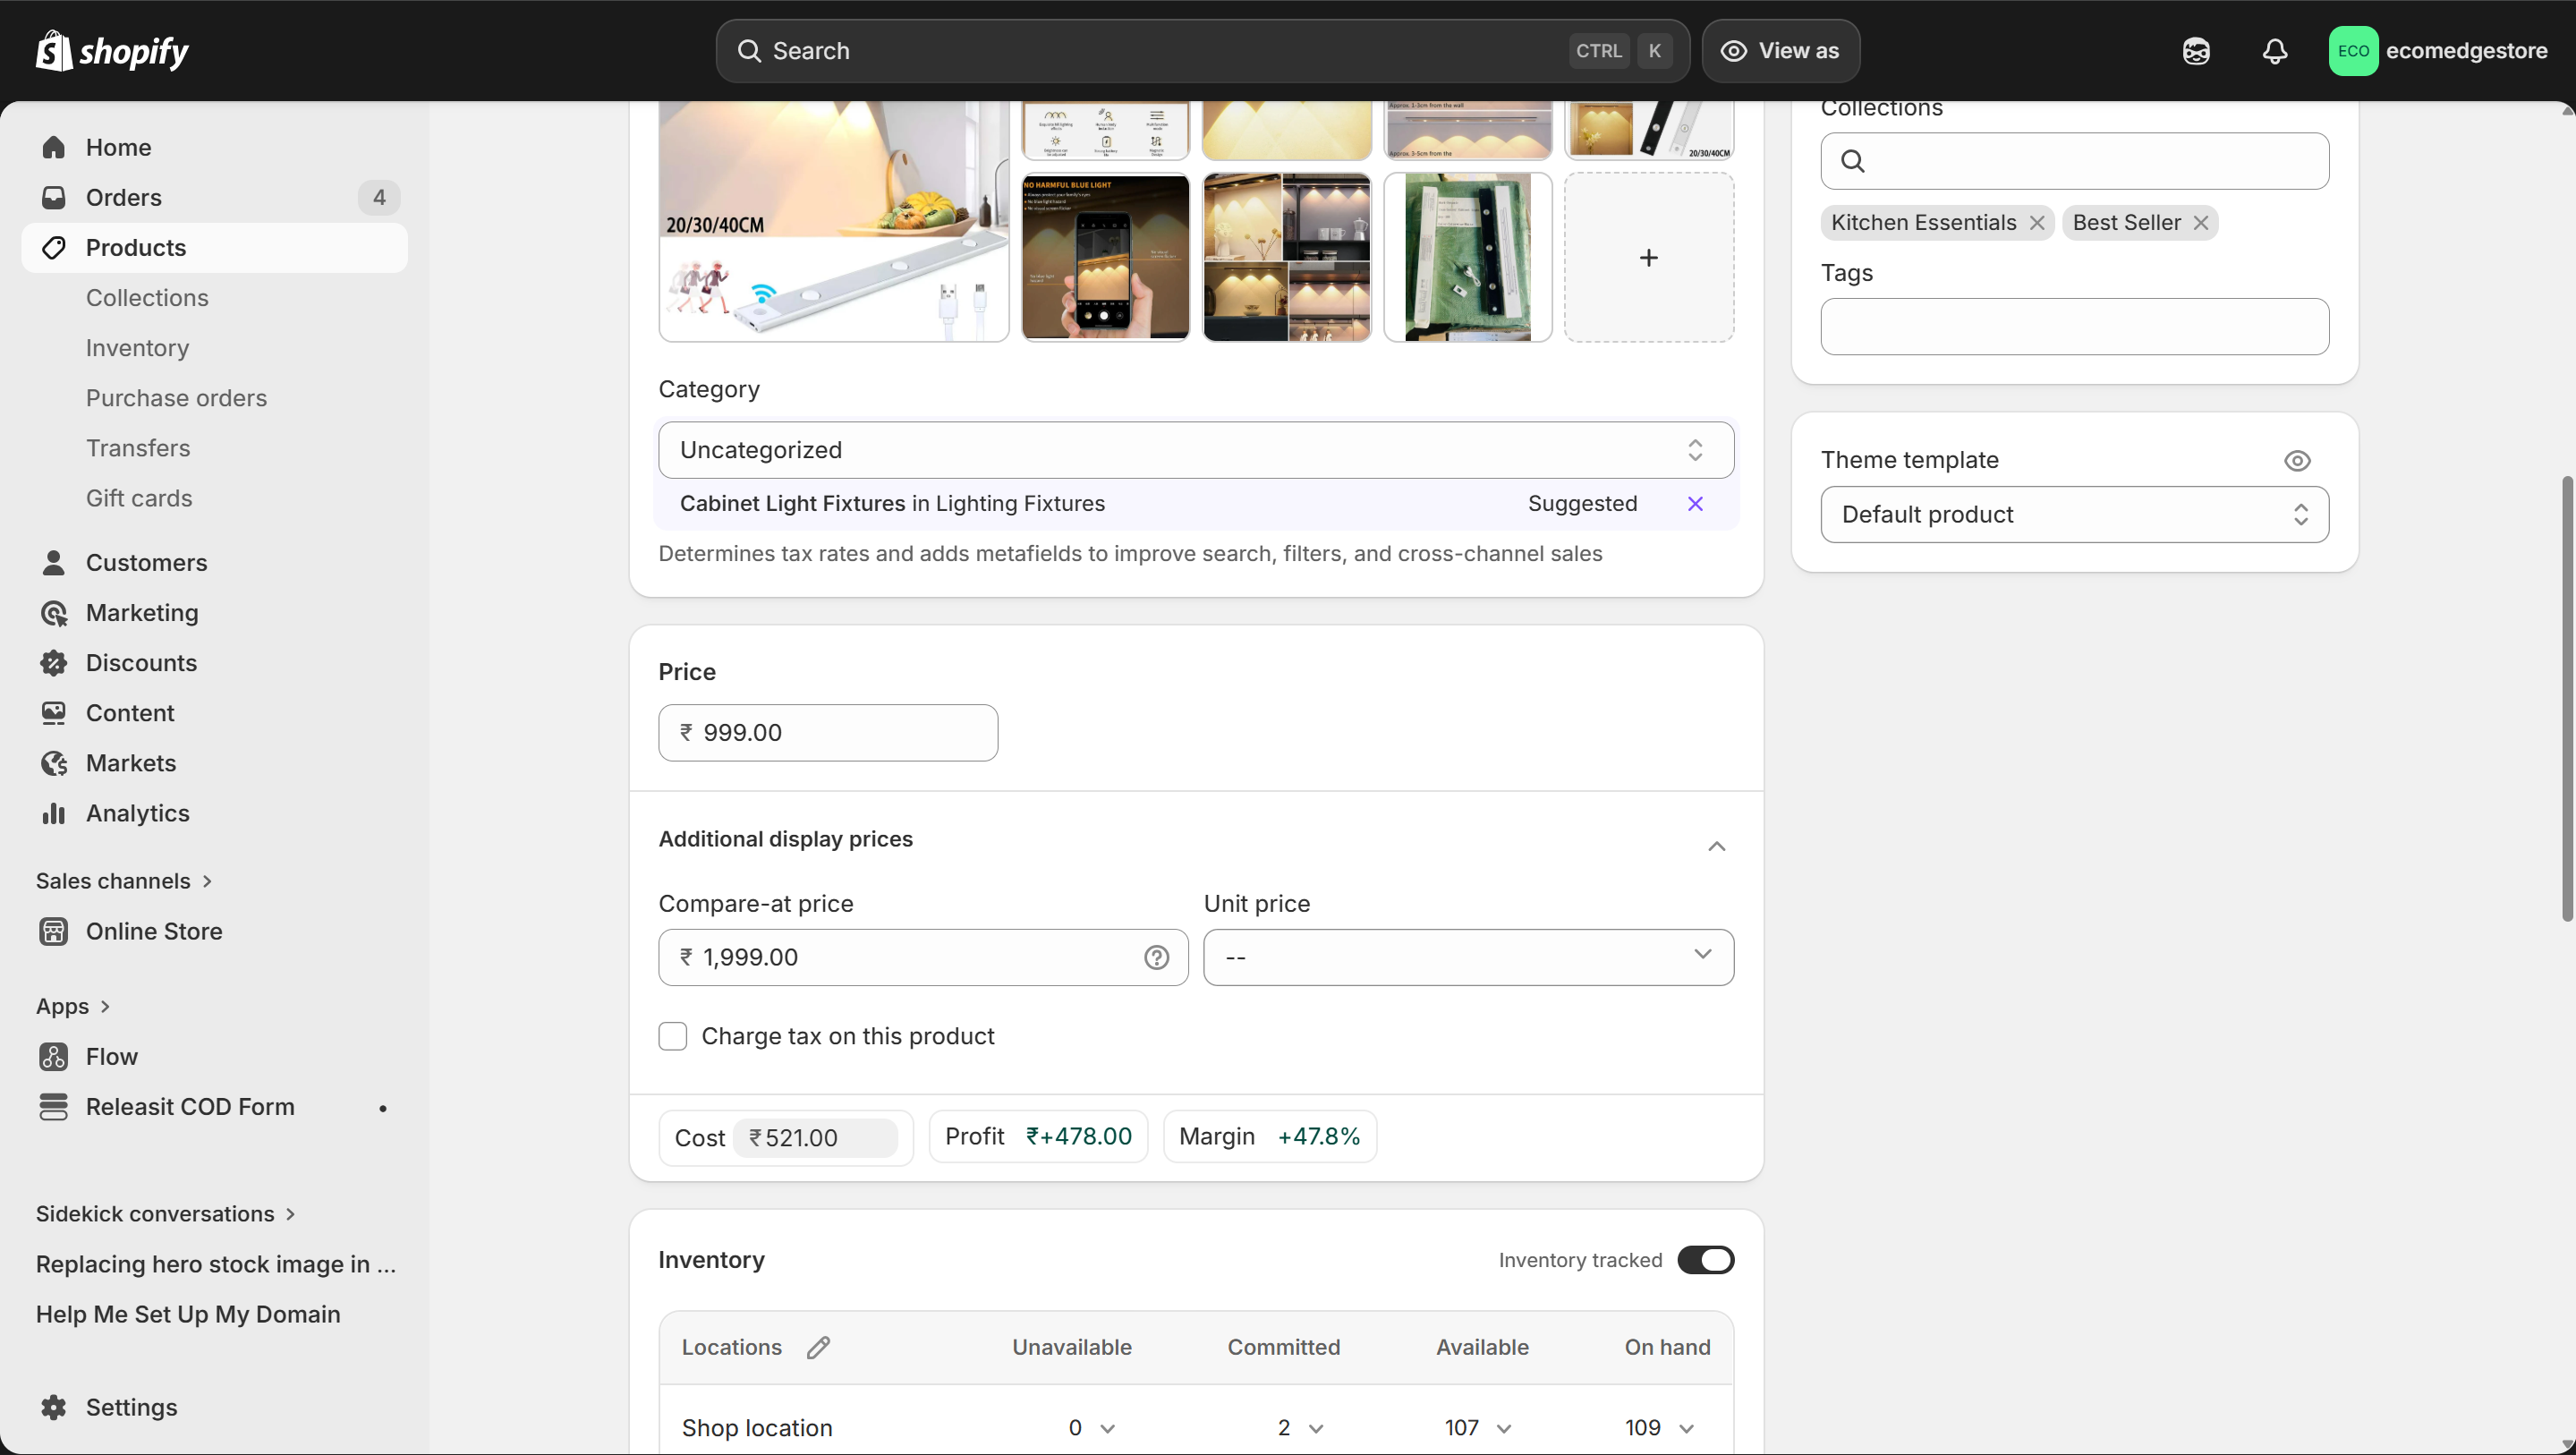
Price, Compare at price, and Cost — Shopify calculates your profit and margin automatically
Shopify Admin
Category & Collections
Assign a product category (helps Shopify suggest tax rates) and add the product to a collection. Remember — if a product isn't in a collection that's linked in the Theme Editor, it won't show on your store.
Theme template
By default, every product uses the "Default product" template. You can create custom templates in the Theme Editor and assign them here — useful when different products need different layouts.
- Inventory tracking — keep it ON. Shopify tracks stock automatically. Set your quantities per location.
- SKU (Stock Keeping Unit) — your internal product code. Essential if you have multiple variants or work with a supplier. Use supplier's code or create your own system.
- Shipping — set the package size and weight. This matters when shipping partners calculate rates. Country of origin is required for Indian compliance.
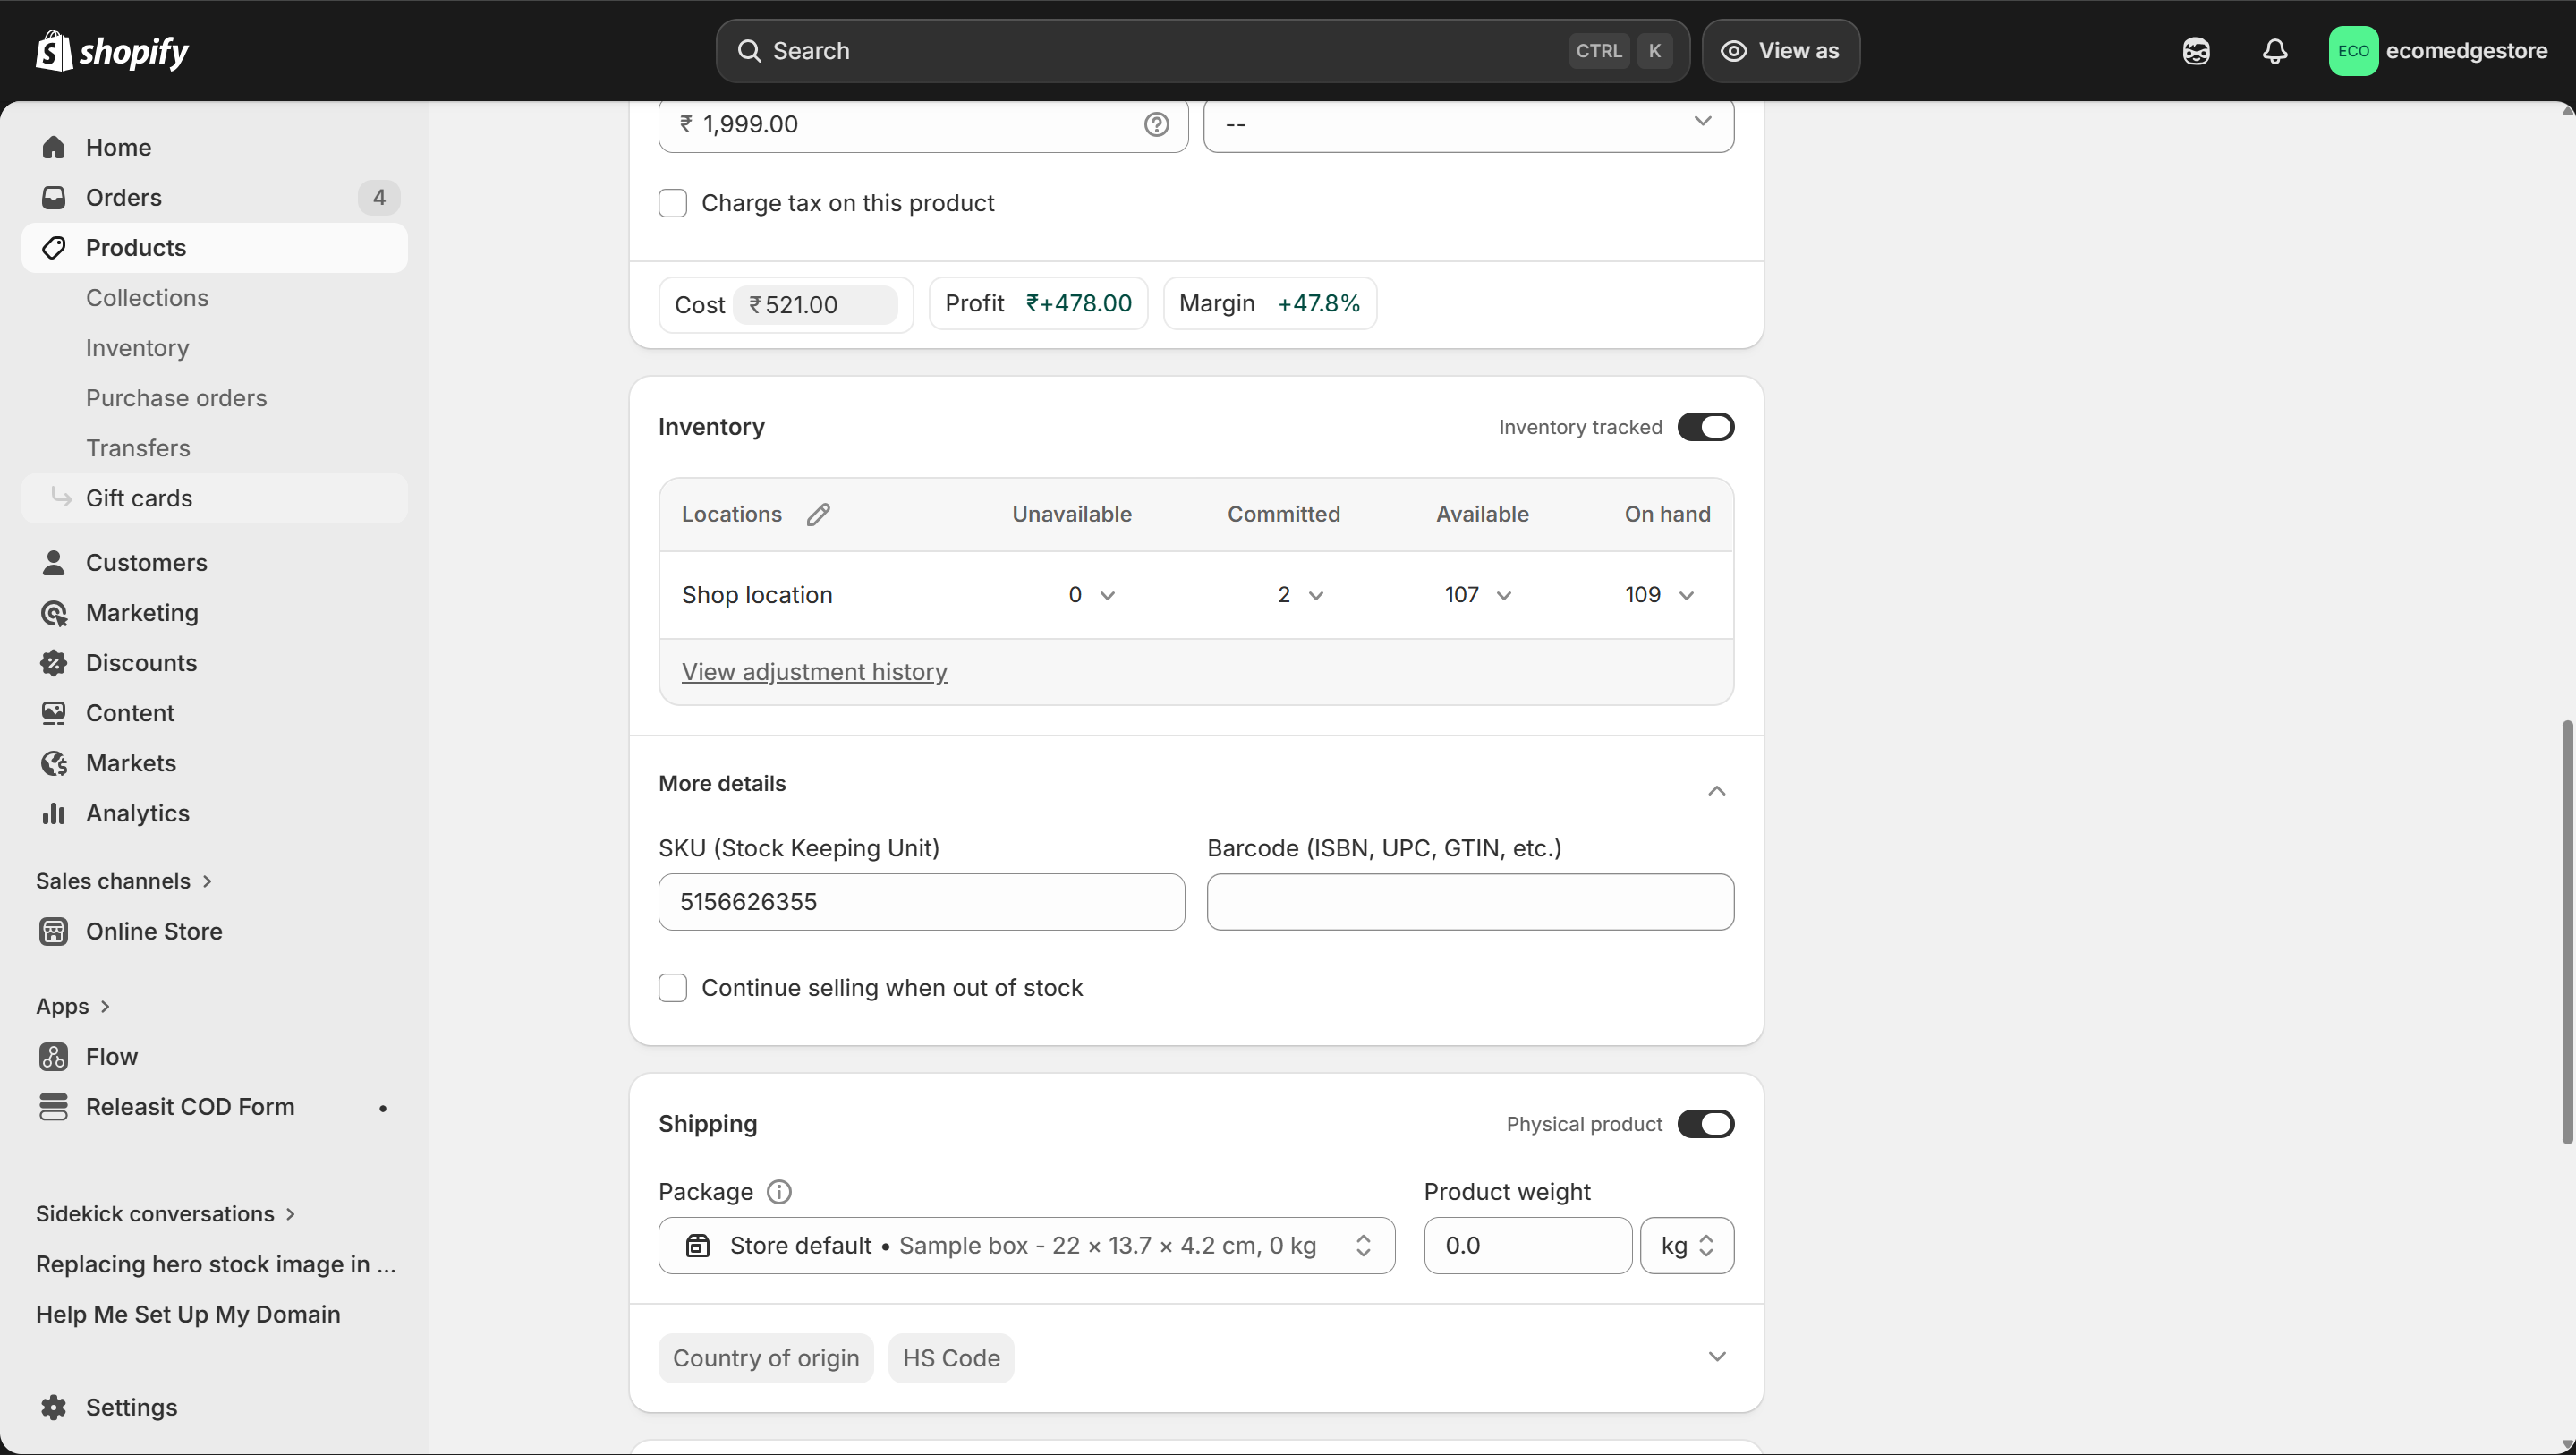
Inventory, SKU, and Shipping — set these correctly for smooth operations
Shopify Admin
Bulk Editing Products
- Go to Products > select multiple products > Edit products to open the bulk editor
- You can update prices, status, categories, vendors, and sales channels for multiple products at once
- This saves massive time when you have 10+ products — update all prices or publish to a new sales channel in one go
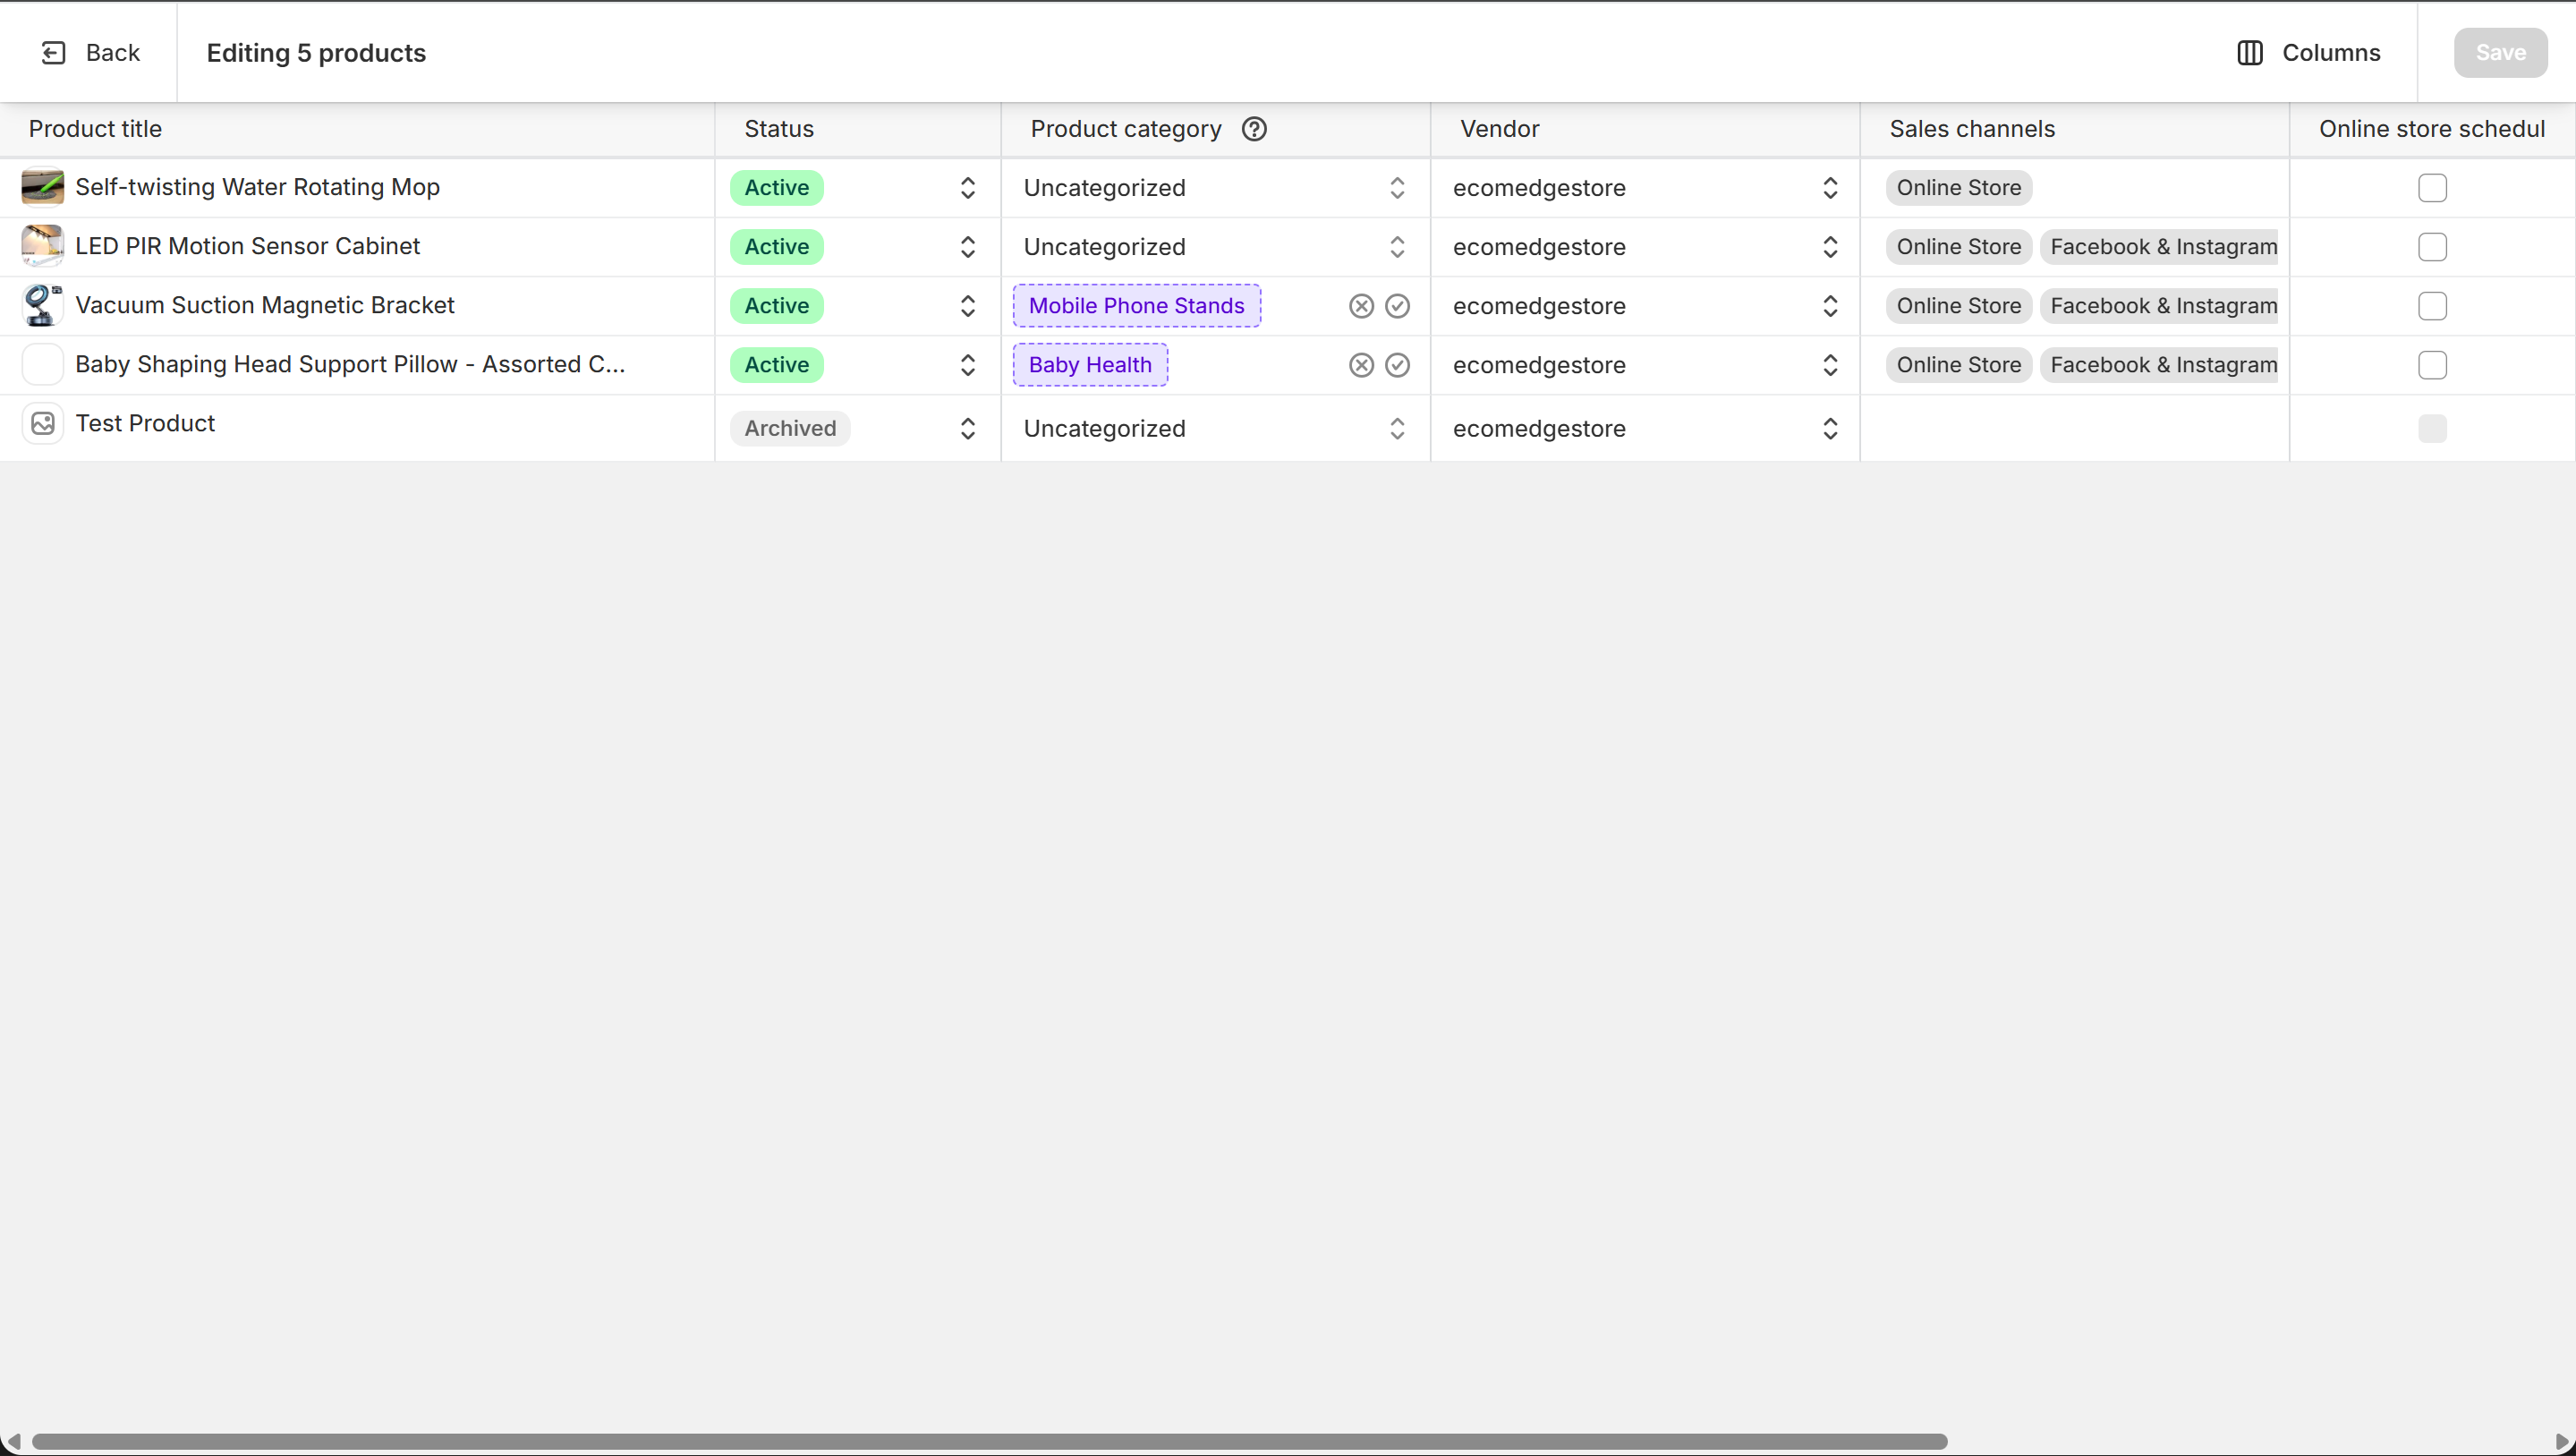
Bulk editor — update status, category, vendor, and sales channels for all products at once
Shopify Admin
Working with a Private Supplier
- If you're sourcing from a private supplier (not a dropshipping app), you create each product manually in Shopify
- Get your supplier's product images, descriptions, and specifications — then build the product page using the anatomy from Step 1
- FBA (Fulfillment by Amazon) or third-party fulfillment: if your supplier ships directly, add their warehouse as a fulfillment location in Settings > Locations. This lets Shopify route orders to the right place.
- Track your cost per item accurately — this is how you know your real margins after shipping, payment gateway fees, and returns
Private supplier = you control the margins
With dropshipping apps, the supplier sets the cost. With a private supplier, you negotiate. Track every cost (product + shipping + packaging) in the "Cost per item" field. Shopify shows your real profit — no guessing.
6
Use AI to Create Product Content
- Writing product descriptions from scratch is slow. Use AI to generate the first draft — then edit it to match your brand voice.
- Open Gemini, ChatGPT, or Claude and give it your product details — name, features, target audience. Ask it to write benefit-driven descriptions, not feature lists.
- AI can also help with: SEO titles, meta descriptions, FAQ questions, and email copy for your products
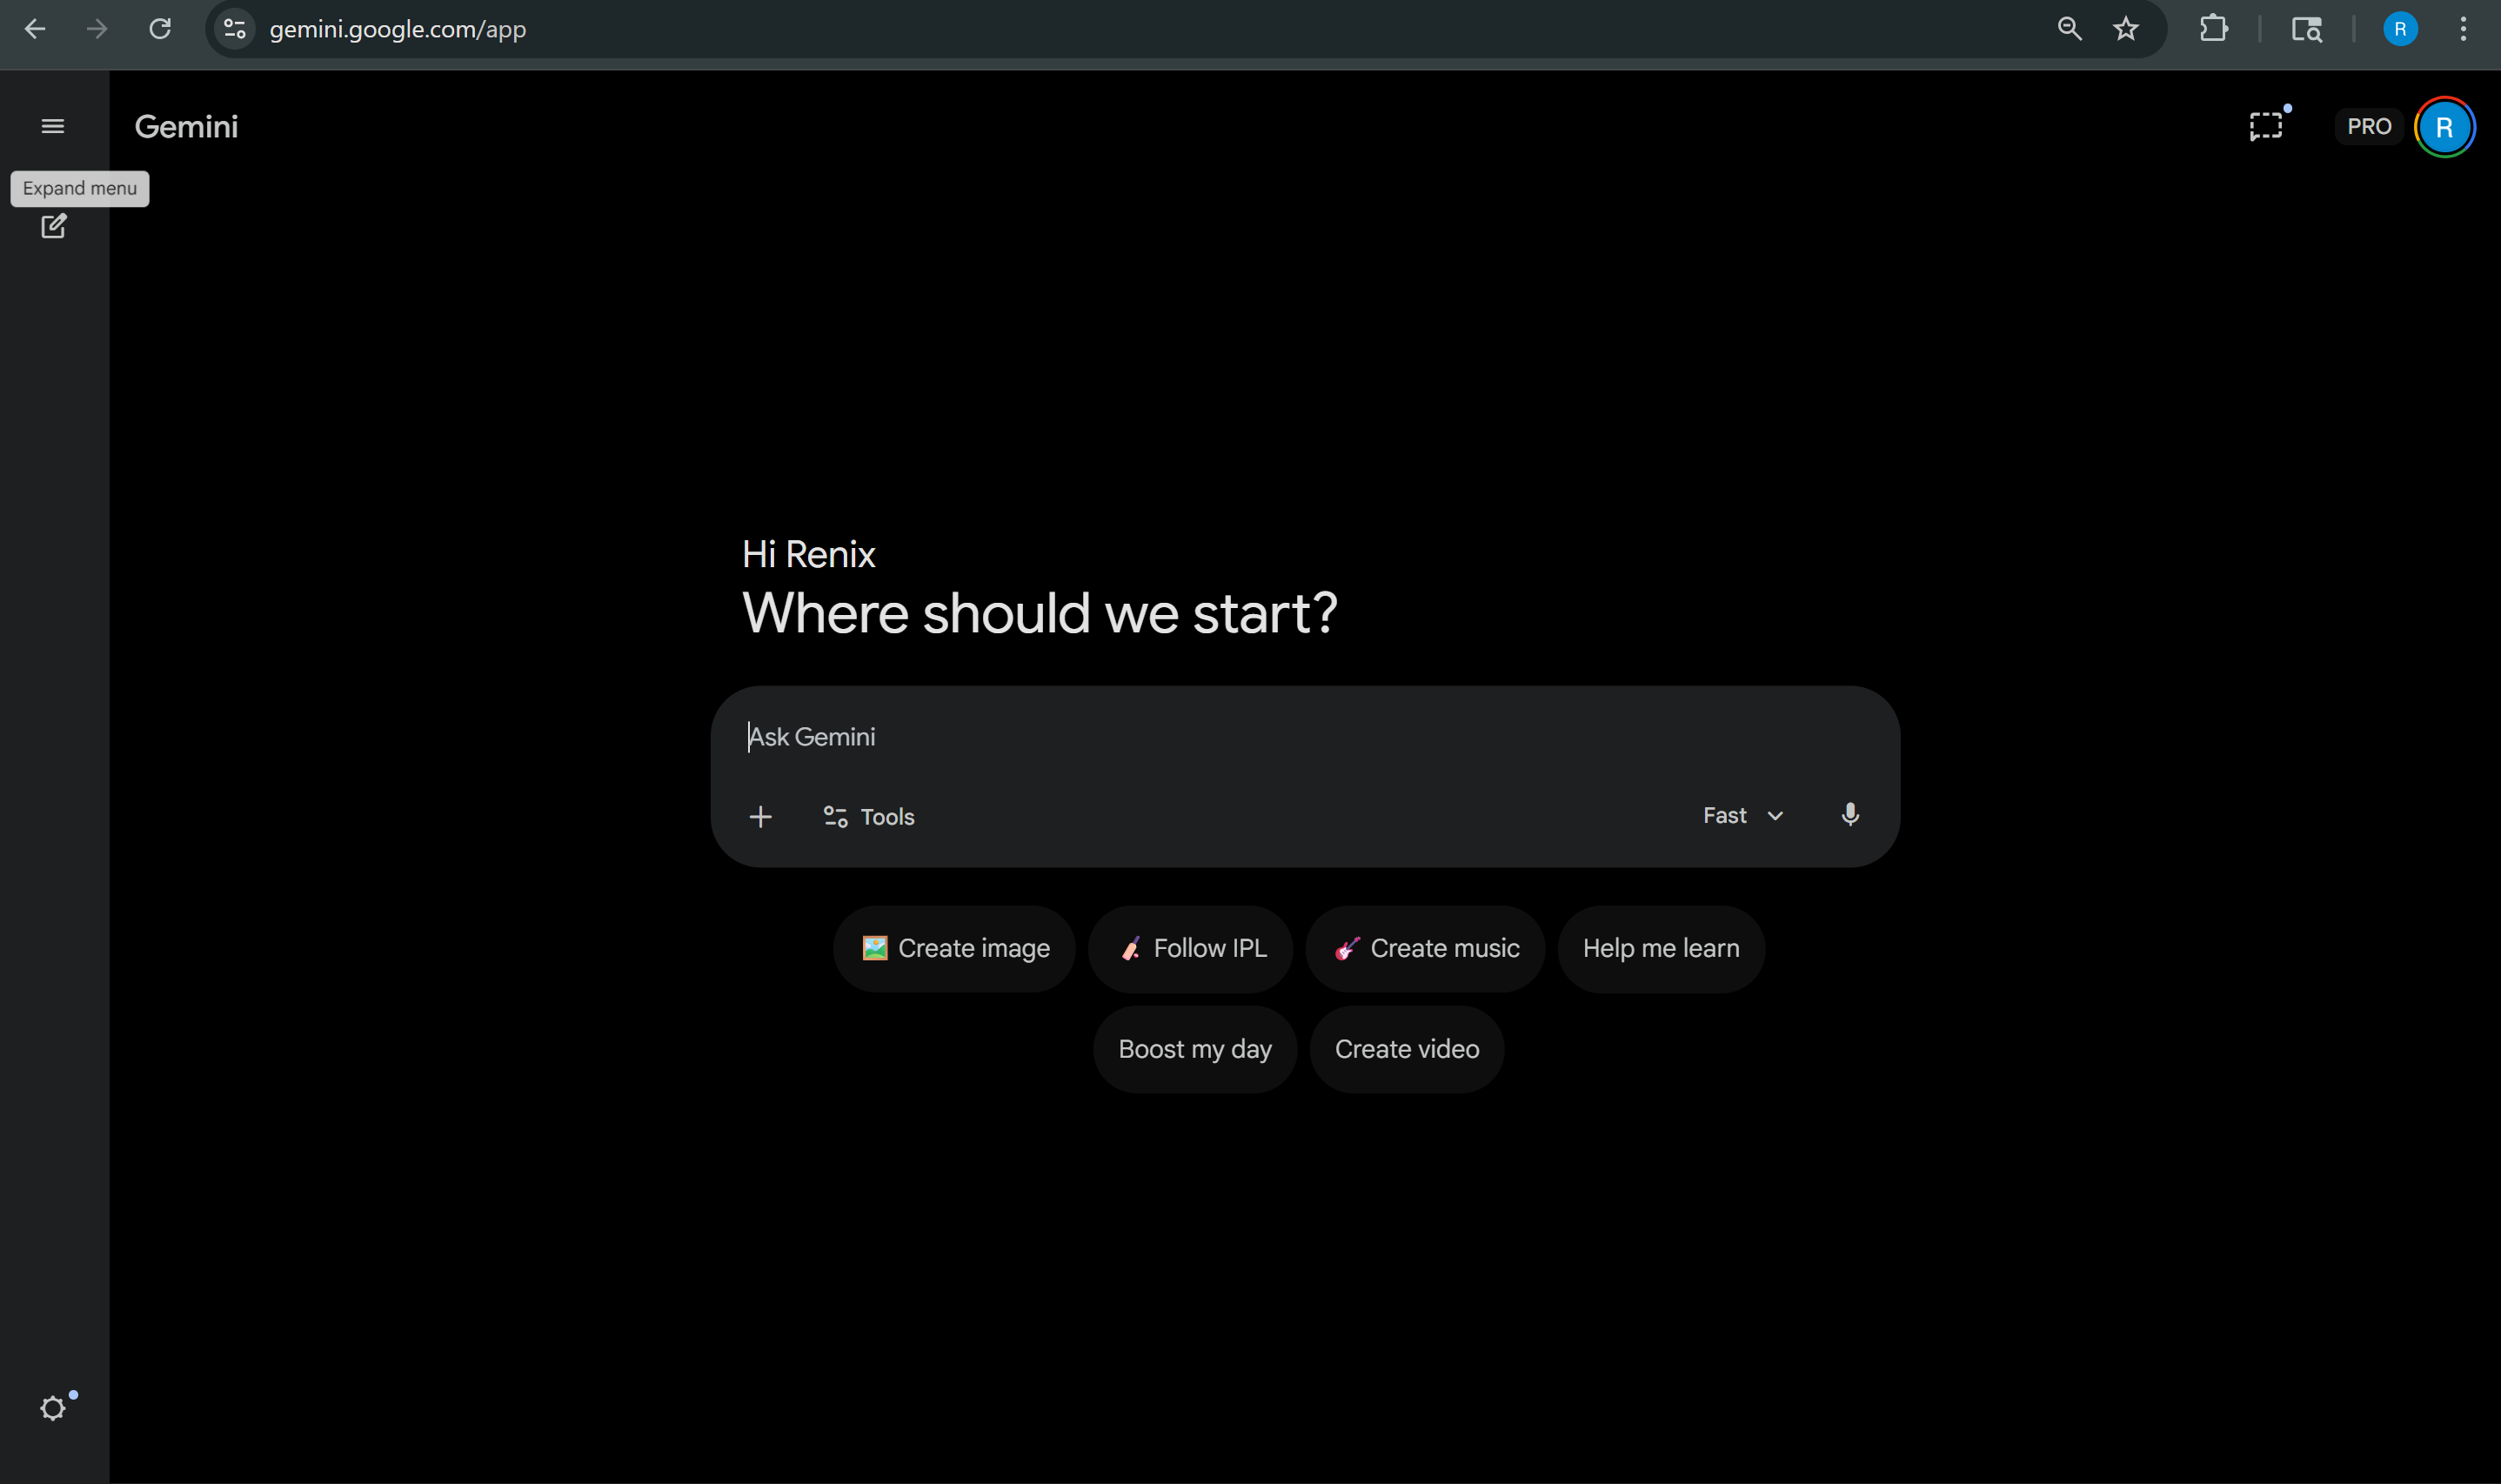
Use AI (Gemini, ChatGPT, Claude) to draft product descriptions — then edit for your brand
Gemini
AI Prompt — Product Description
I'm building a product page for my dropshipping store in India. Before writing anything, ask me 5 questions about:
- The product name and what it does
- My target customer (age, lifestyle, what problem they have)
- The top 3-5 features of this product
- My price point and any offers (BOGO, discount, free shipping)
- My brand tone (fun, premium, minimal, bold)
After I answer, write a product description structured like this:
Format for each feature (repeat 3-5 times):
- Feature headline (benefit-driven, not technical — "Stays Put on Wet Floors" not "Non-Slip Rubber Backing")
- 2 lines of description explaining why the customer should care
- Suggest what image or GIF would work next to this feature
Also generate:
- A compelling product title with an offer hook (e.g., "Premium Kitchen Mat | Buy 1 Get 1 FREE")
- 4 FAQ questions customers would ask before buying (with answers)
- A one-line meta description for SEO (under 160 characters)
Rules:
- Write benefits, not features. The customer doesn't care what it's made of — they care what it does for them.
- No generic filler ("high quality", "best in class", "premium material"). Be specific.
- Tone should match my brand — ask me first, don't assume.
- Every sentence should either build desire or remove doubt. Nothing else.
Always edit the AI output
AI doesn't know your actual product, your shipping times, or your customers' real pain points. Use it for the first draft — then replace generic claims with real specifics and make it sound like your brand, not a template.
7
The Psychology Behind the Layout
- The anatomy order isn't random. It follows how humans make buying decisions:
01
Attention → Hero Image
The brain processes images 60,000x faster than text. A strong product image earns the customer's first second of attention. Without it, they bounce.
02
Interest → Title + Price + Offer
Anchoring effect: showing the original price crossed out makes the sale price feel like a win. Add urgency ("Limited Time") and the customer's brain shifts from browsing to evaluating.
03
Trust → Signals + Payment Icons
The customer's first objection is always "Can I trust this store?" Free shipping, COD, returns, and secure payment icons answer this before they have to ask.
04
Desire → Rich Description + GIFs
Features alone don't sell. Benefits sell. "Non-slip rubber backing" is a feature. "Your mat stays put on wet floors — no more slipping" is a benefit. Show, don't tell.
05
Validation → Reviews + Photos
The customer wants to buy but needs permission. Other customers' photos and reviews give them that permission. "If 489 people bought this and love it, it must be good."
06
Resolution → FAQ
The last holdouts have one specific question. Answer it and they buy. Don't answer it and they leave to "think about it" — which means they never come back.
Product Page Checklist
Minimum 3 images: product front, product in use (lifestyle), and product from a different angle. A GIF or short video showing the product in action is a bonus that significantly increases conversion.
In Shopify, set a "Compare at price" (original) and a "Price" (sale). The theme automatically shows the strikethrough. The gap between the two creates perceived value — the bigger the gap, the stronger the urgency.
"Above the fold" = what the customer sees without scrolling. Free Shipping, COD Available, Returns, and Secure Payments should all be visible here. Use icons + short text, not full sentences.
Go to Products > [your product] > Description. If it's a plain paragraph, restructure it: feature headline → image/GIF → 1-2 lines of benefit text. Repeat for 3-5 features. The description is a mini landing page, not a paragraph.
Install a review app (Loox or Judge.me) and import or request reviews with photos. A product page with 10+ photo reviews converts significantly better than one with zero. Even 5 reviews make a difference.
80%+ of Indian D2C traffic is mobile. In the Theme Editor, click the mobile icon at the bottom to preview. Check: is the buy button visible without scrolling? Are images loading fast? Is text readable without zooming?