Store Foundation
Store Infrastructure
Set up policies, payments, shipping, menus, and essential apps — so your store can actually take orders.
Watch the Video
Opens in Skool community
- Policy pages are legally required — Shopify auto-generates templates, just review and save
- Shipping and payments must be set up before your first order — no shipping zone = checkout blocked
- COD (Cash on Delivery) is essential for Indian D2C — set it up as a manual payment method
- 3 apps are all you need to start — a COD form, a supplier app, and a review app
Why this matters
A beautiful store with no shipping rates, no payment methods, and no policies is a store that can't sell. This is the plumbing — nobody sees it, but nothing works without it. After this guide, your store can legally operate and accept orders.
1
Policy Pages
- Go to Settings > Policies — this is where all your legal pages live
- The formula is the same for every policy: click into it → click "Insert template" → review → hit Save
- Shopify auto-generates standard legal language for Return & Refund, Privacy, Terms of Service, and Shipping policies
- Do this for every single policy page — if you don't hit Save, the policy won't be active
- Fill in your Contact Information — trade name, email, and address. Required by law for e-commerce.
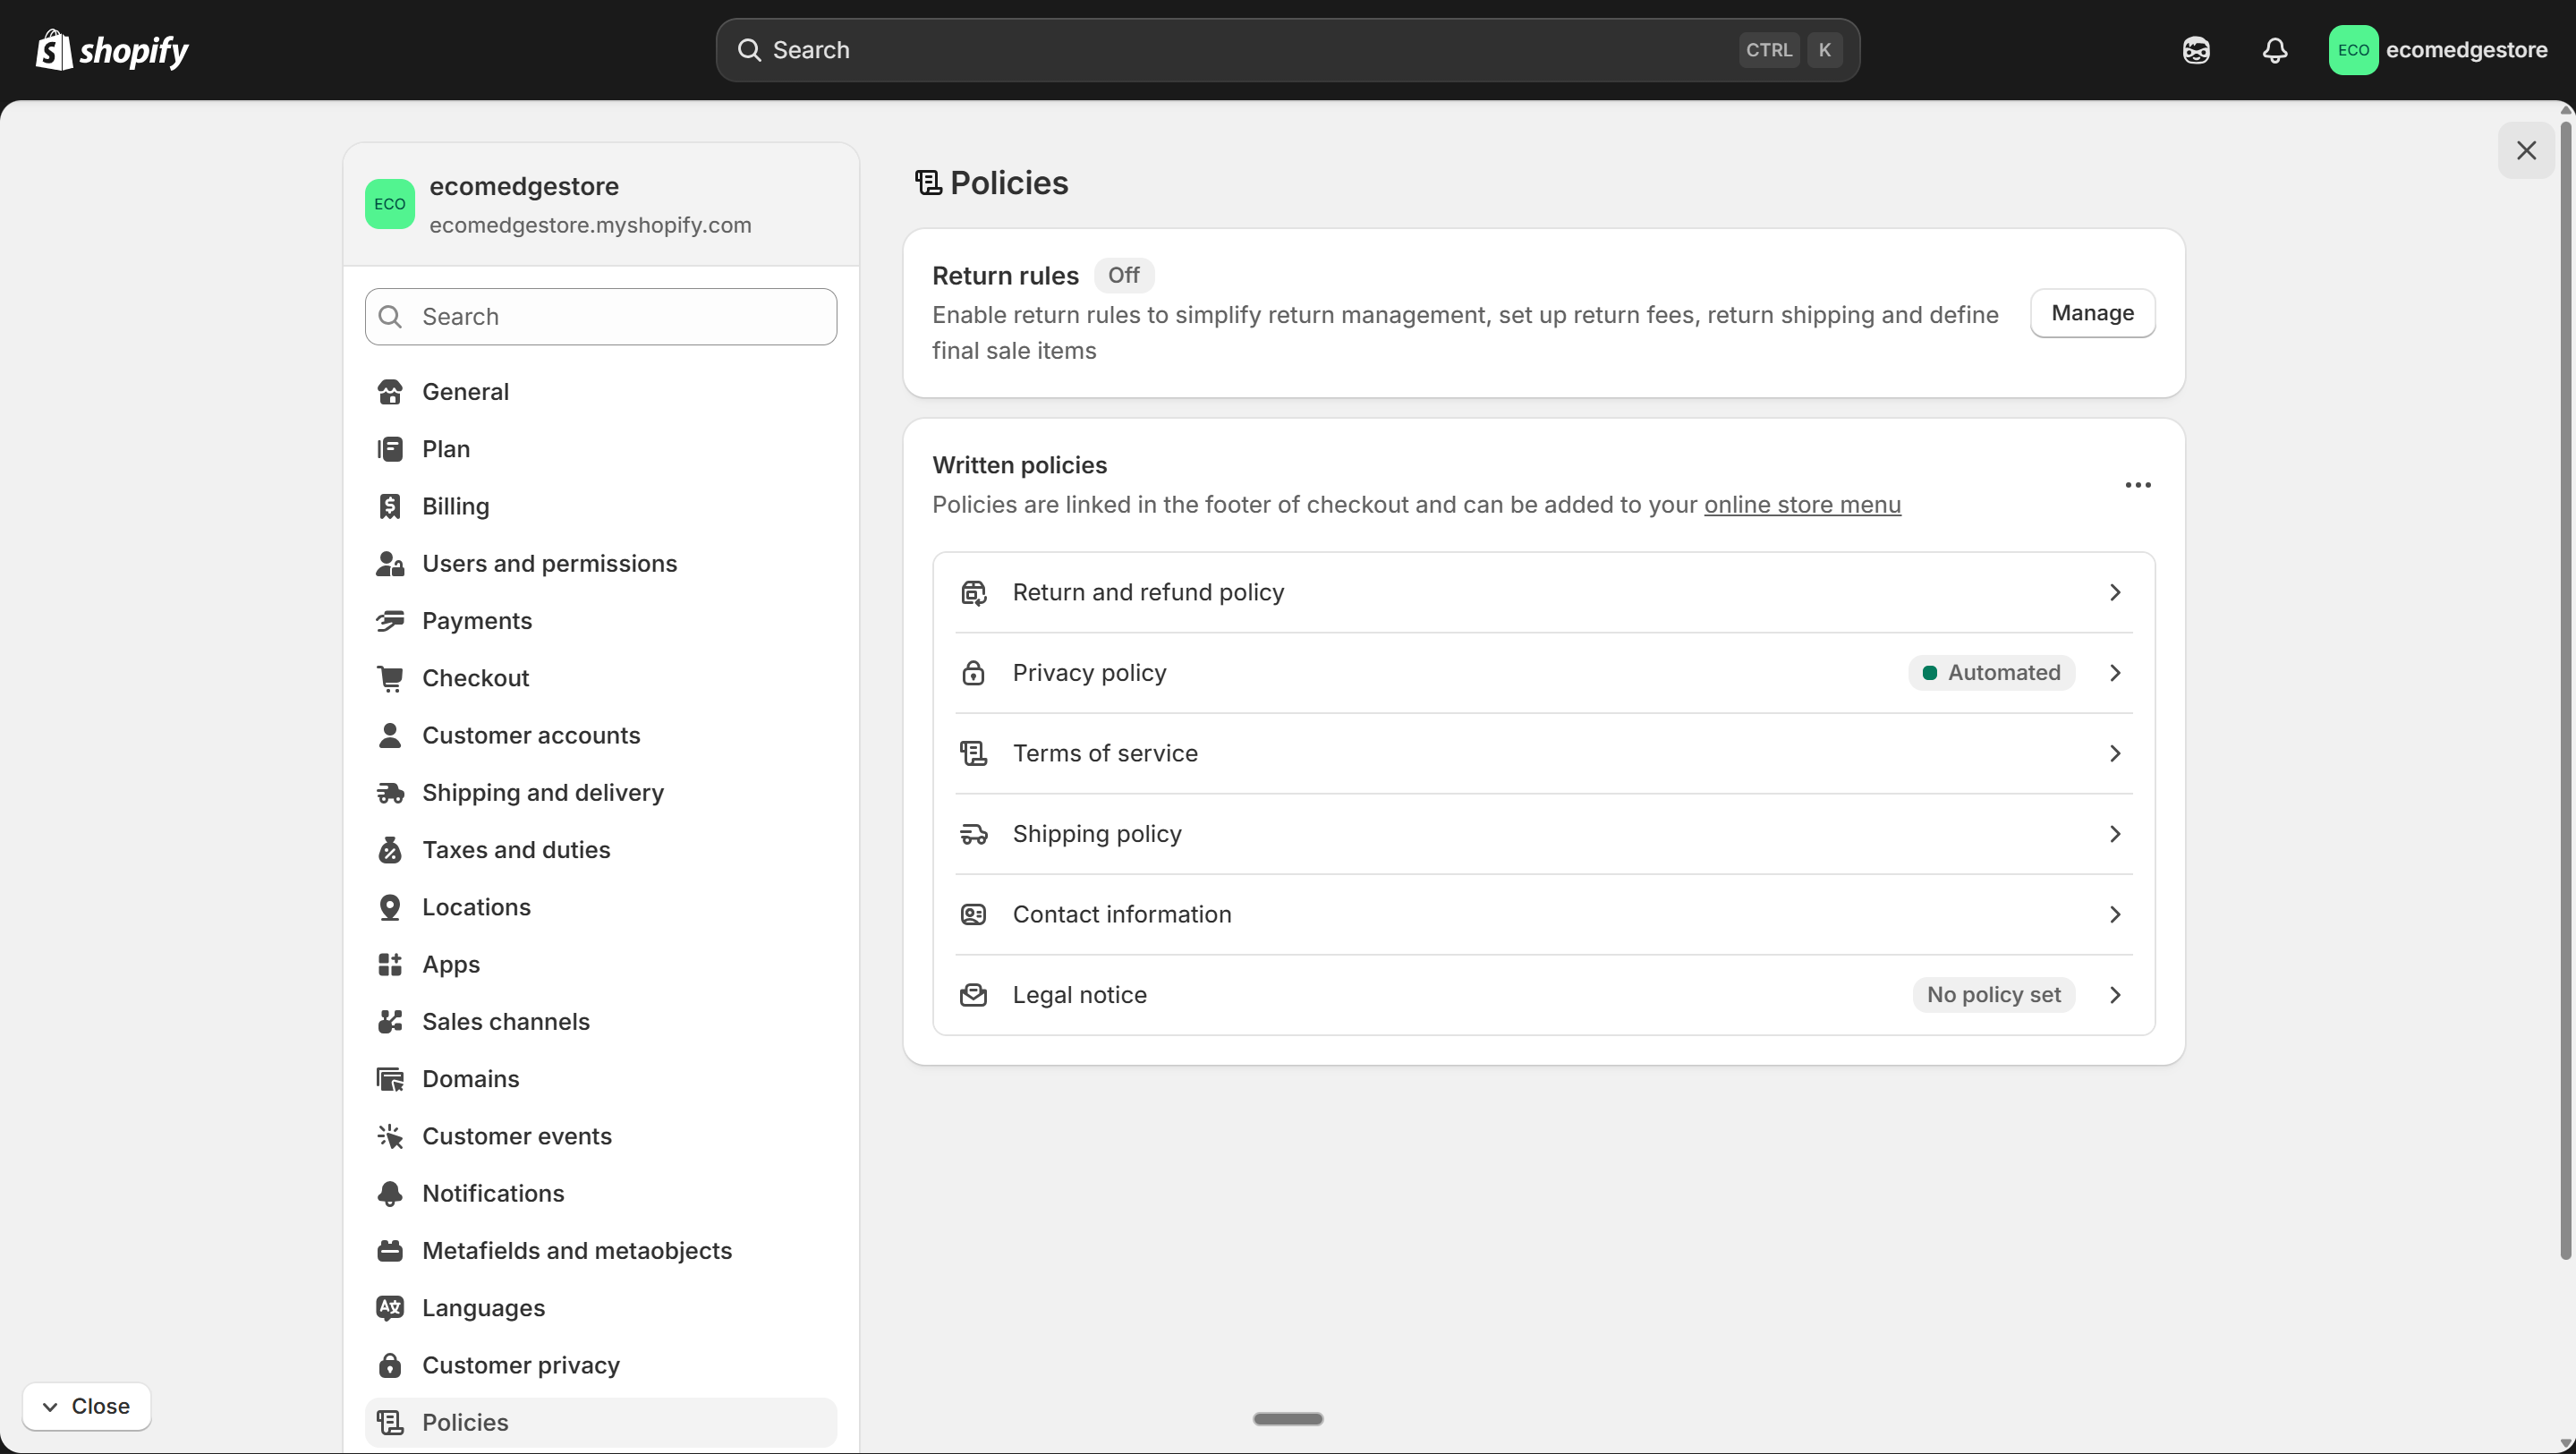
Settings > Policies — click each one, insert the template, review, and save
Shopify Admin
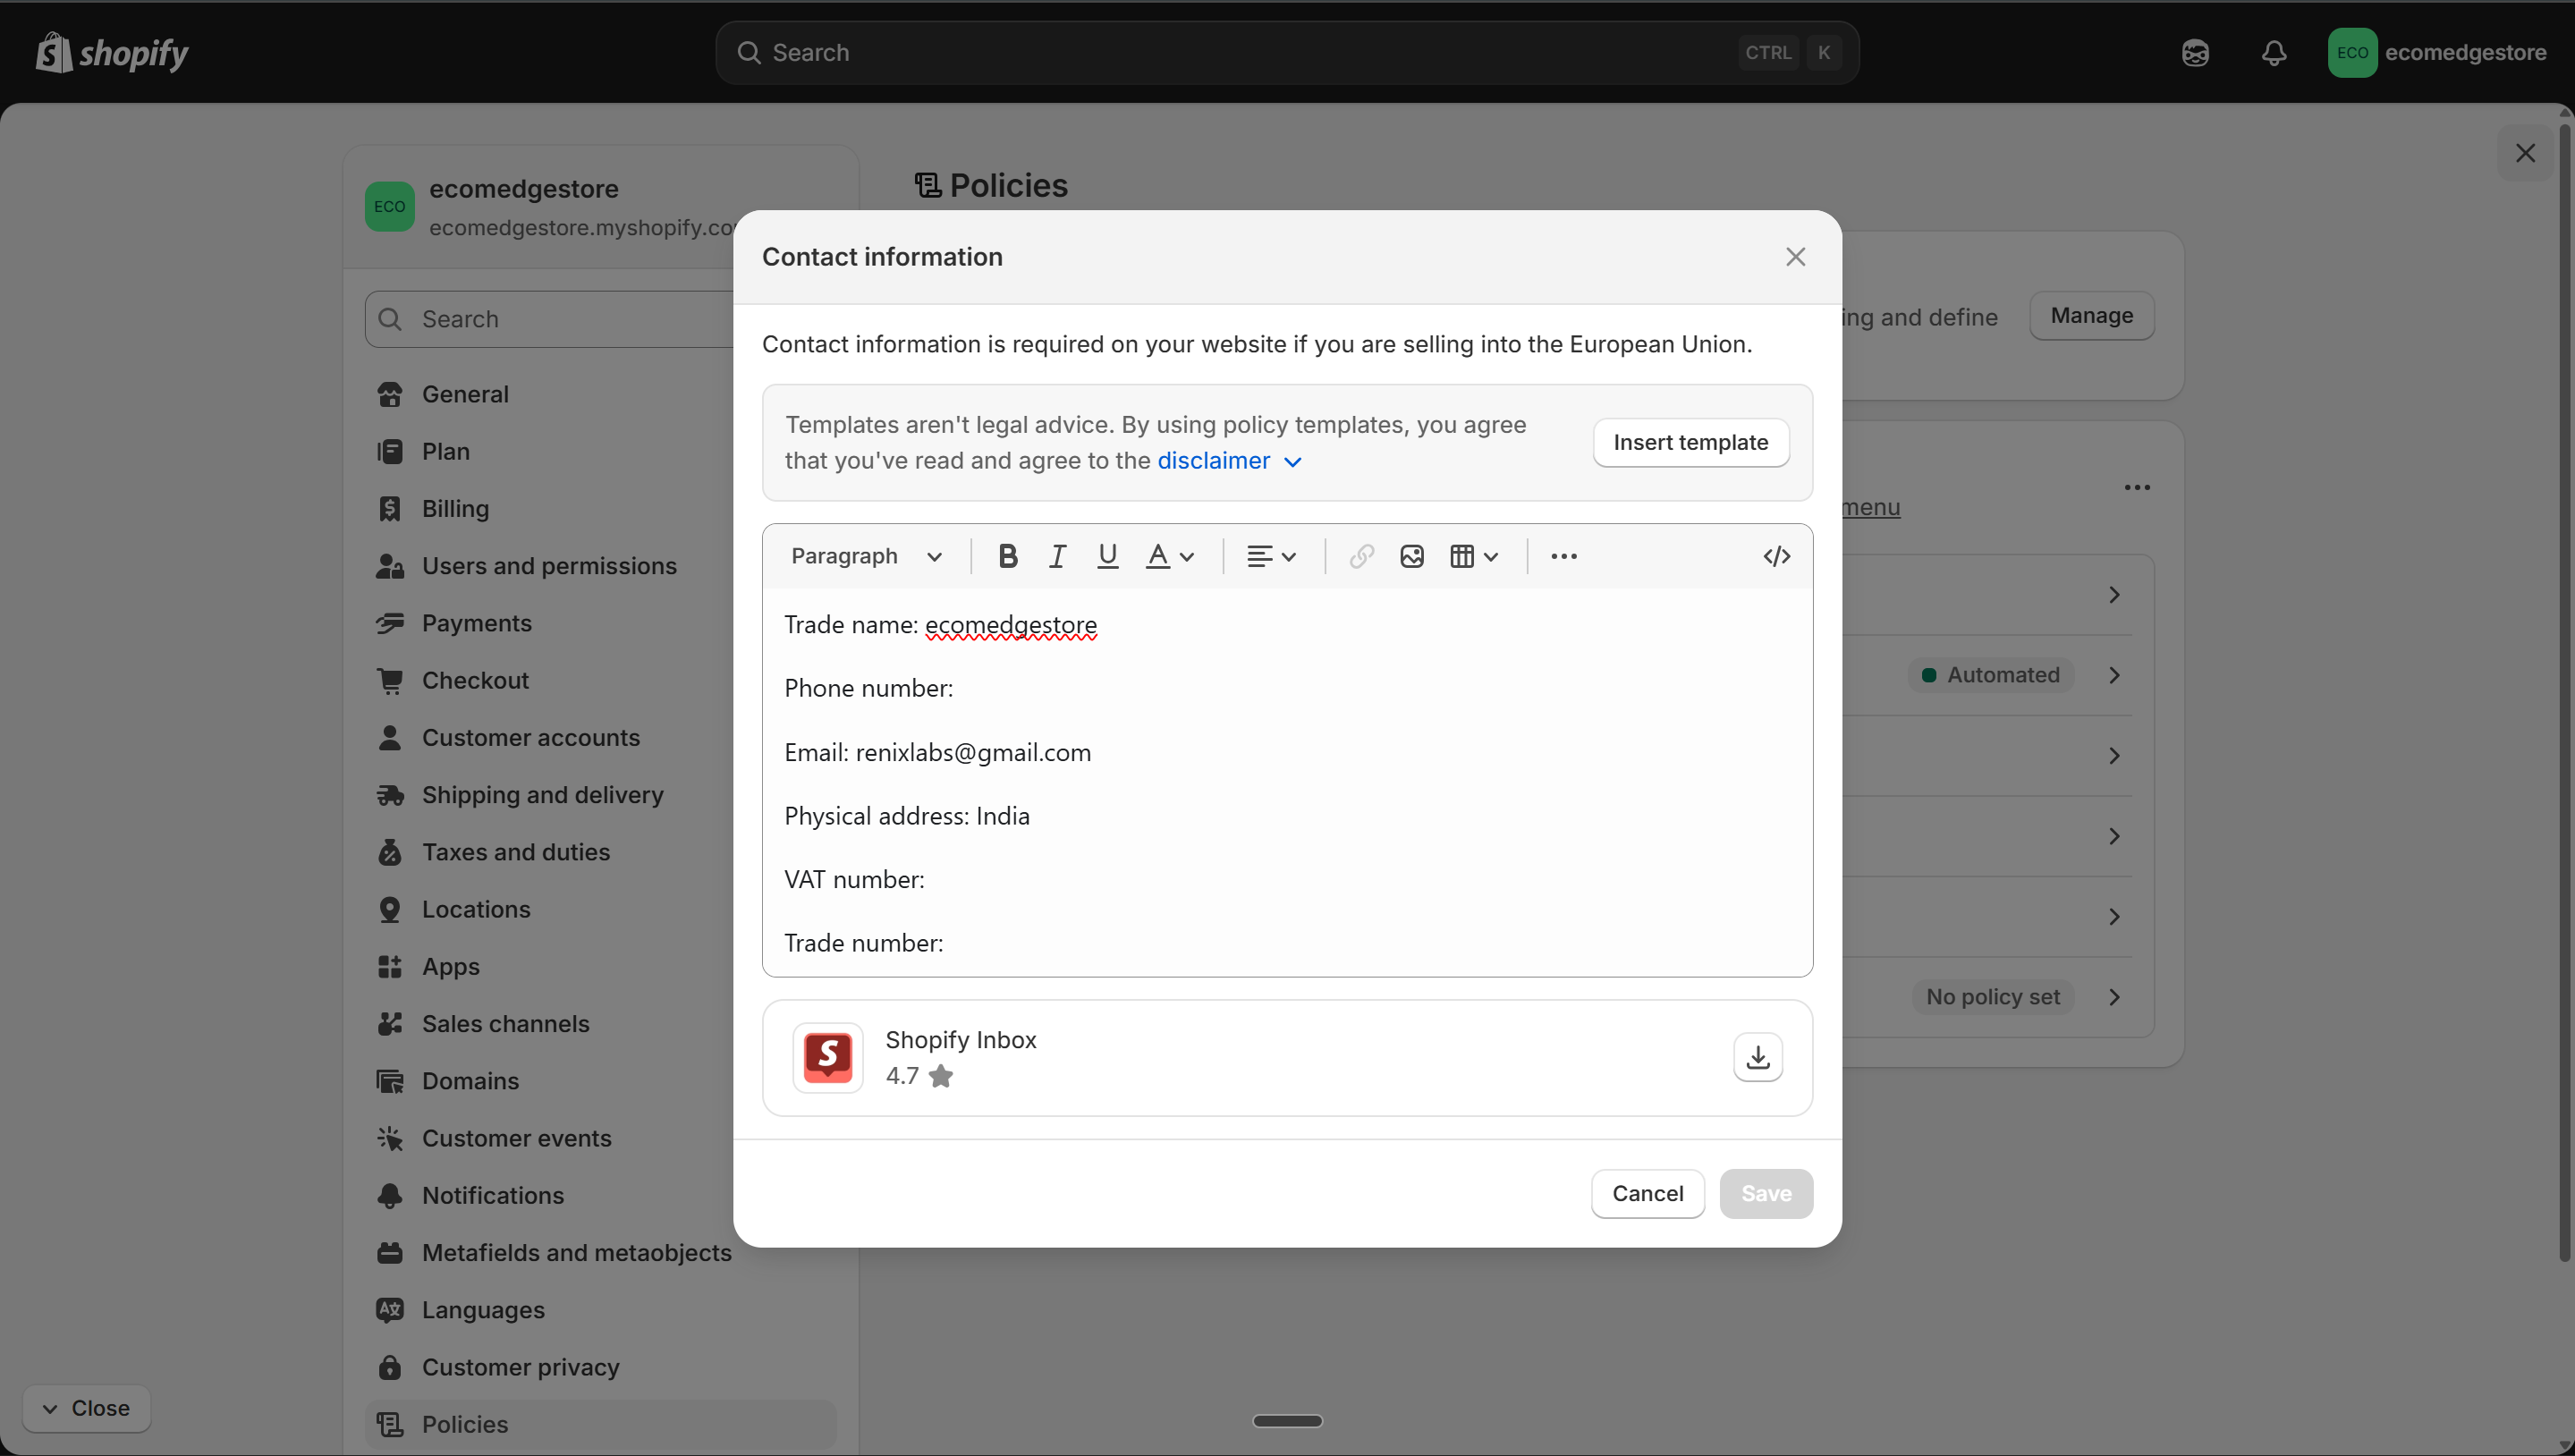
Contact Information — fill in your trade name, email, and address. Required by Indian e-commerce law.
Shopify Admin
Don't skip policies
Payment gateways (Razorpay, PhonePe) check if your store has policy pages before approving your account. No policies = no payment processing.
2
Checkout Settings
- Go to Settings > Checkout — this controls what customers see and fill in at checkout
- Customer contact method: set to "Phone number or email"
- Full name: require first and last name — you need this for shipping labels
- Company name: set to "Don't include" — keeps checkout clean
- Shipping address phone number: set to "Required" — delivery partners need it to reach the customer
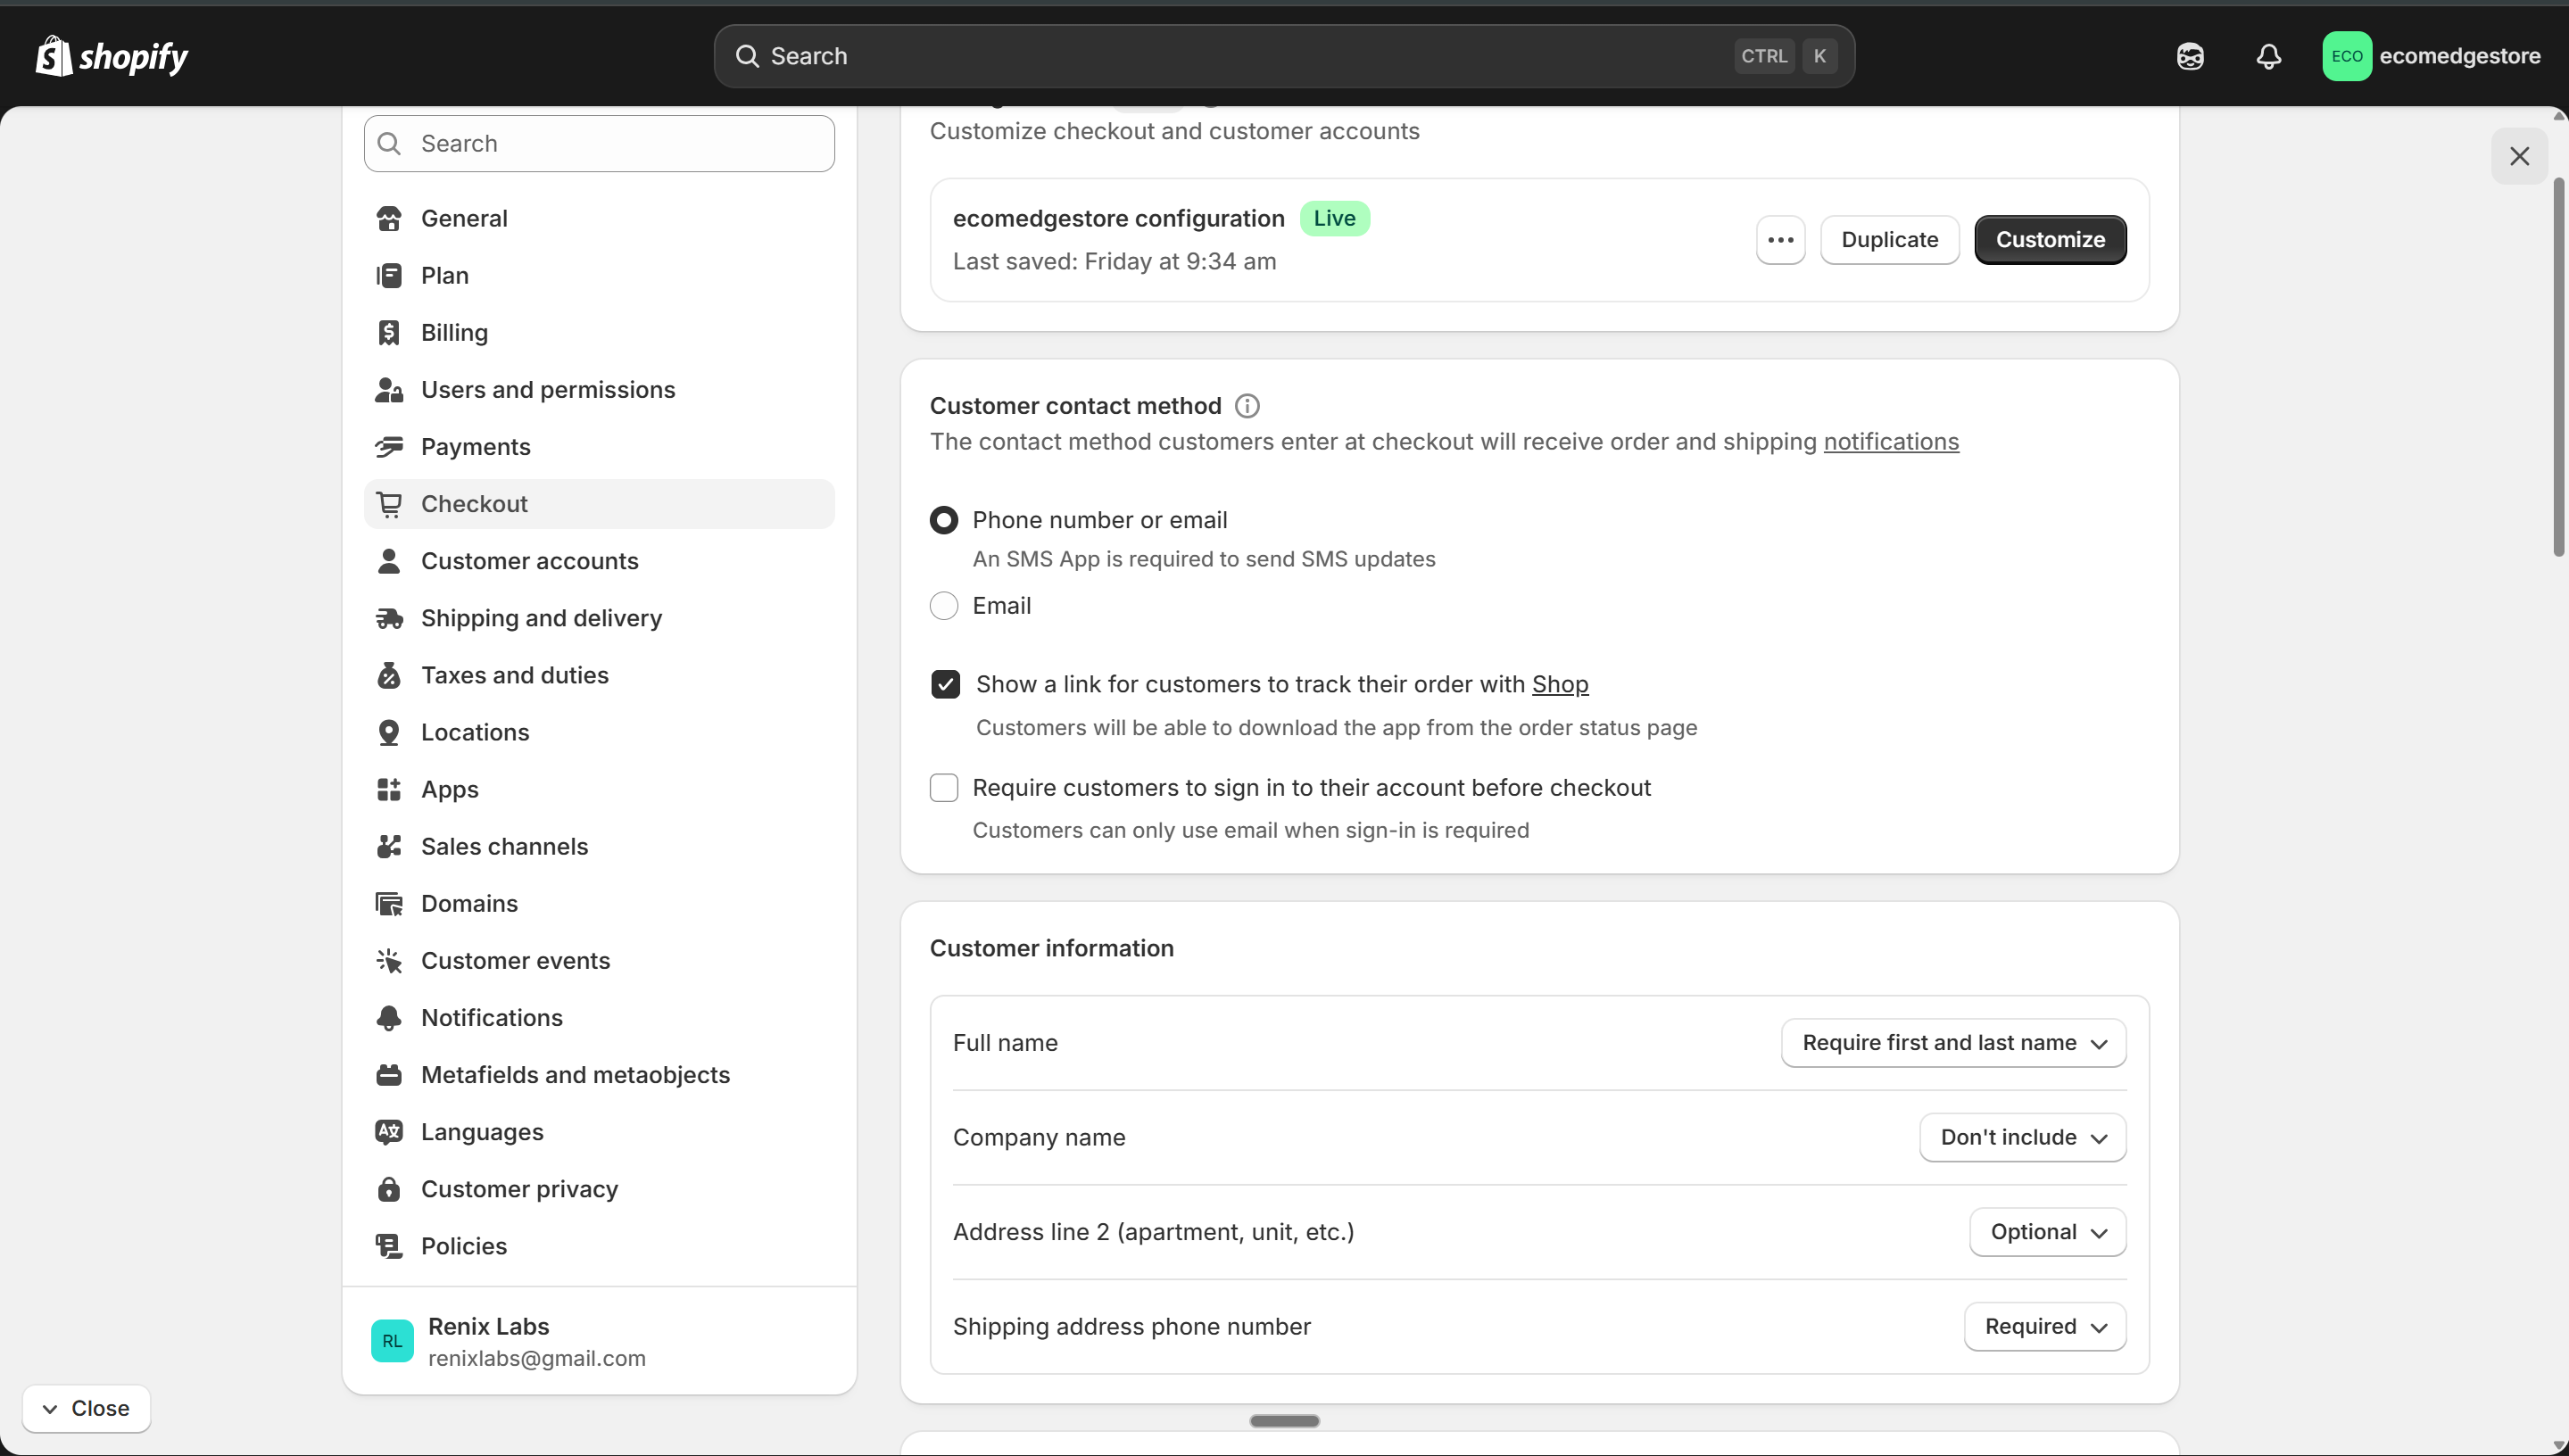
Checkout settings — phone + email, full name required, phone number required for shipping
Shopify Admin
3
Shipping & Delivery
- Go to Settings > Shipping and delivery — this is where you define WHERE you ship and HOW MUCH it costs
- Without a shipping zone, customers cannot check out. This is the #1 reason new stores fail at launch — the checkout is literally blocked.
- You need to: create a shipping zone (India) → set a shipping rate (free or flat) → save
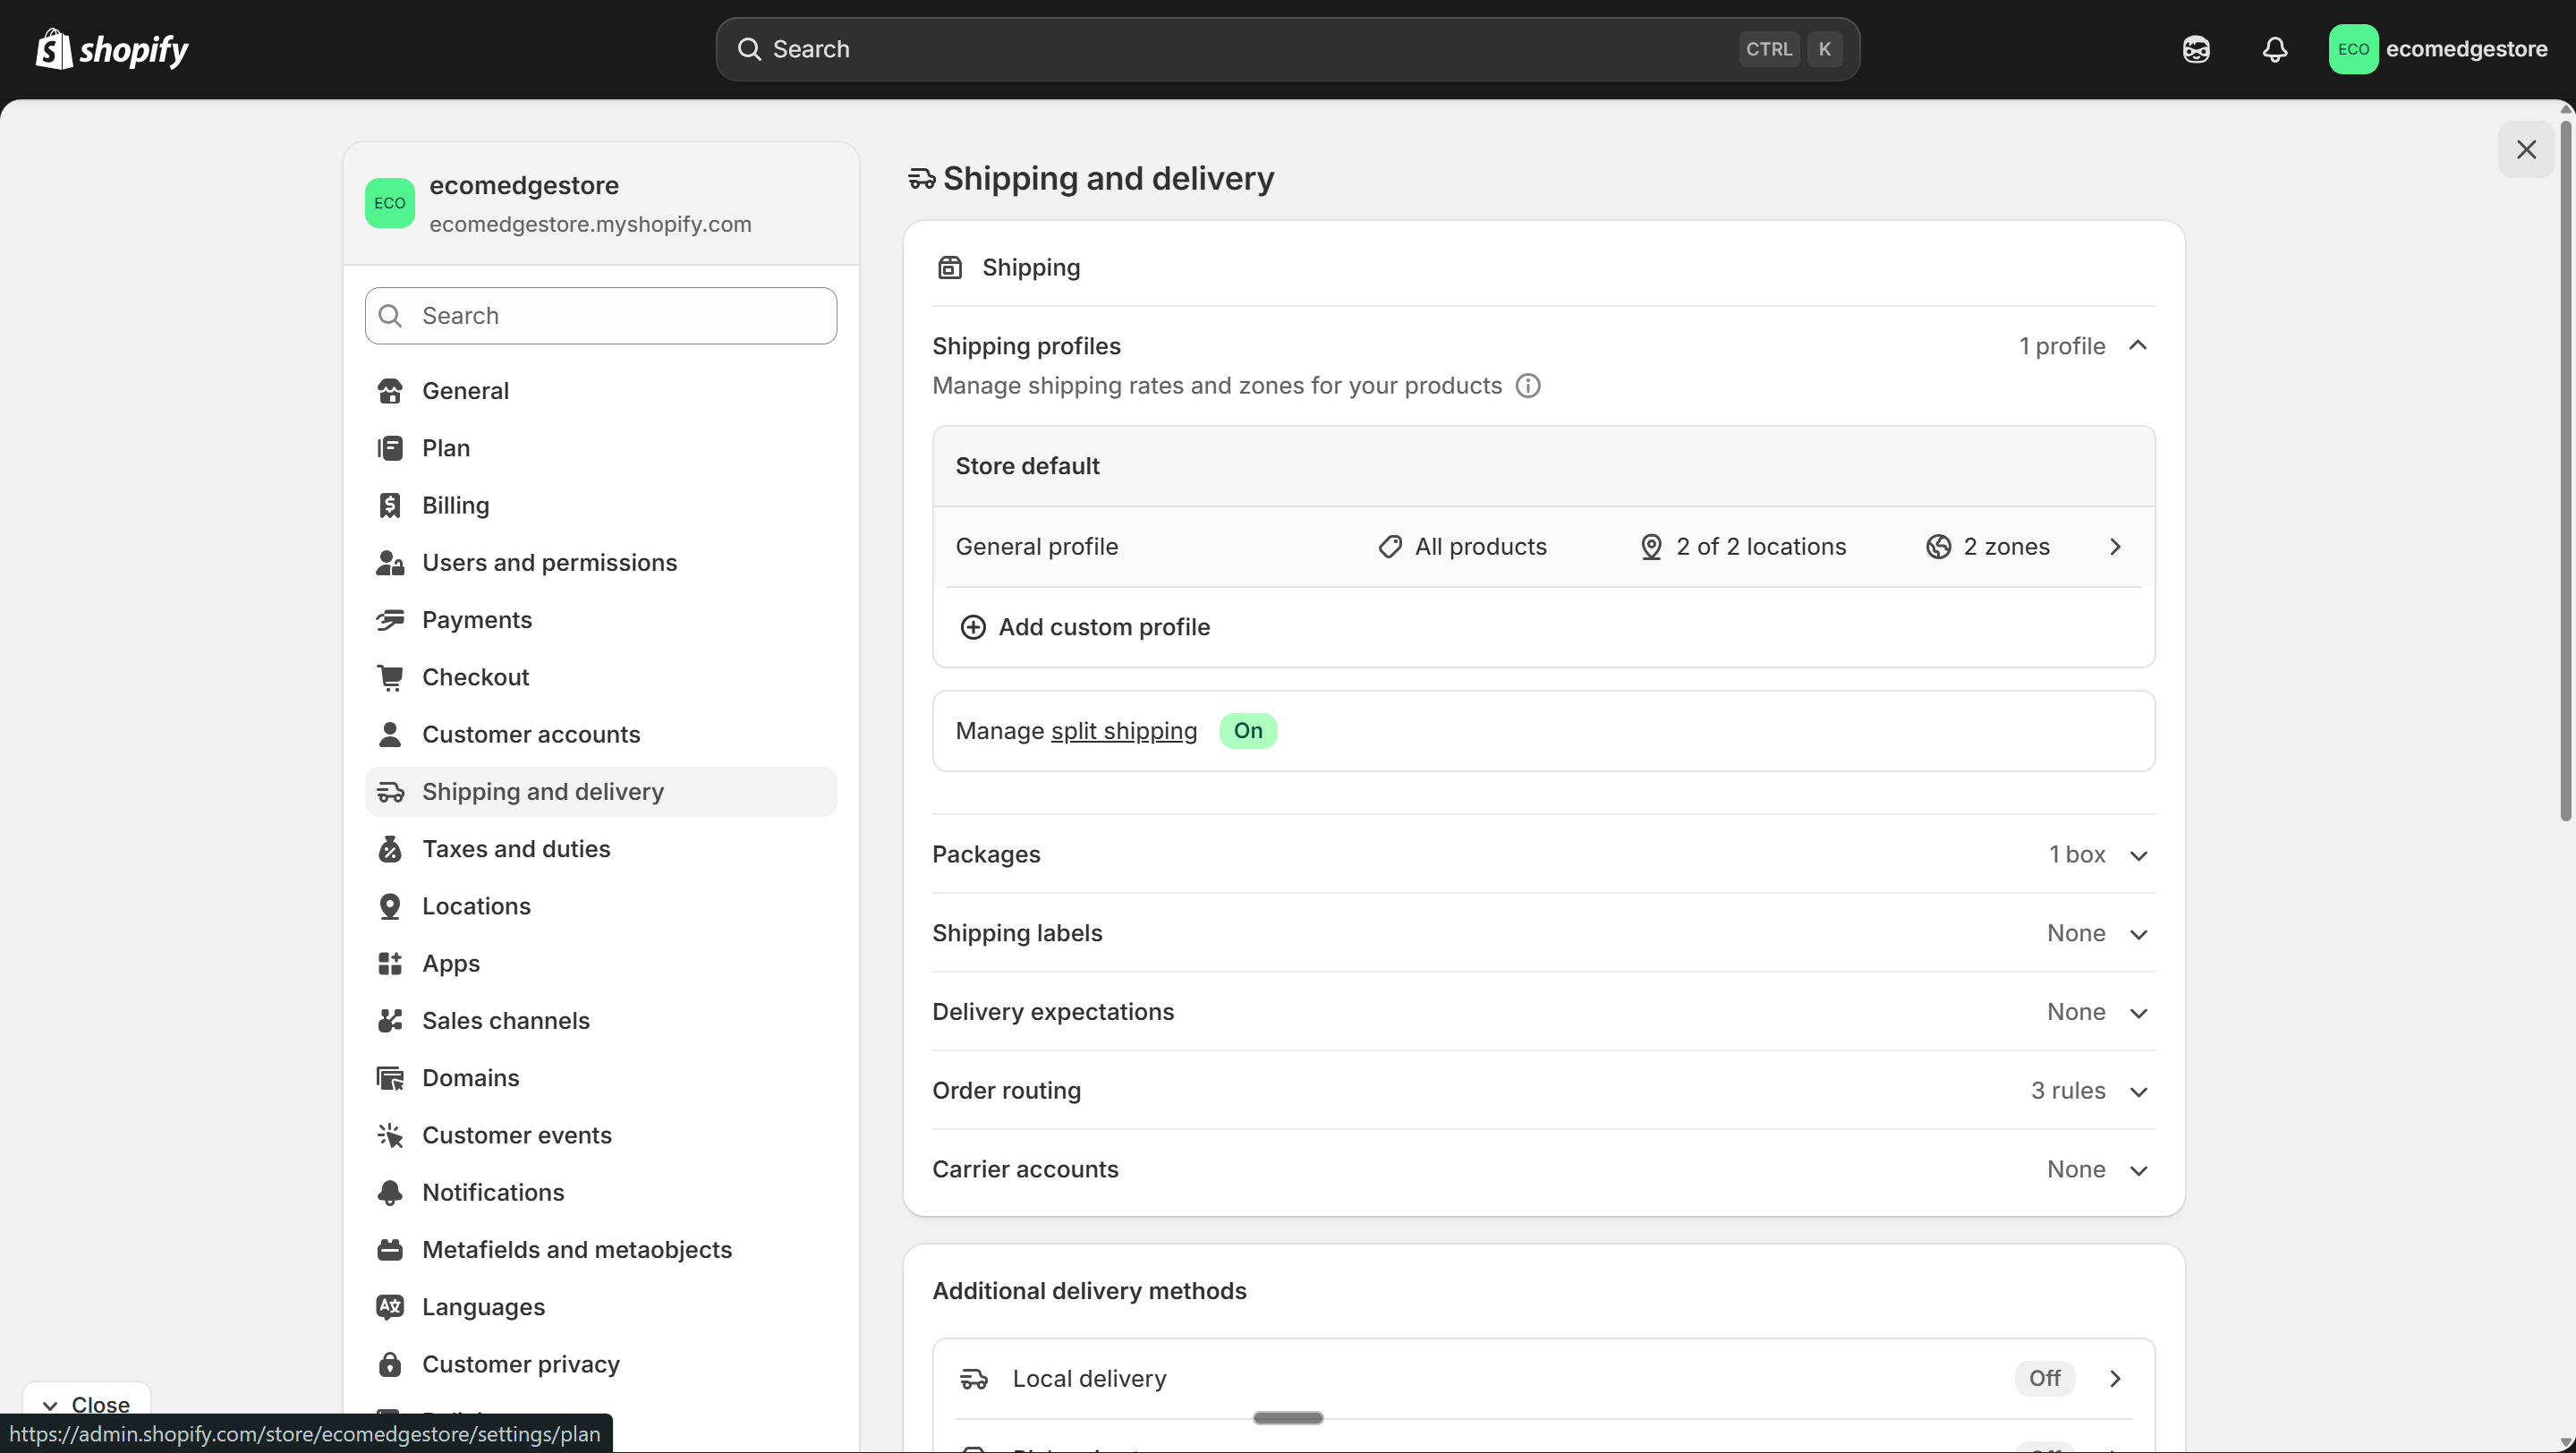
Shipping and delivery — your General profile covers all products. Click it to add zones and rates.
Shopify Admin
- Inside the General profile, click "Add zone" → select Asia > India (all states)
- Give it a name like "India" or "Domestic"

Create a new zone — select India with all 37 states checked
Shopify Admin
- After creating the zone, add a shipping rate — click "Add rate"
- Set Free shipping (price = 0) — we don't charge any shipping. Bake the cost into your product price instead.
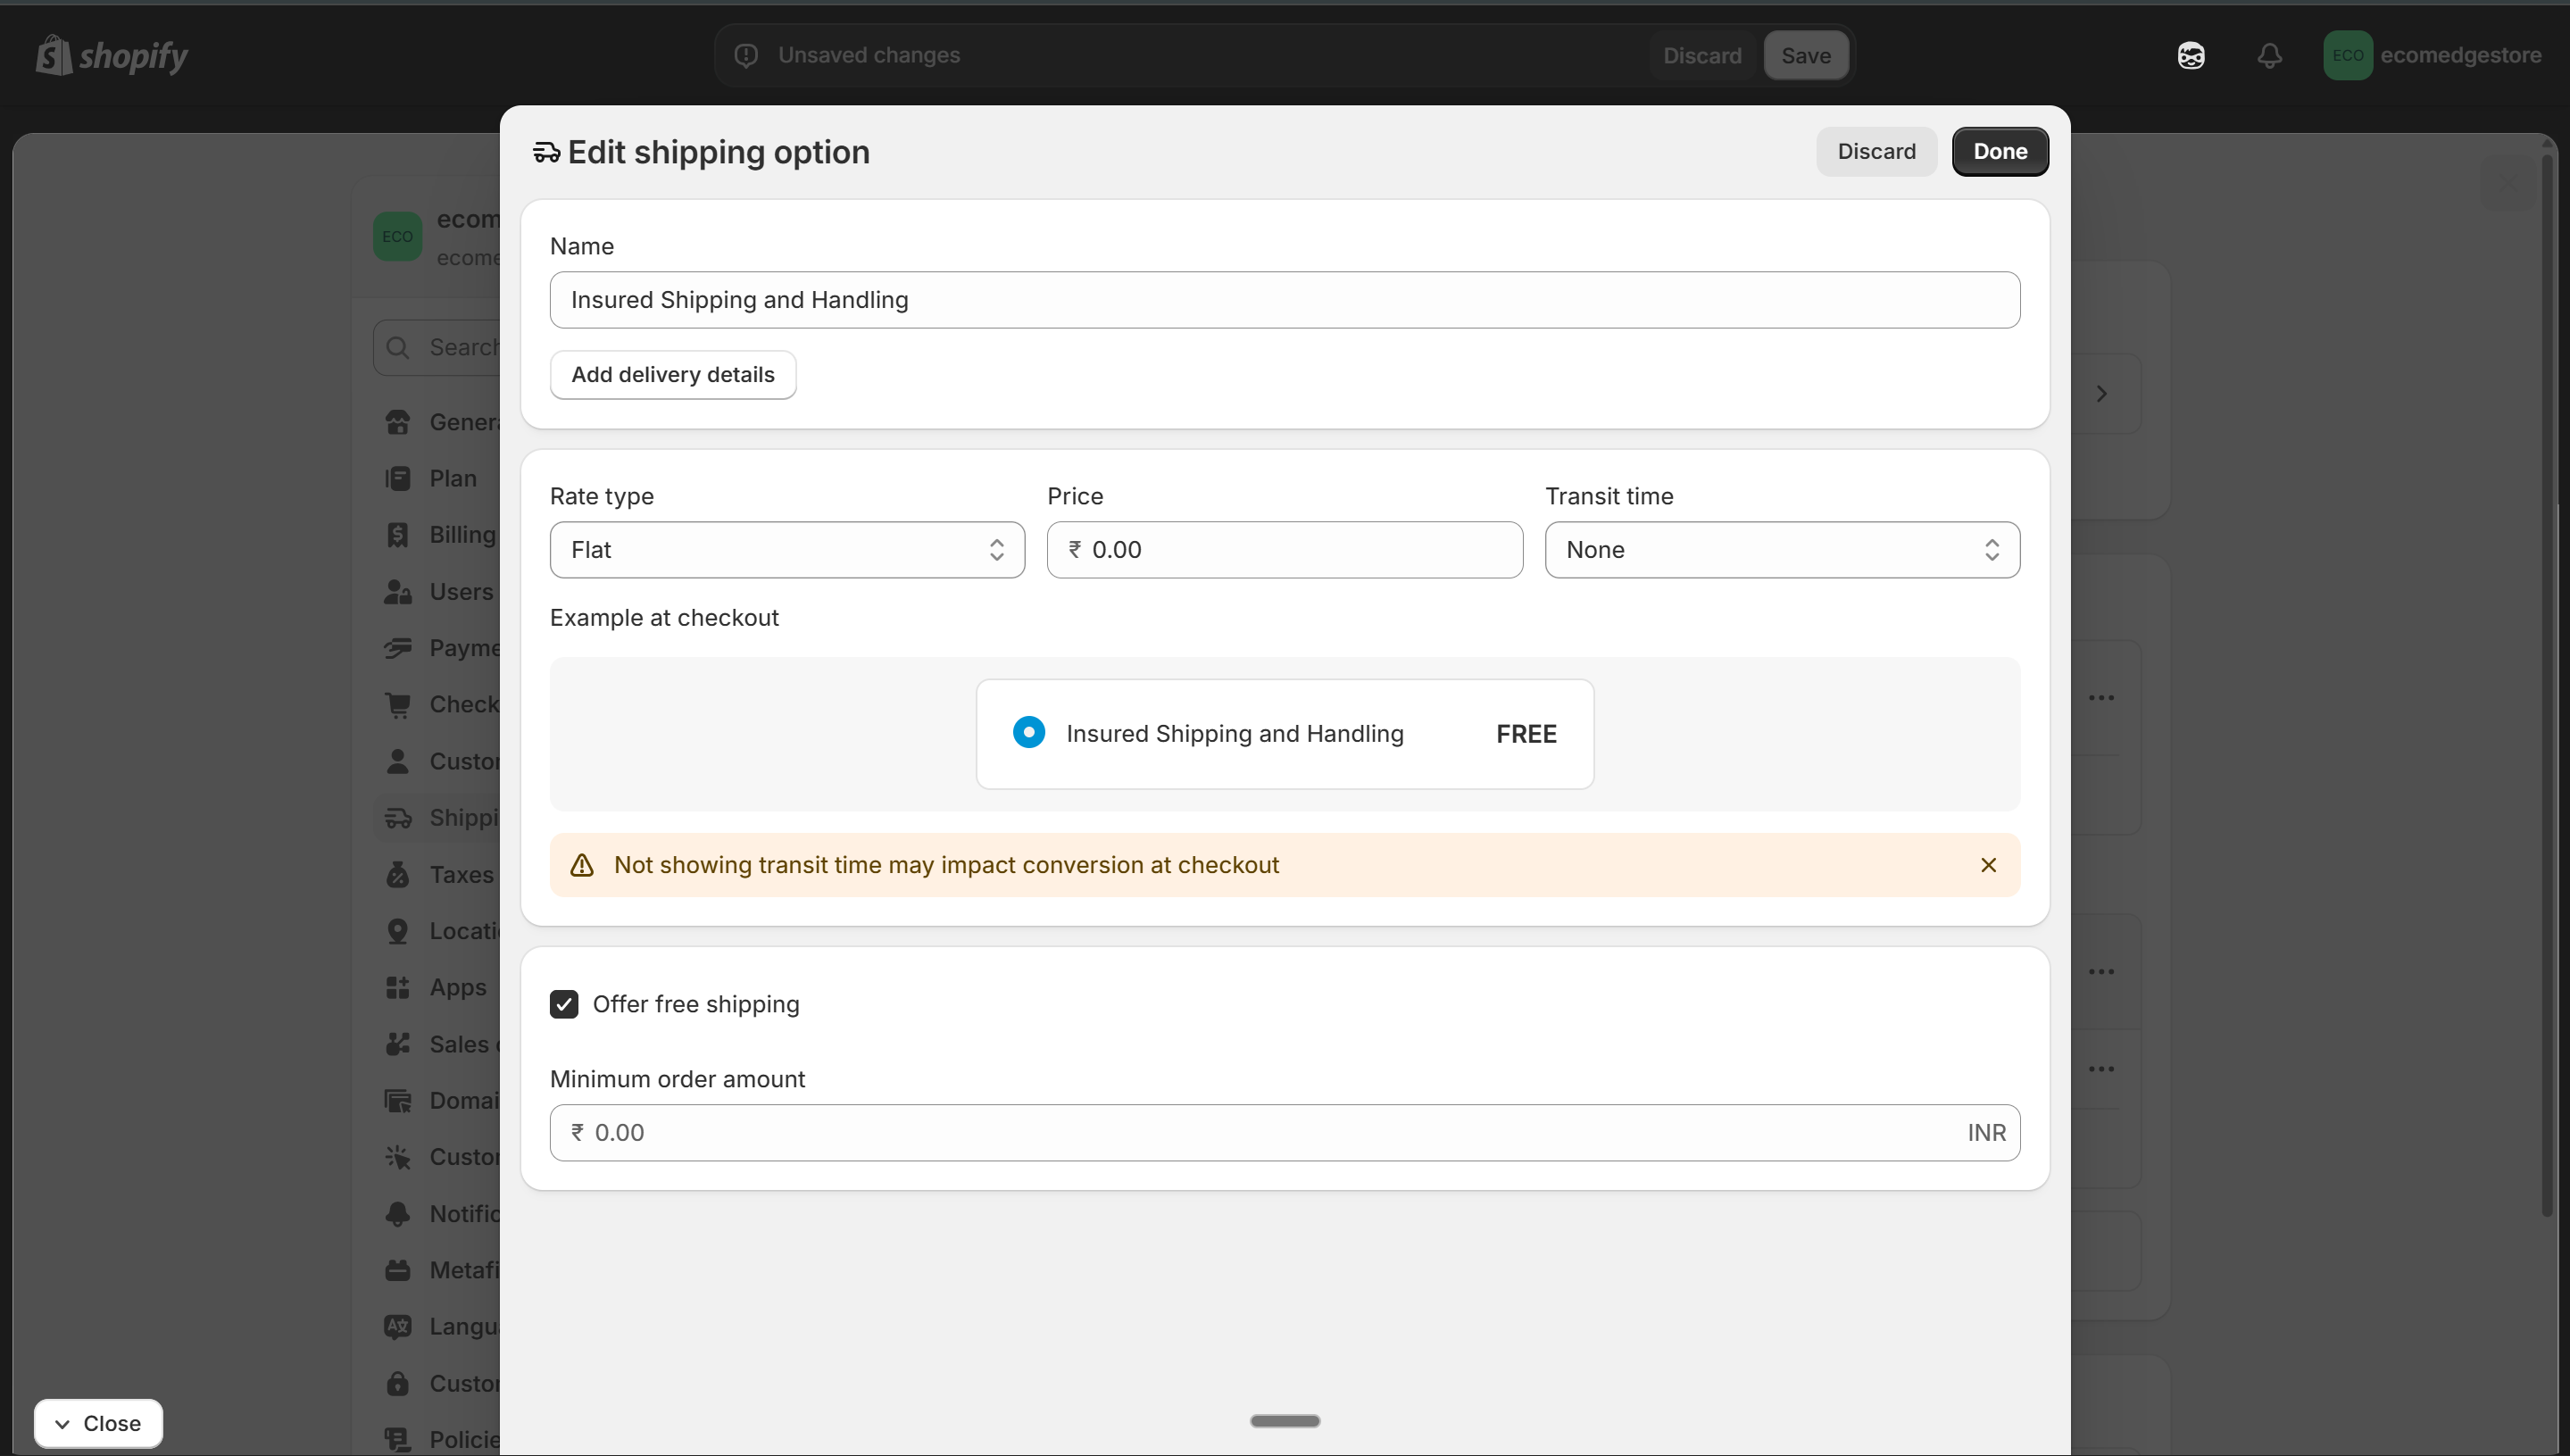
Set your shipping rate — free shipping (Rs 0) is recommended for higher conversion
Shopify Admin
- Once saved, your shipping profile should show the zone with a rate attached
- If you use a supplier app (like Roposo), add it as a fulfillment location in the shipping profile
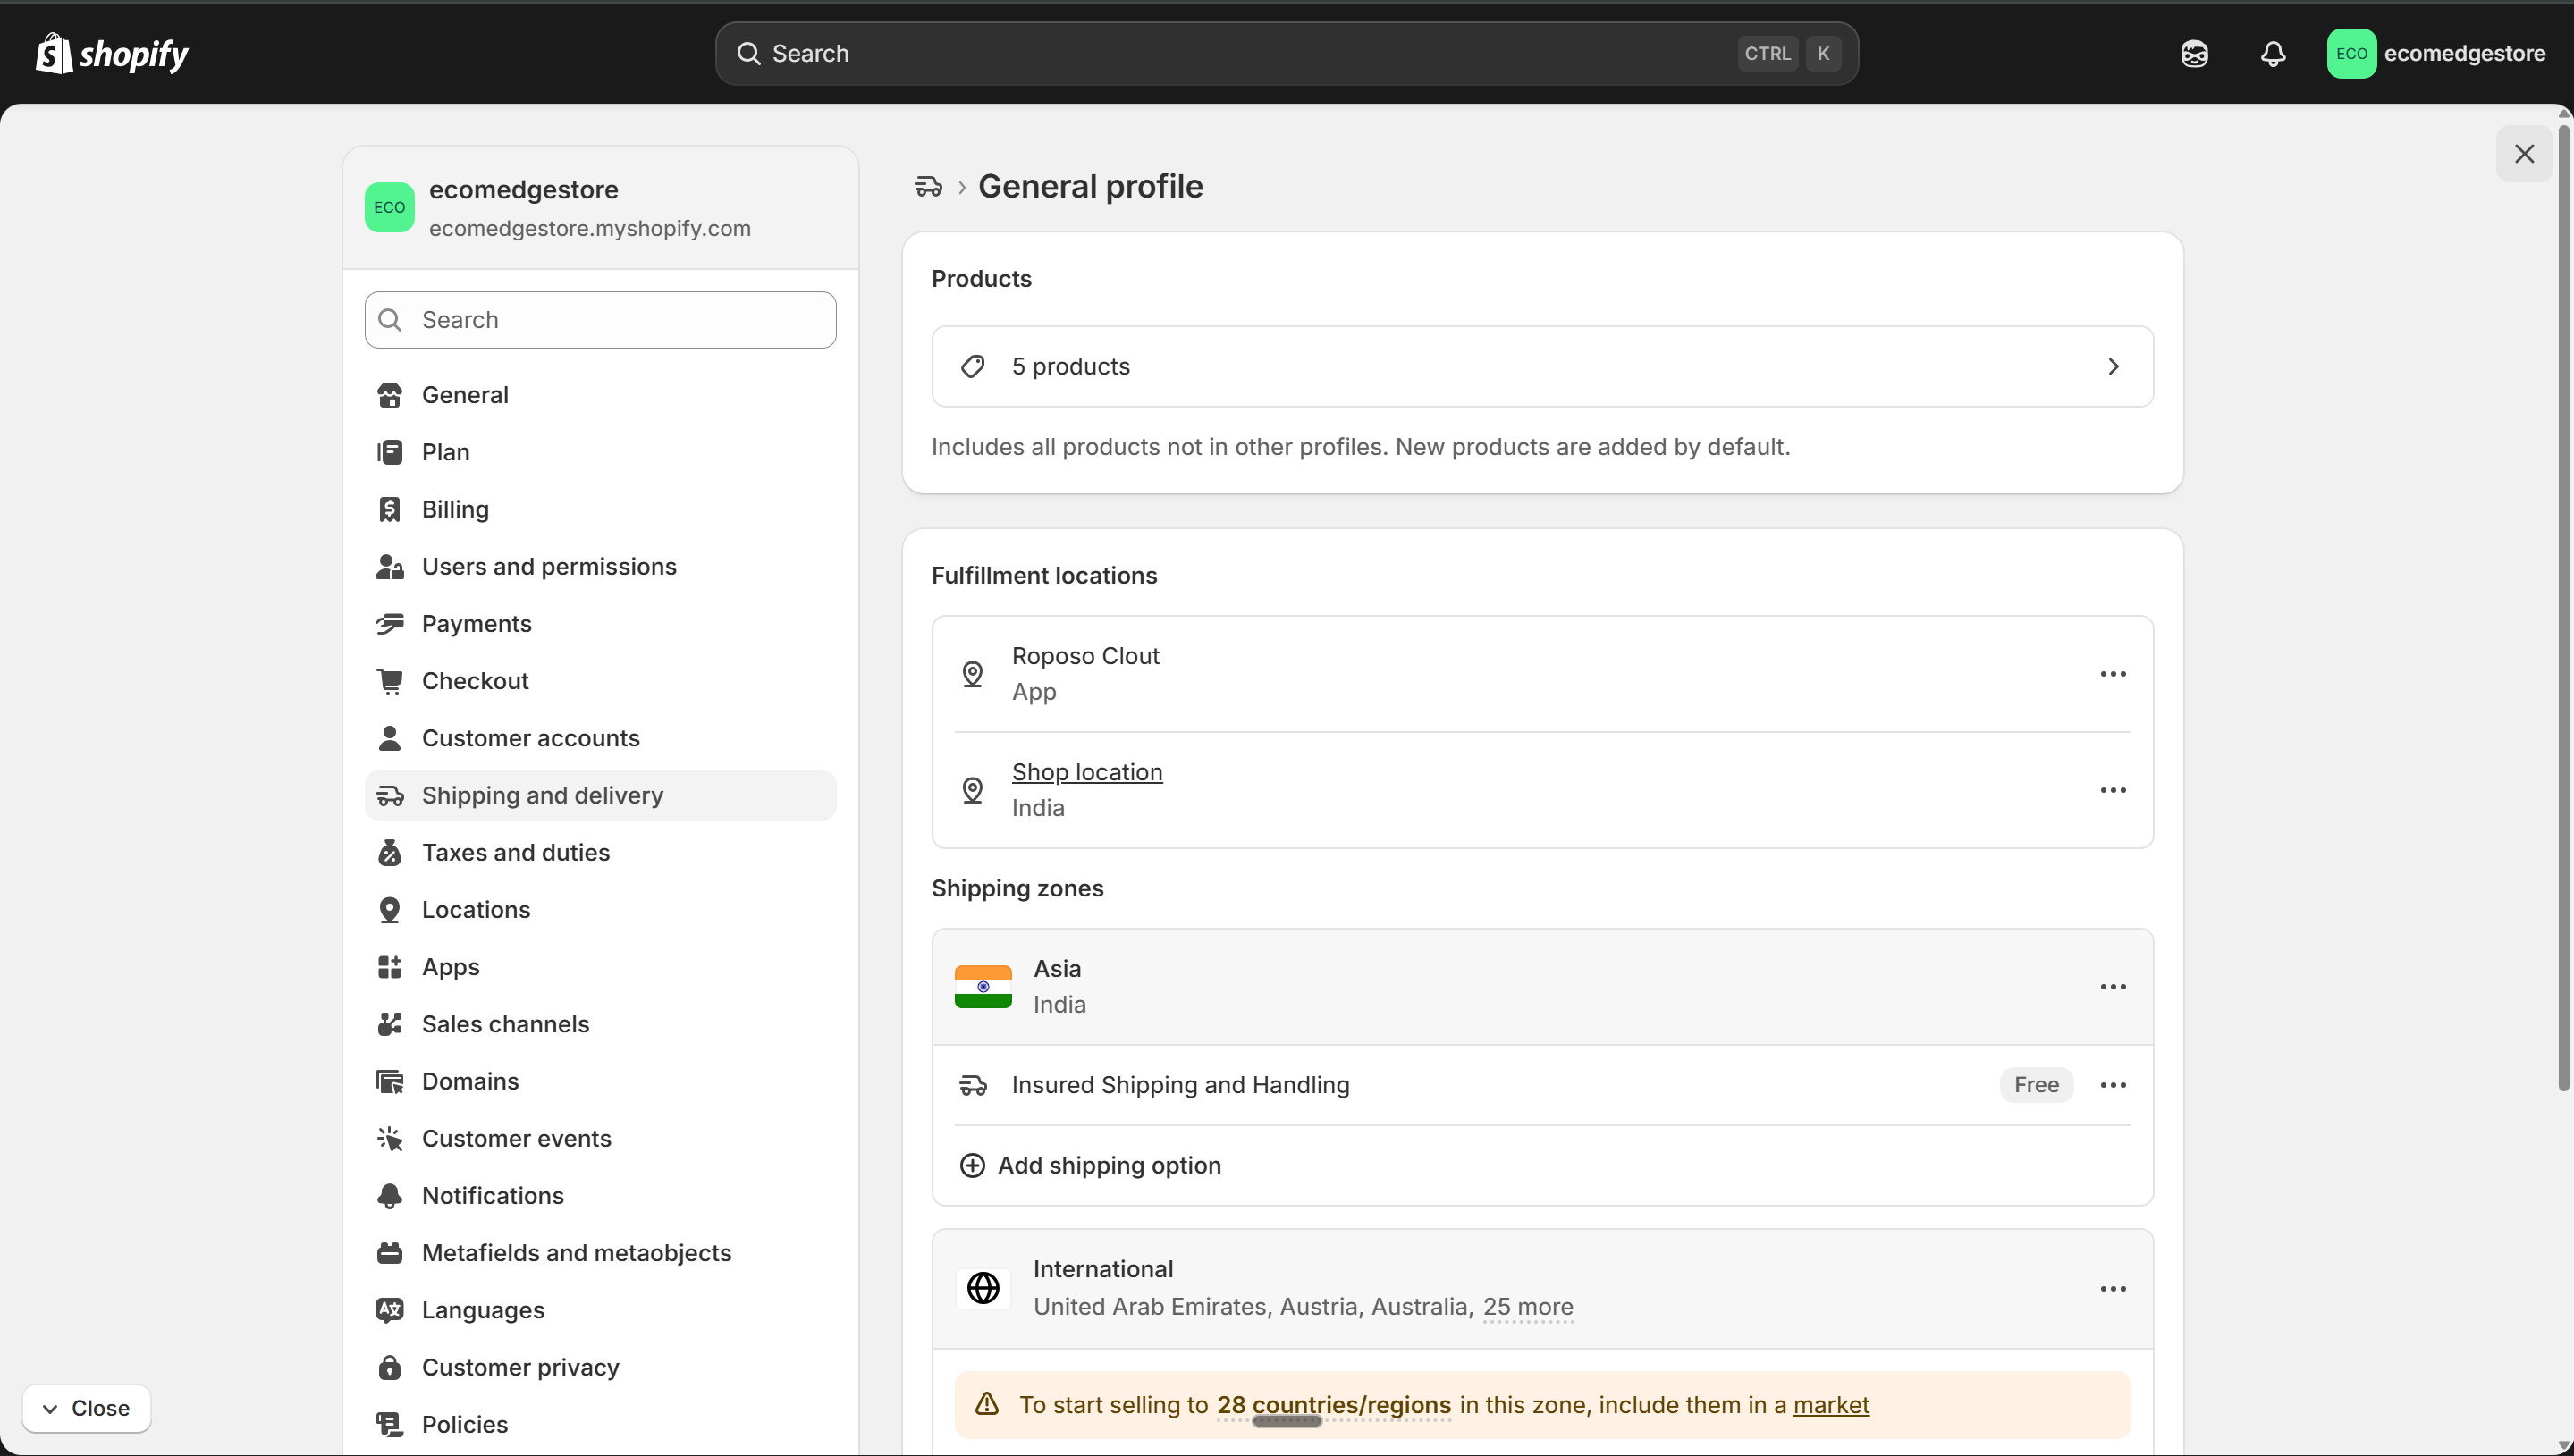
Done — India zone with "Insured Shipping and Handling" rate set to Free
Shopify Admin
Common problem: "Not fulfilling from this location"
When you add a supplier app (like Roposo), it creates a new fulfillment location. That location appears under "Not fulfilling from" with no shipping rates. You MUST add a shipping zone and rate for that location too — otherwise orders from that supplier won't ship.
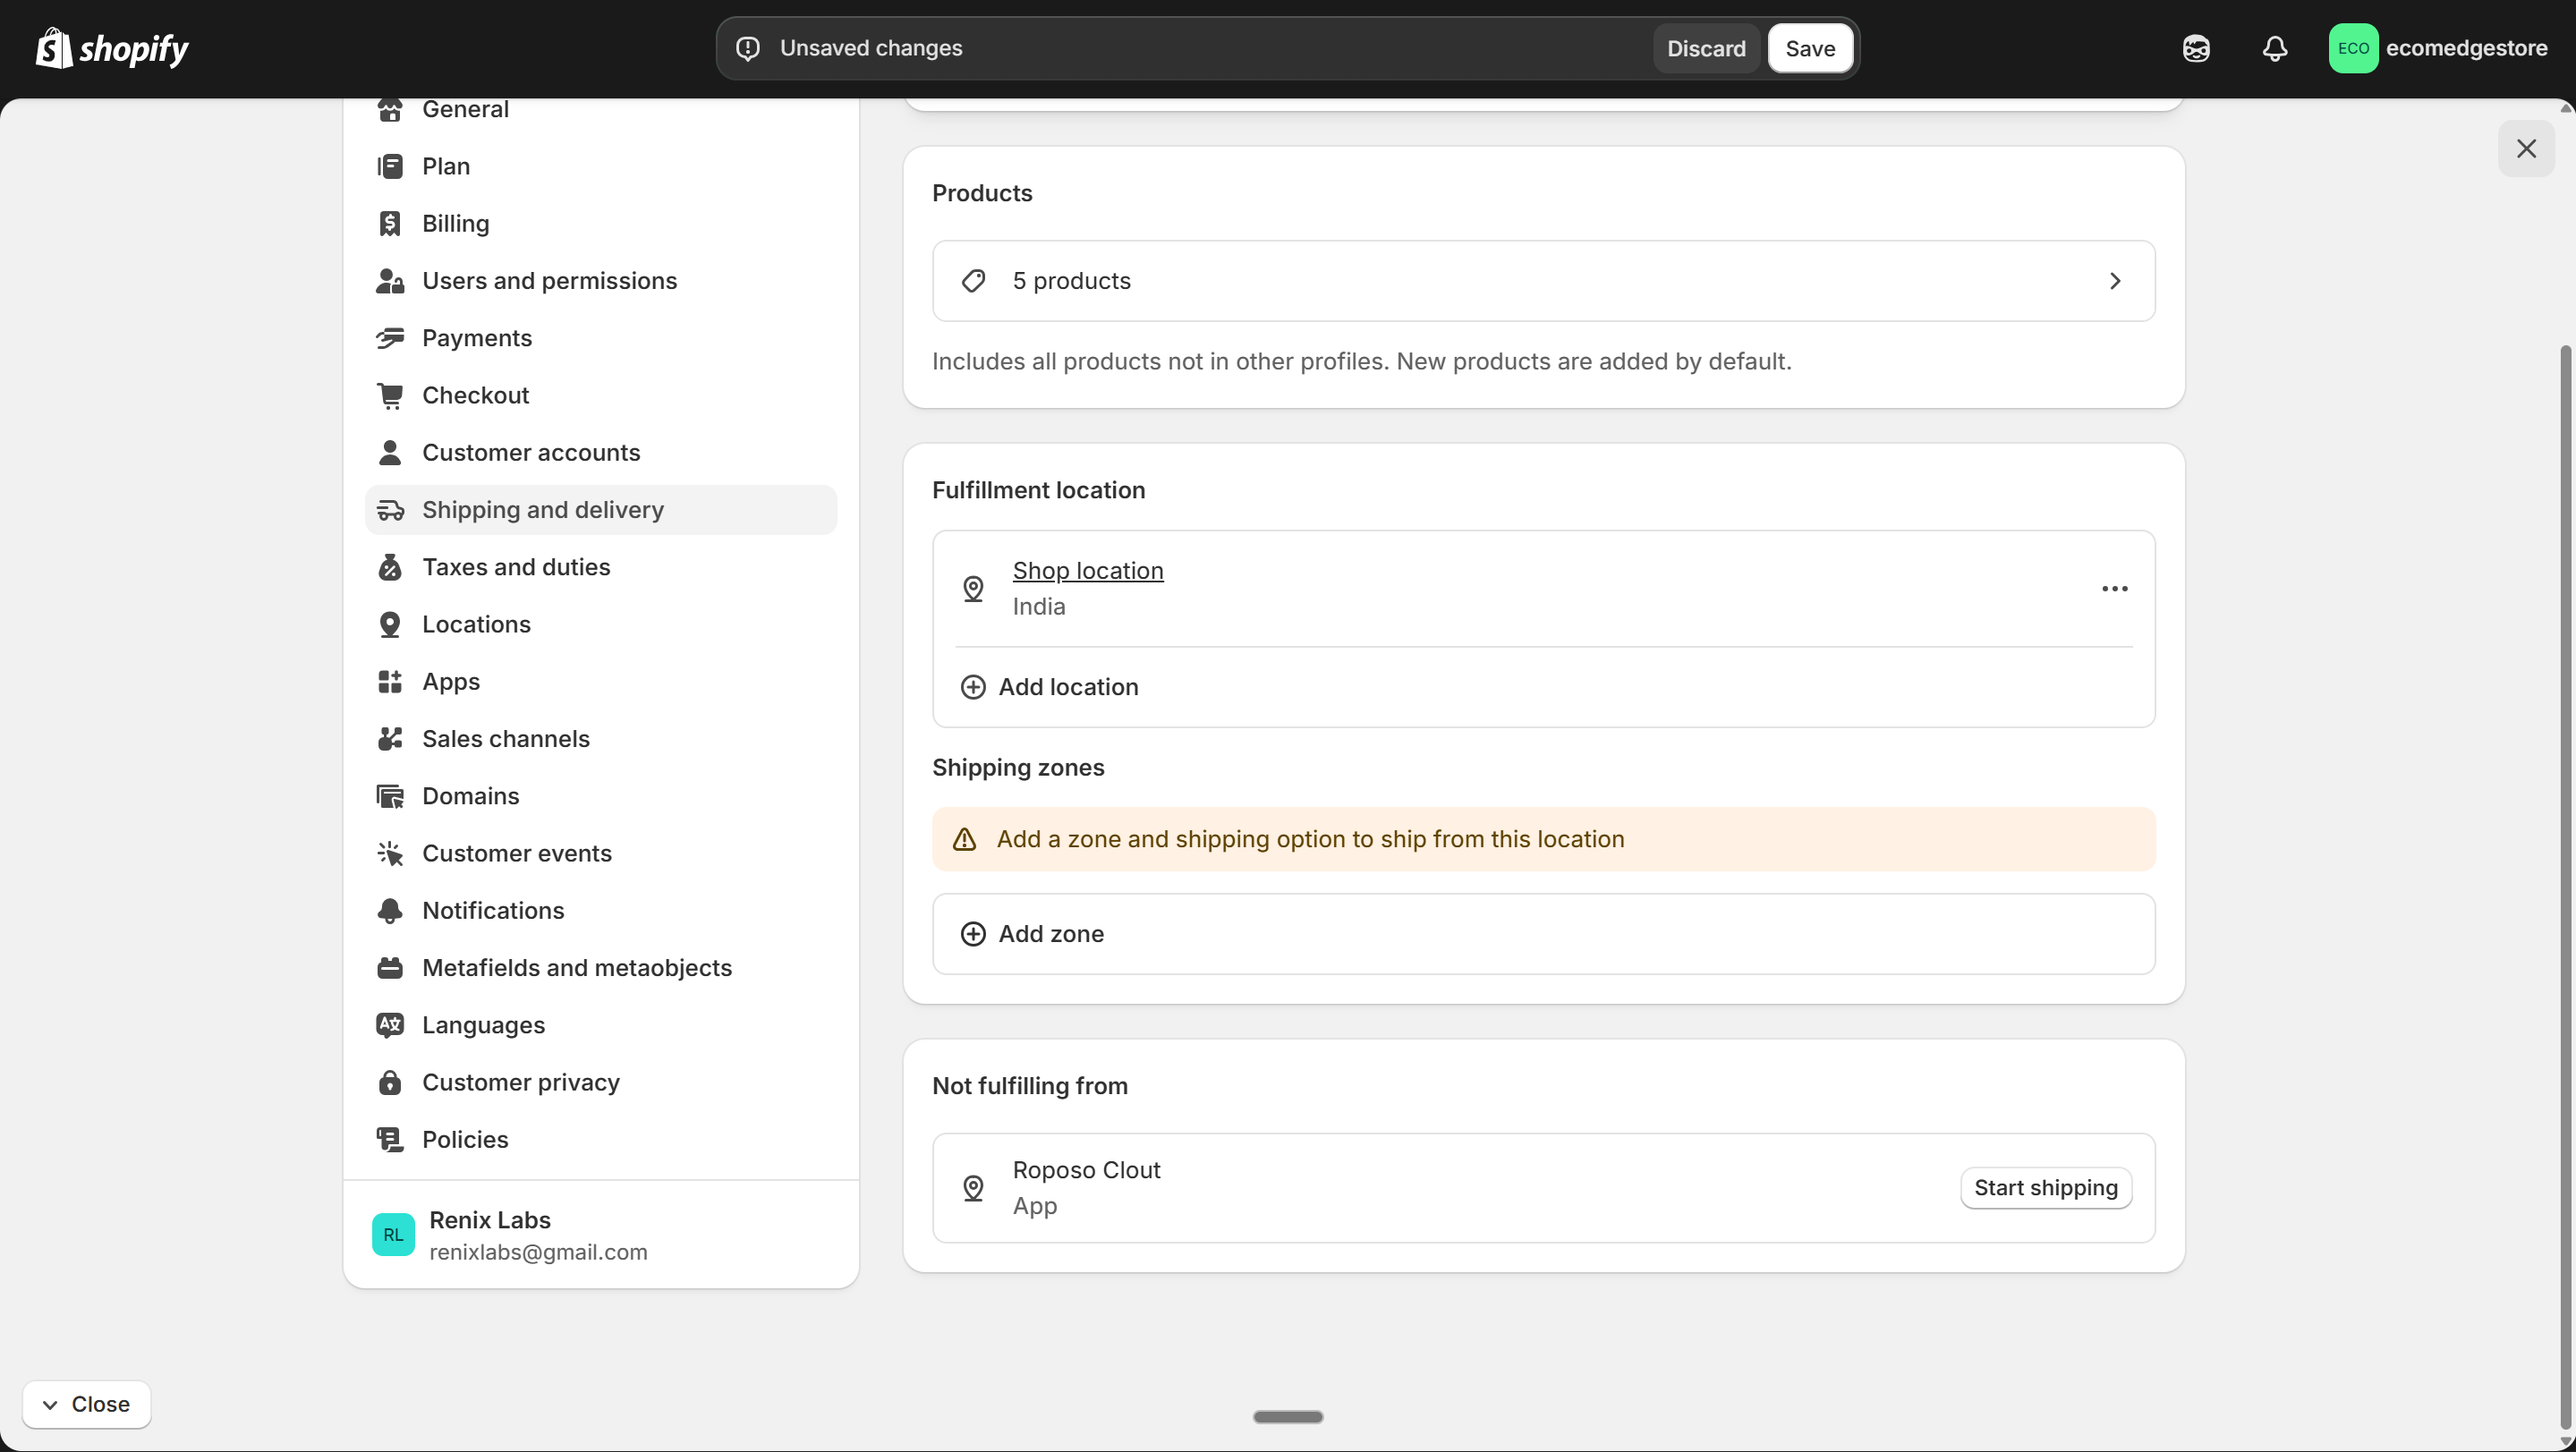
New locations appear under "Not fulfilling from" — add a zone and shipping rate for each one
Shopify Admin
Shipping partner integration. If you're using a third-party shipping partner (Shiprocket, Delhivery, etc.), add their app first — it creates shipping rates automatically. You may not need to set manual rates at all.
4
Payment Methods
- Go to Settings > Payments — this is where you set up how customers pay you
- Payment capture: keep it on "Automatically at checkout" — money is collected the moment they pay
- For COD (Cash on Delivery): scroll down to Manual payment methods and add it
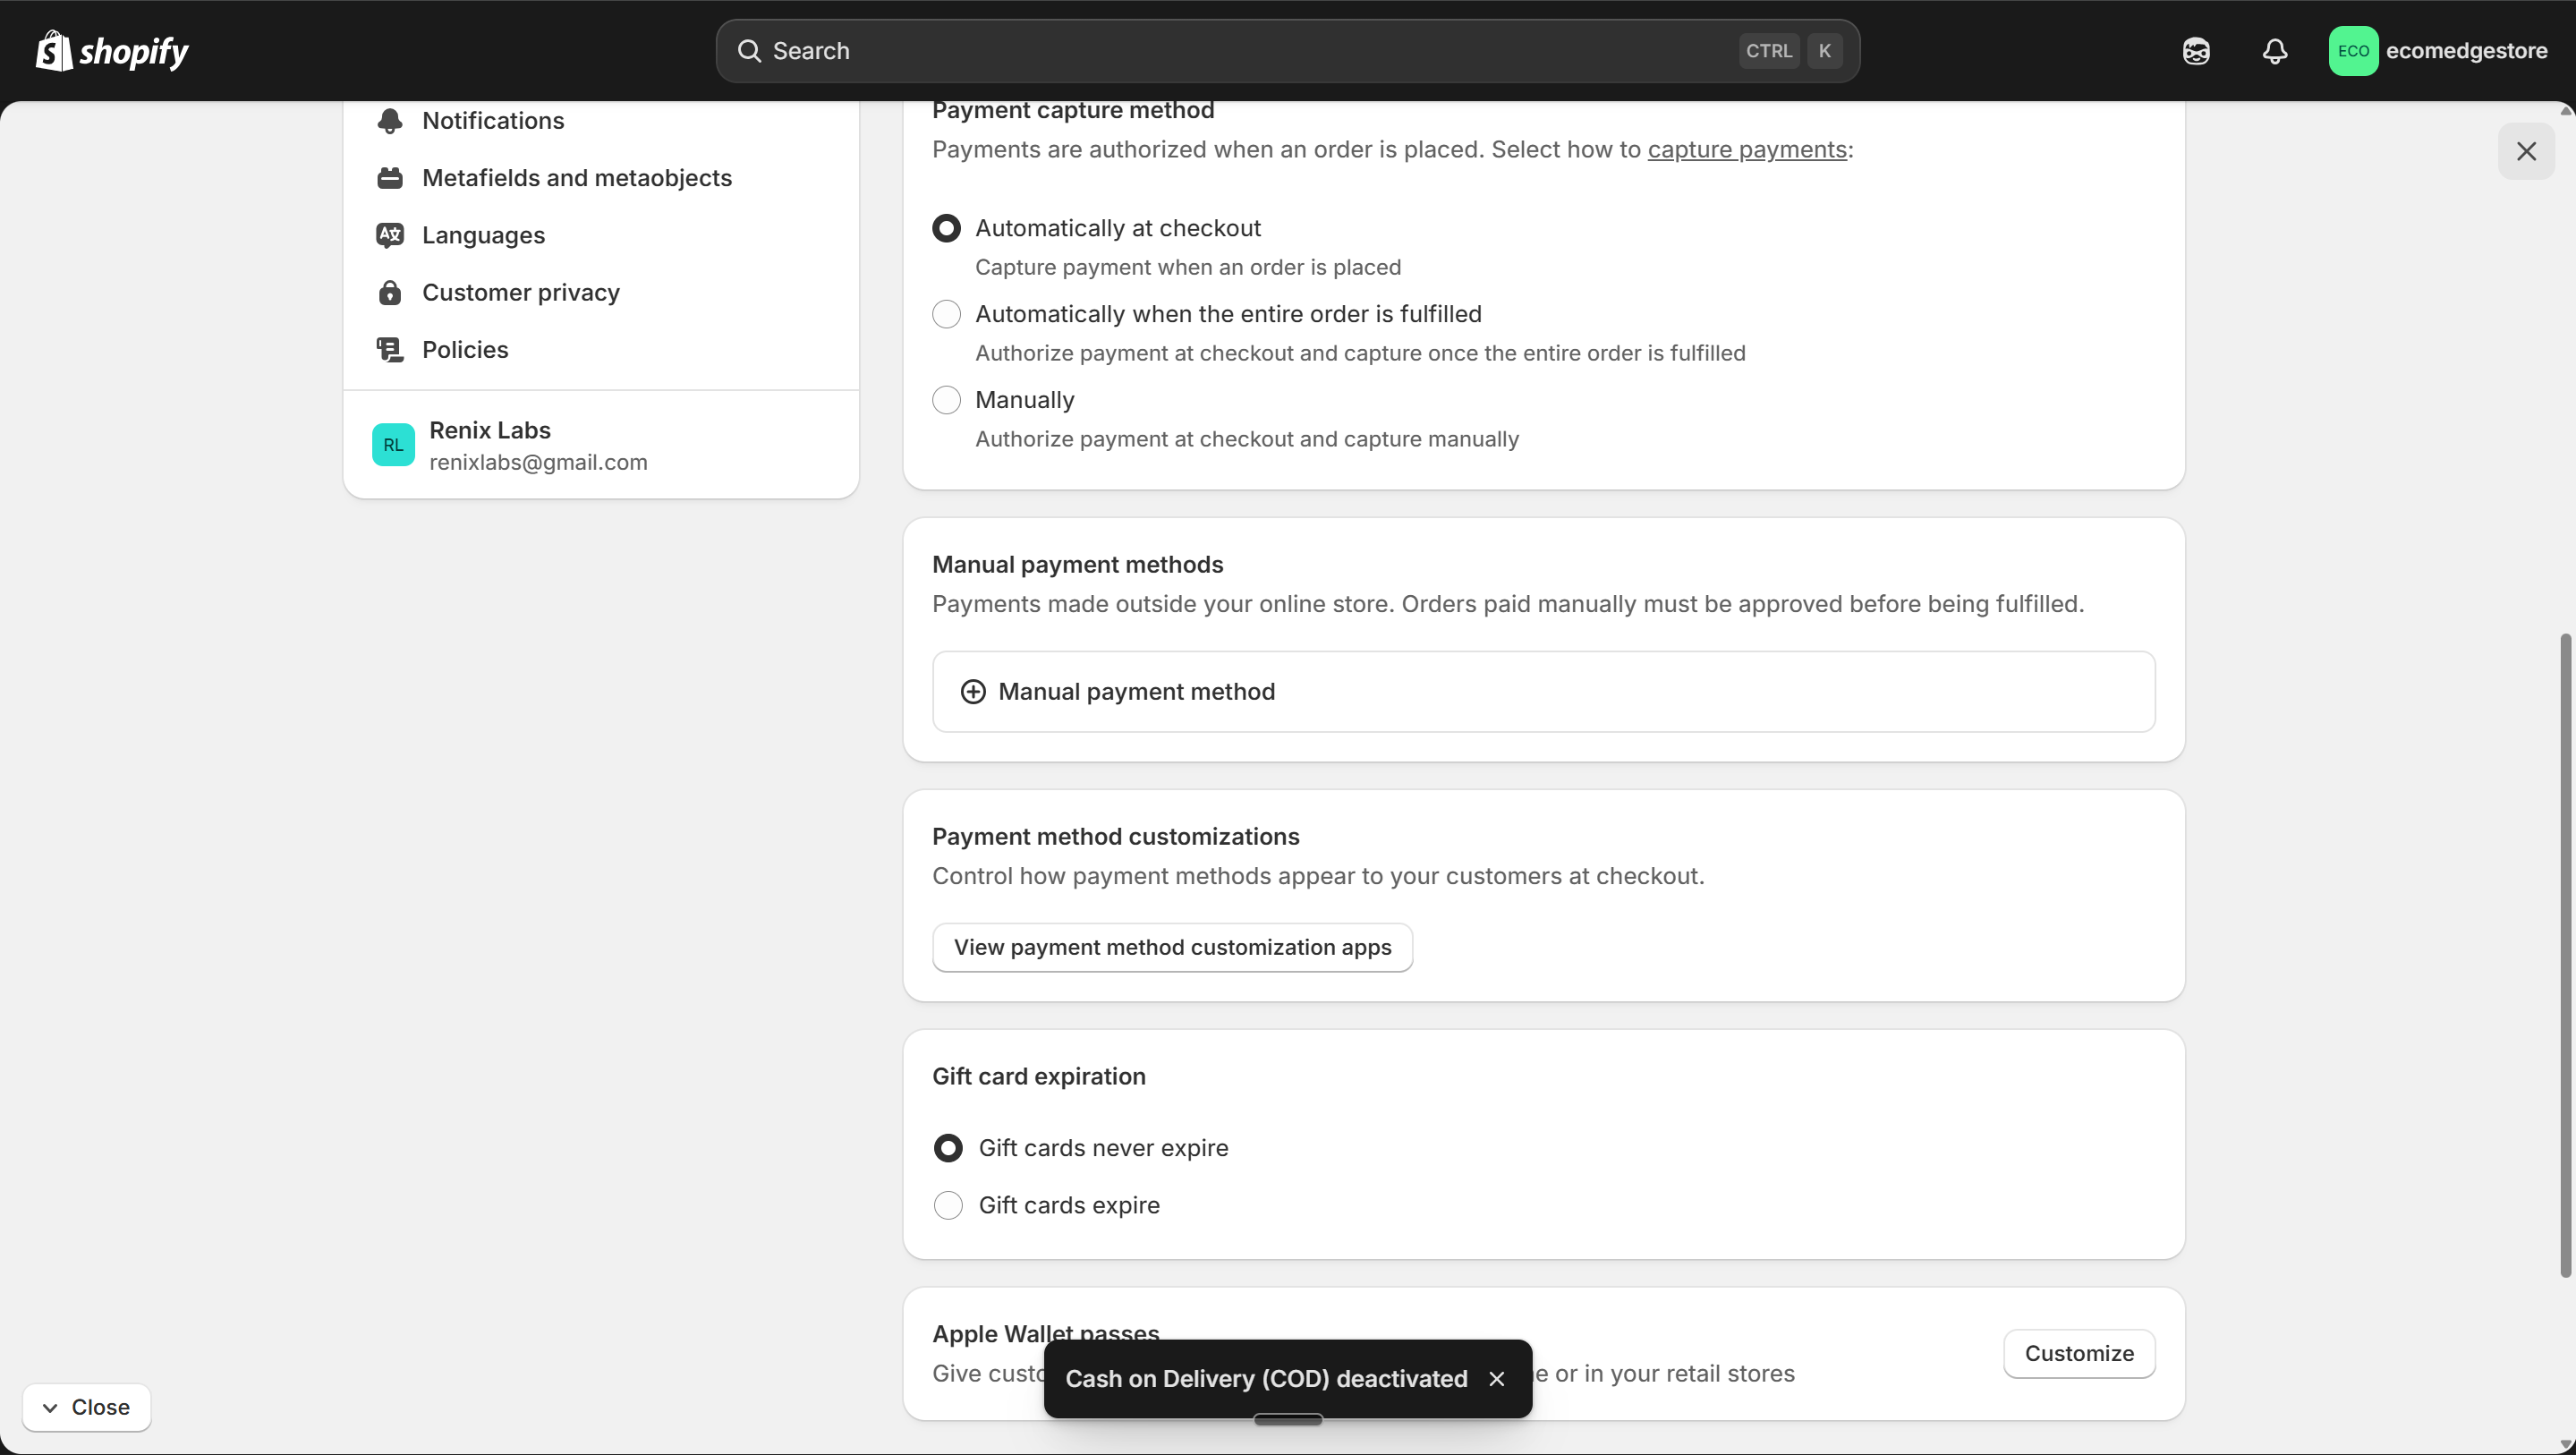
Settings > Payments — automatic capture is set, manual payment methods below
Shopify Admin
- Click "Add manual payment method" → name it "Cash On Delivery"
- You can add payment instructions (e.g., "Pay cash to the delivery partner at your doorstep")
- Click Activate — COD is now live on your store
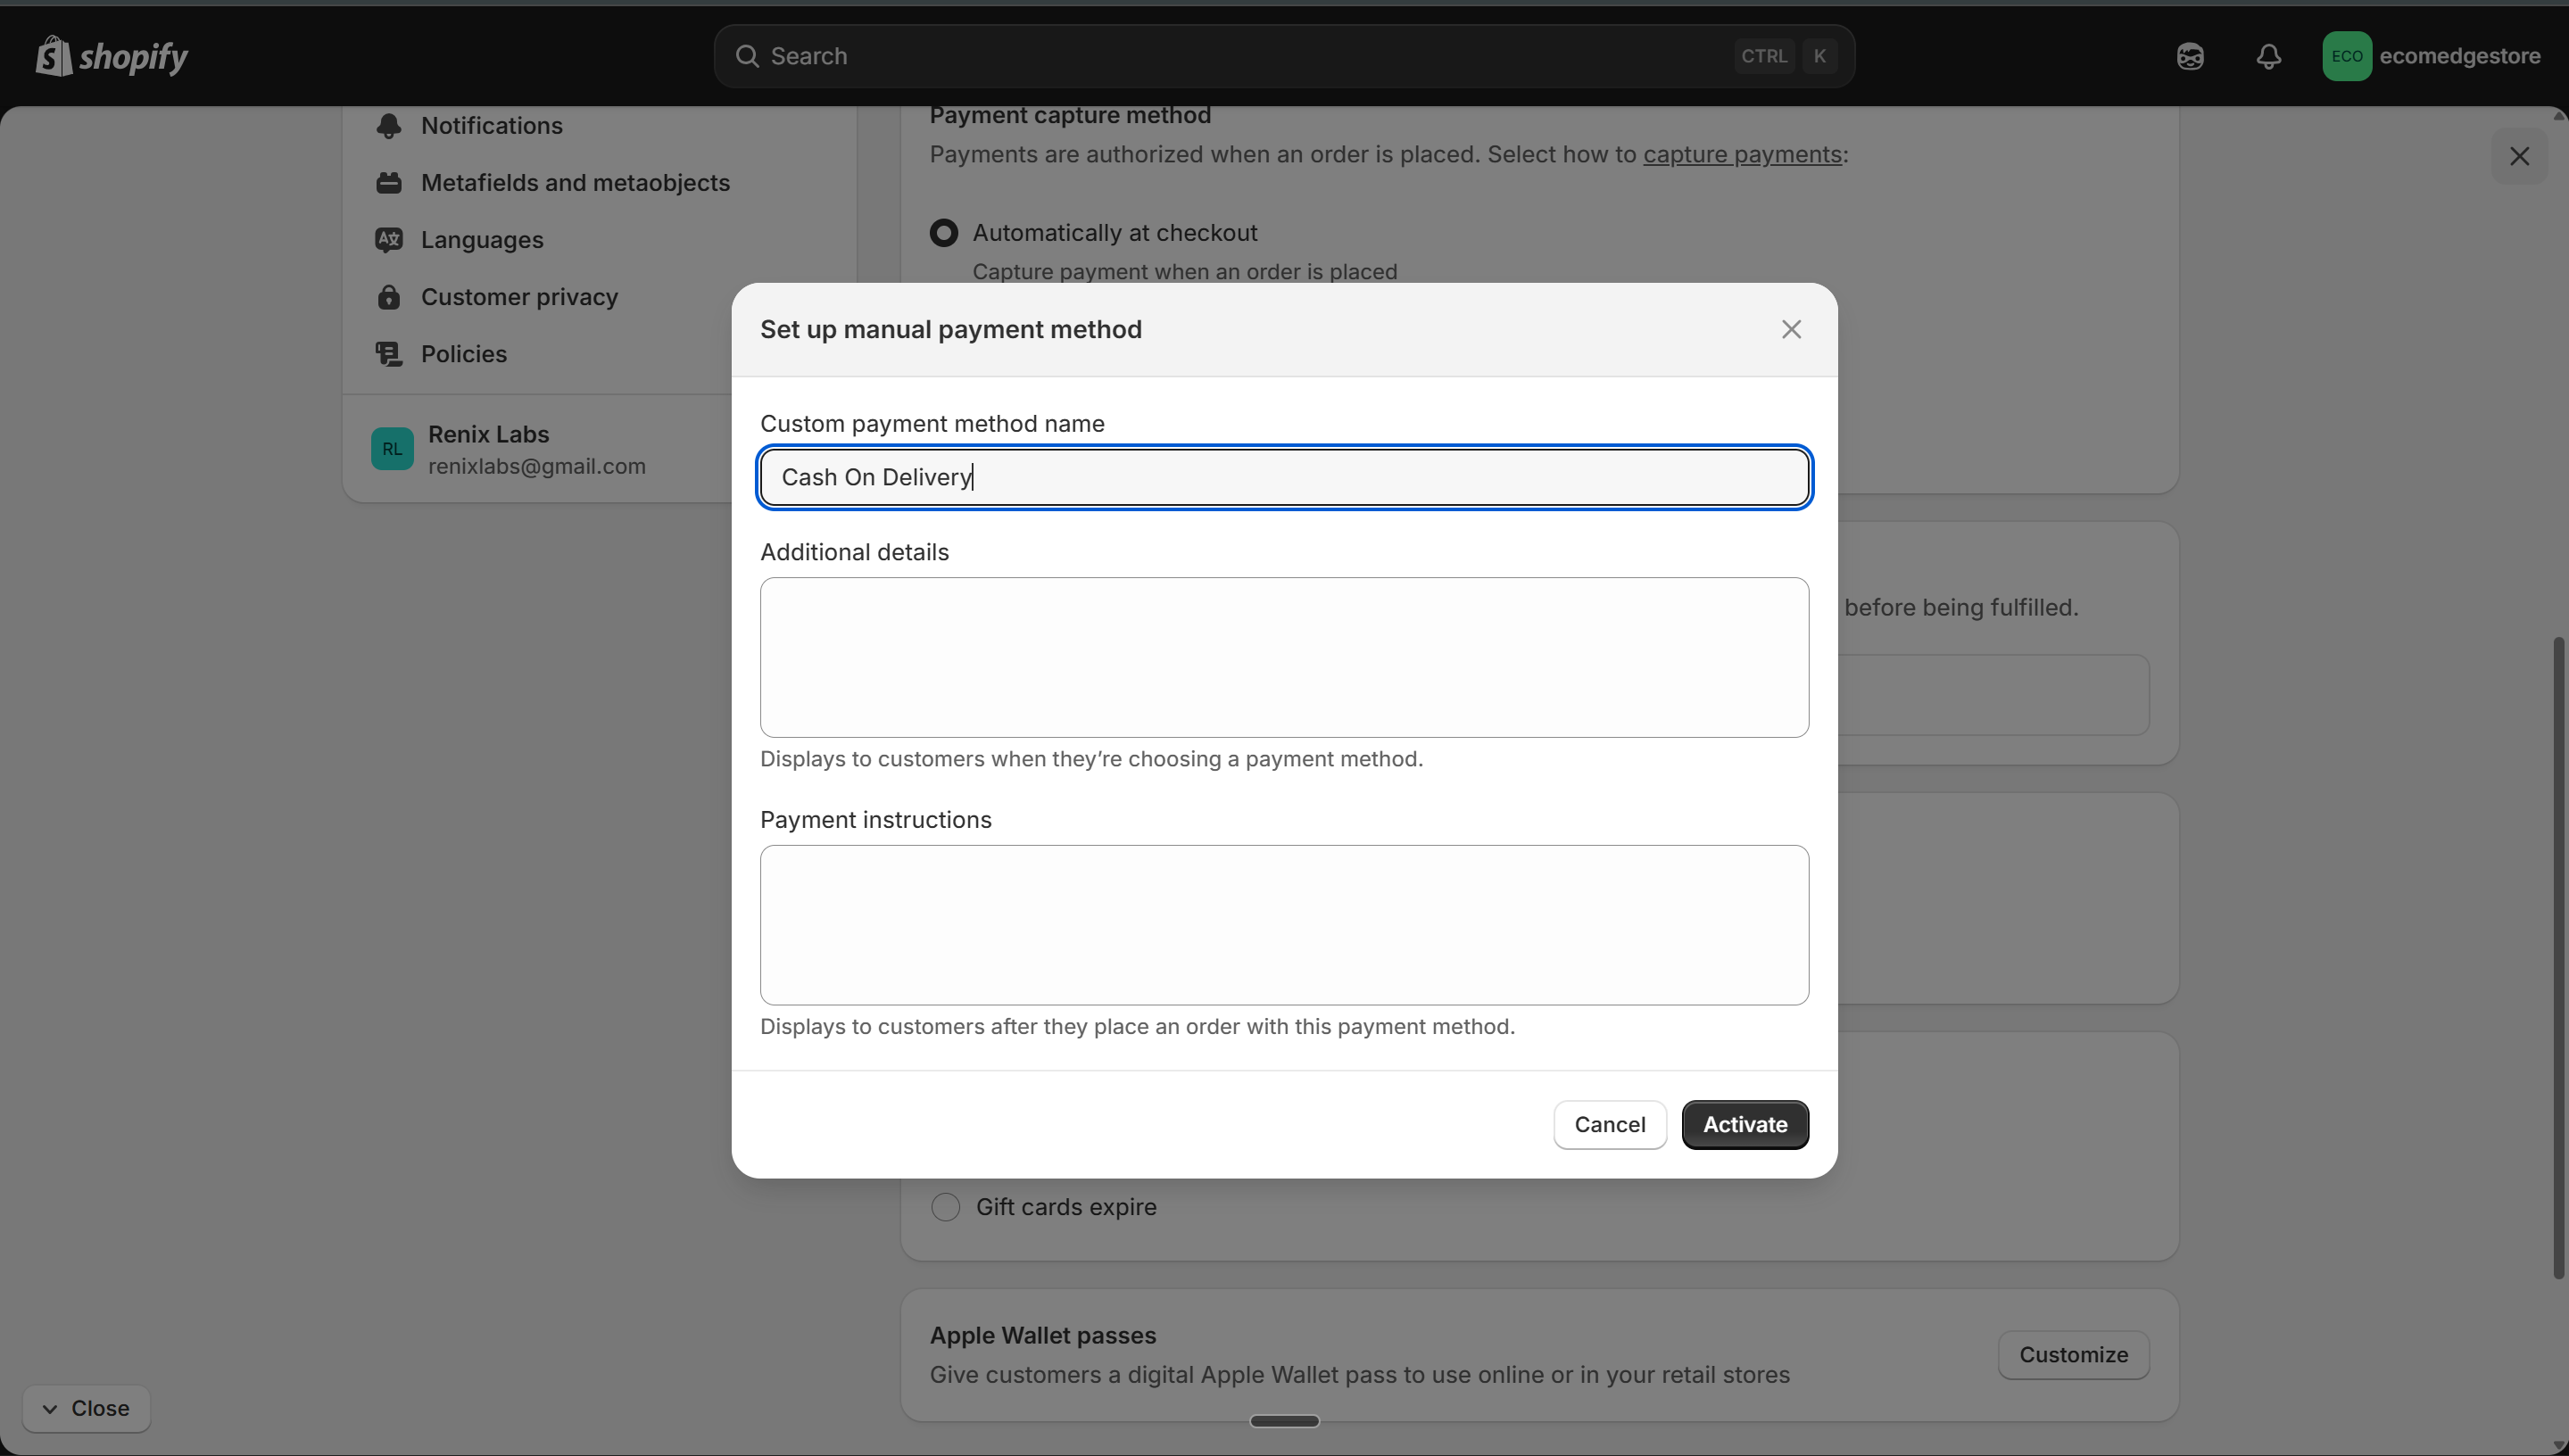
Add "Cash On Delivery" as a manual payment method — essential for Indian D2C
Shopify Admin
Prepaid payments (Razorpay, PhonePe, Cashfree)
Go to Settings > Payments > choose a provider. Most require you to sign up on their platform first. Contact their support team or use Shopify Sidekick — they'll walk you through the integration.
COD + Prepaid = best combo
Indian customers prefer COD for trust. But prepaid orders have lower return rates. Offer both and let the customer choose.
5
Menus & Navigation
- Go to Online Store > Navigation (or Content > Menus in newer Shopify versions)
- Your store has two default menus: Main menu (top navigation) and Footer menu (bottom links)
- Main menu should have: Home, Catalog (or your collection), Contact, About Us
- Footer menu should have: Search, Refund Policy, Privacy Policy, Shipping Policy, Terms of Service
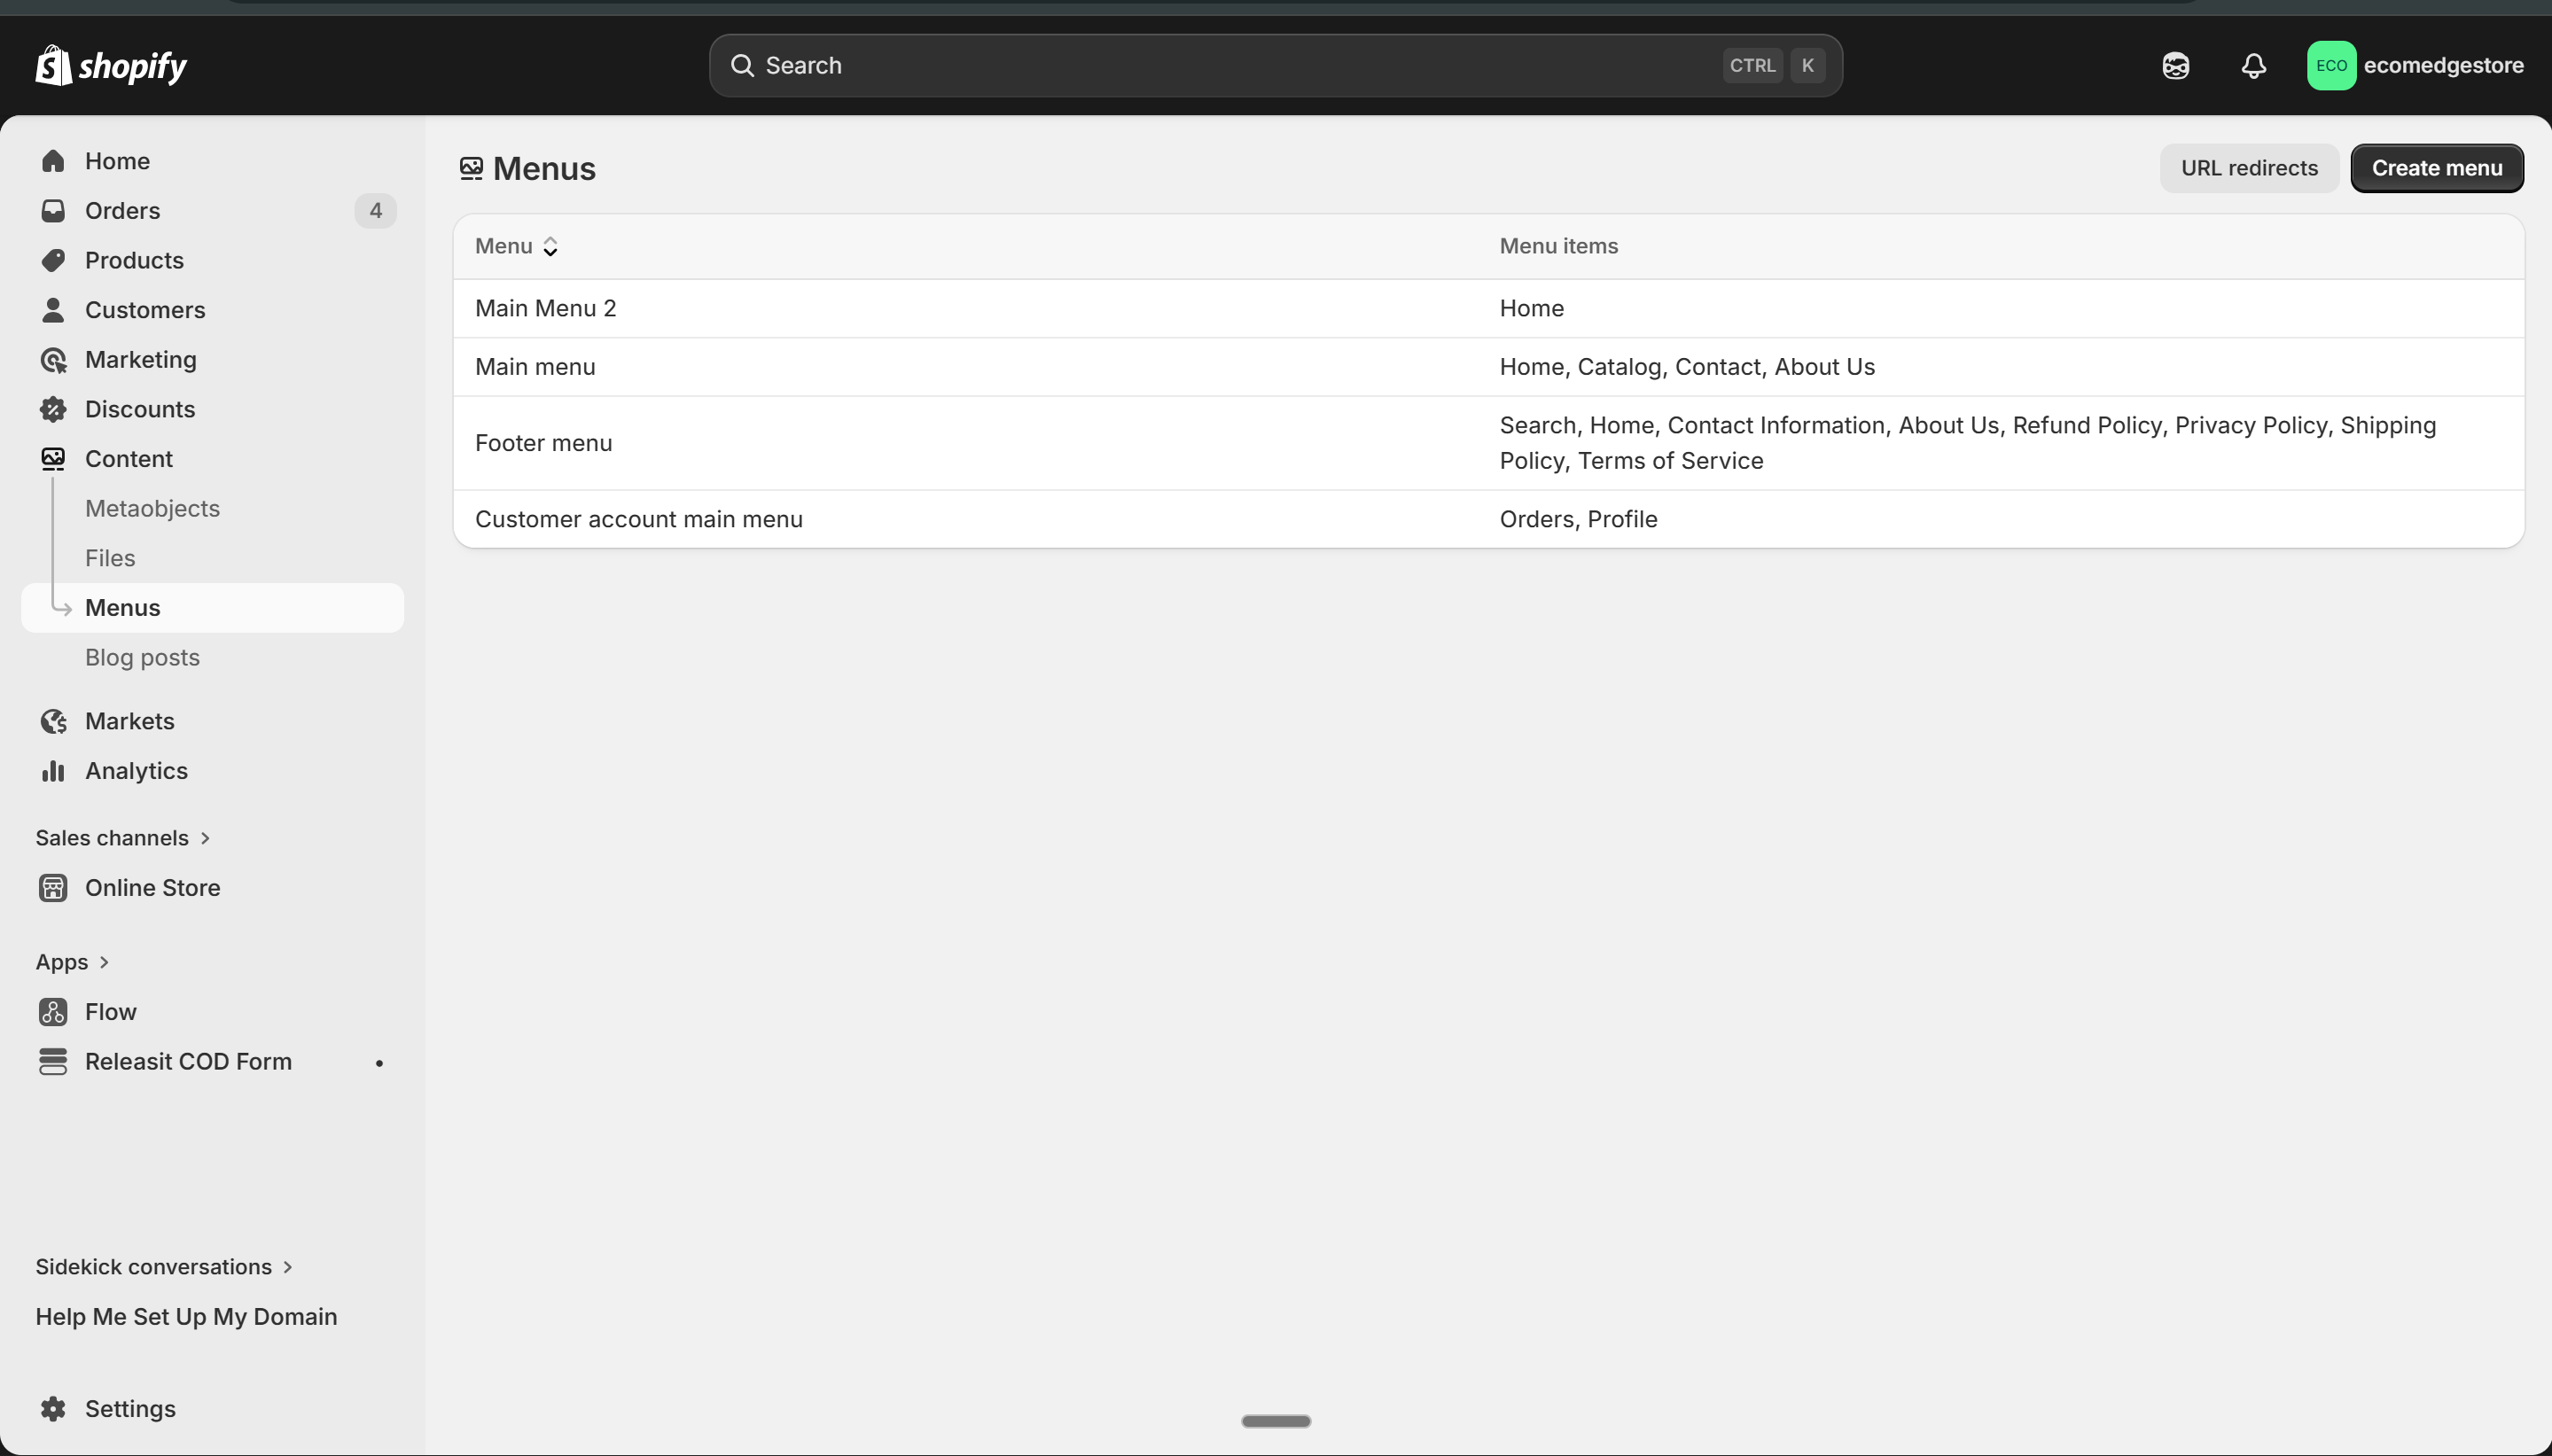
Your store's menus — Main menu (header navigation) and Footer menu (bottom links)
Shopify Admin
- Click on any menu to add, remove, or reorder items
- You can create nested (dropdown) menus — drag an item under another to make it a sub-item
- Menu items can link to: pages, collections, products, URLs, or blog posts
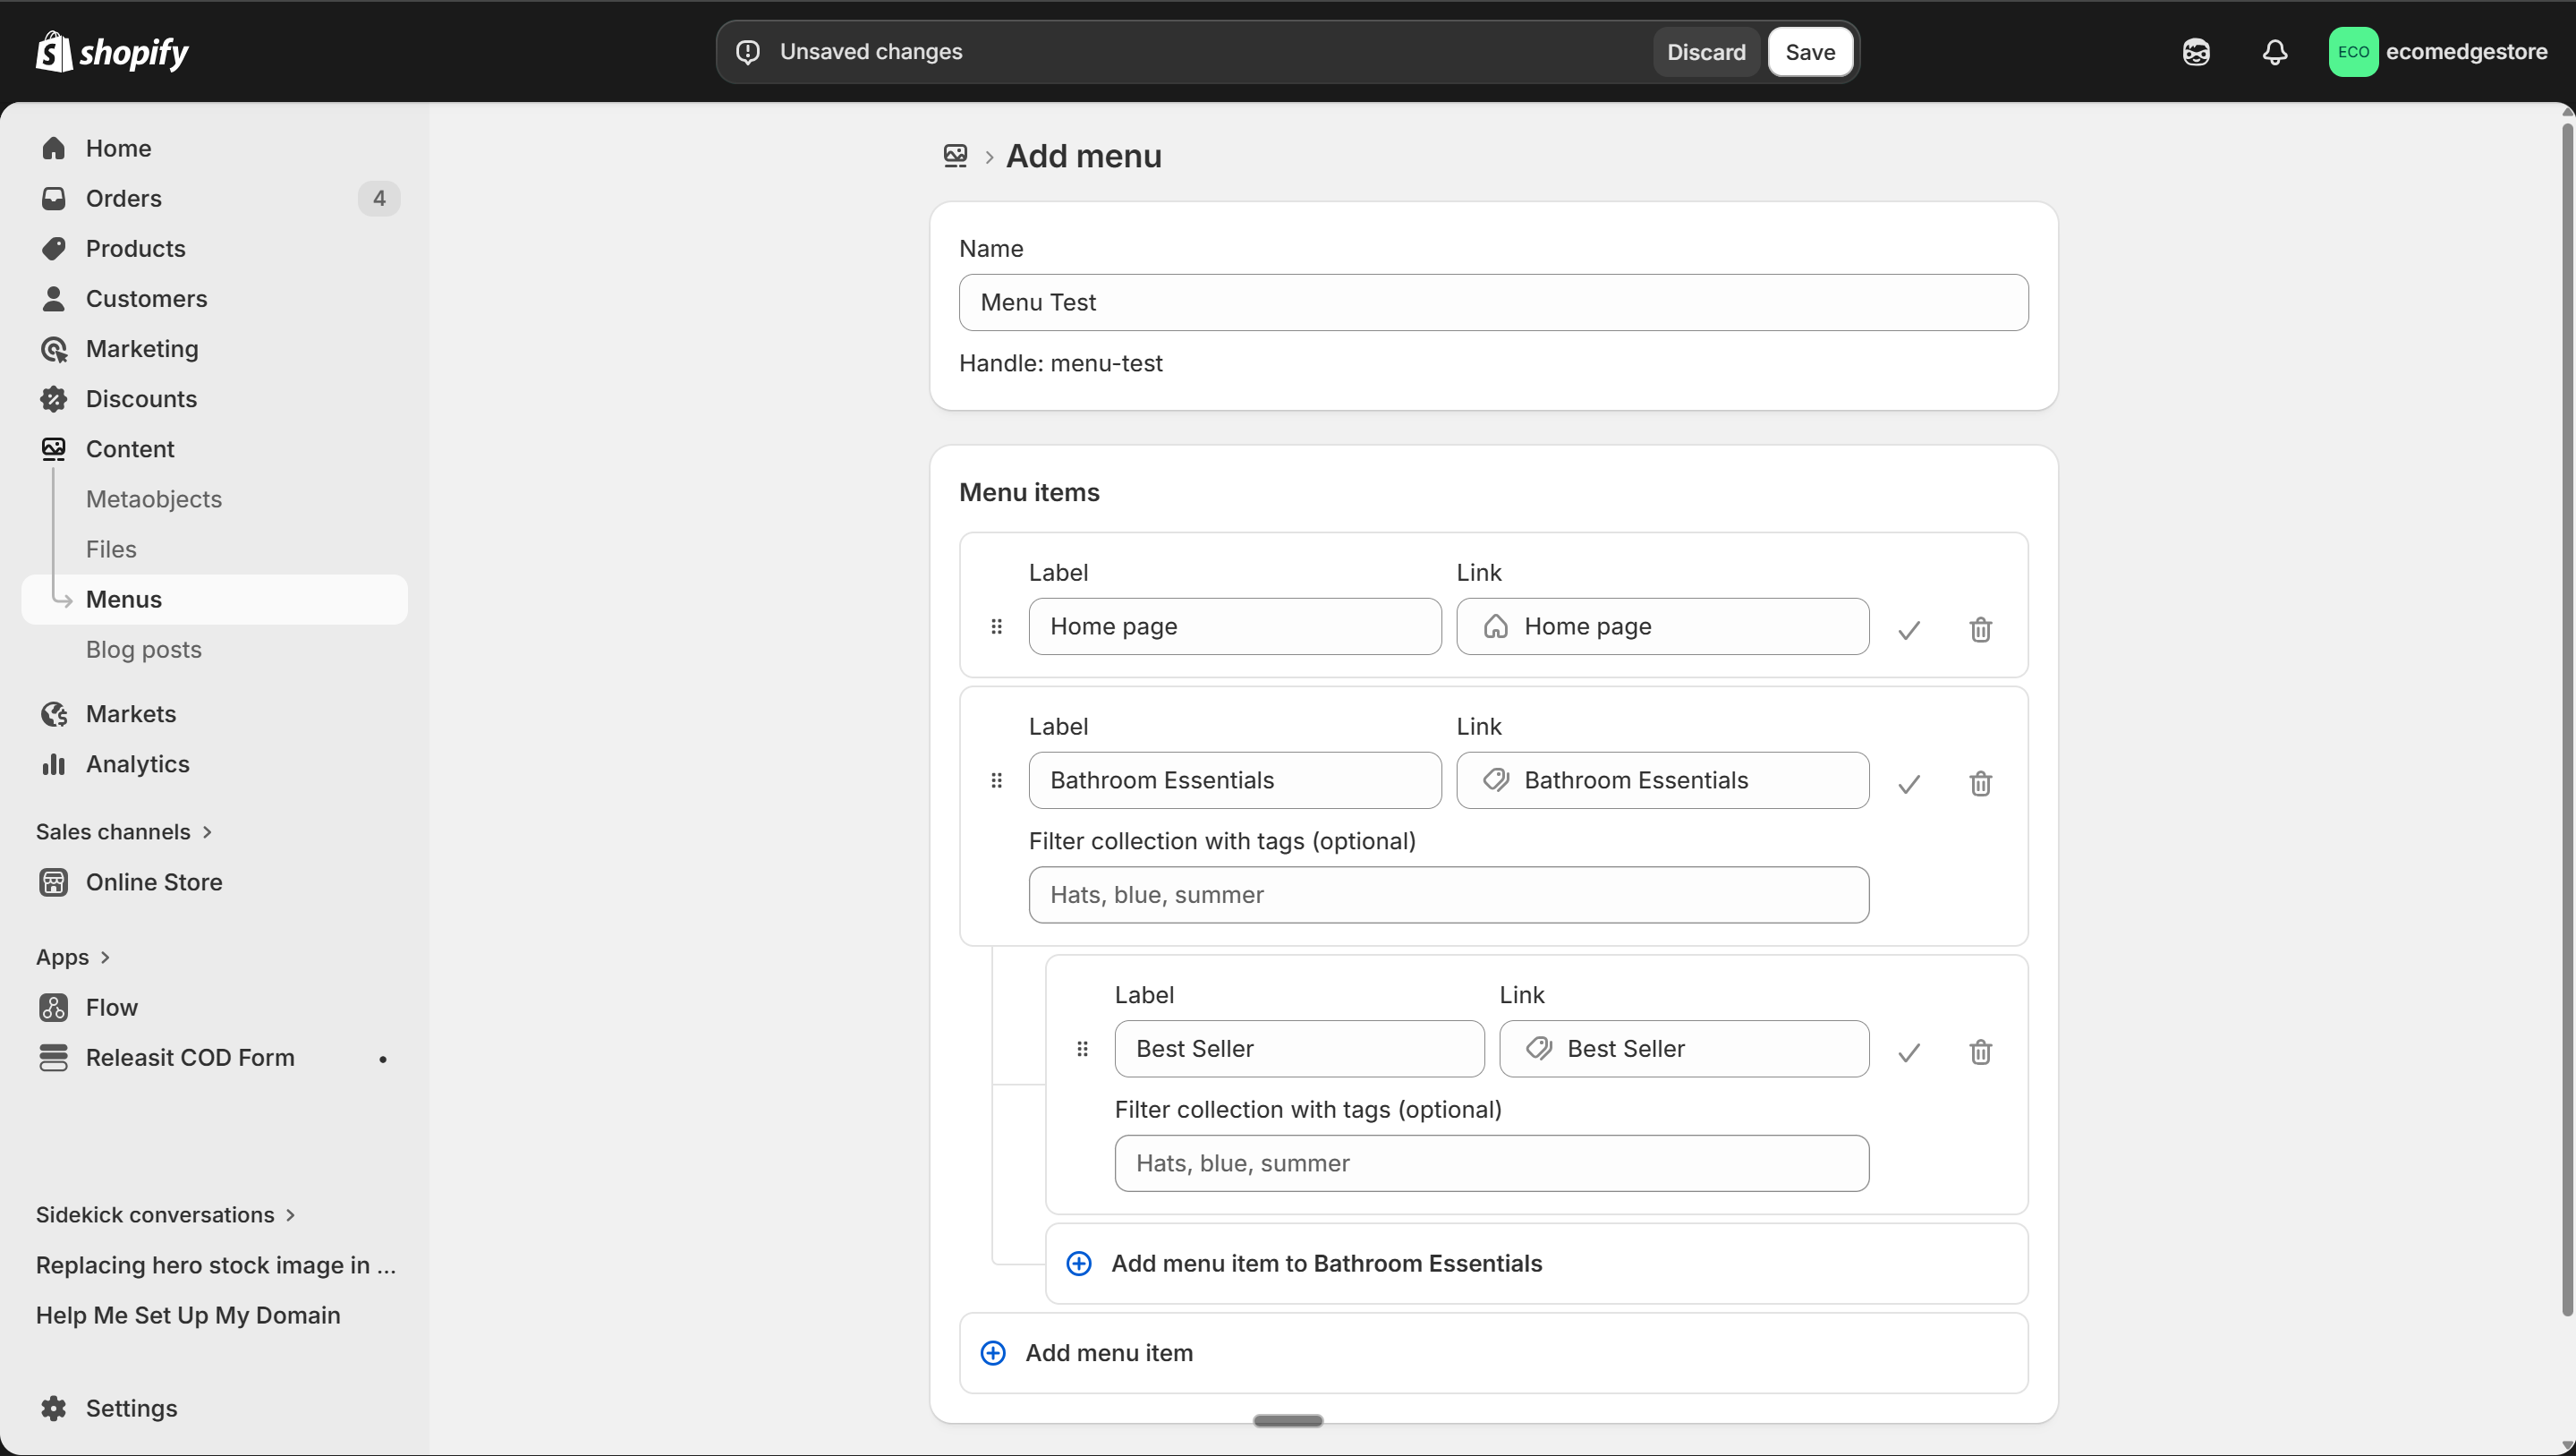
Creating a nested menu — drag items under others to create dropdown navigation
Shopify Admin
Link your policy pages in the footer menu
After setting up policies in Step 1, they don't appear anywhere automatically. You must add them to the footer menu manually — Refund Policy, Privacy Policy, Shipping Policy, Terms of Service. Customers and payment gateways look for these.
- To create standalone pages (About Us, Contact, etc.), go to Online Store > Pages
- Click "Add page" — give it a title, add content, and save
- After creating a page, add it to your menu (Main or Footer) so customers can find it
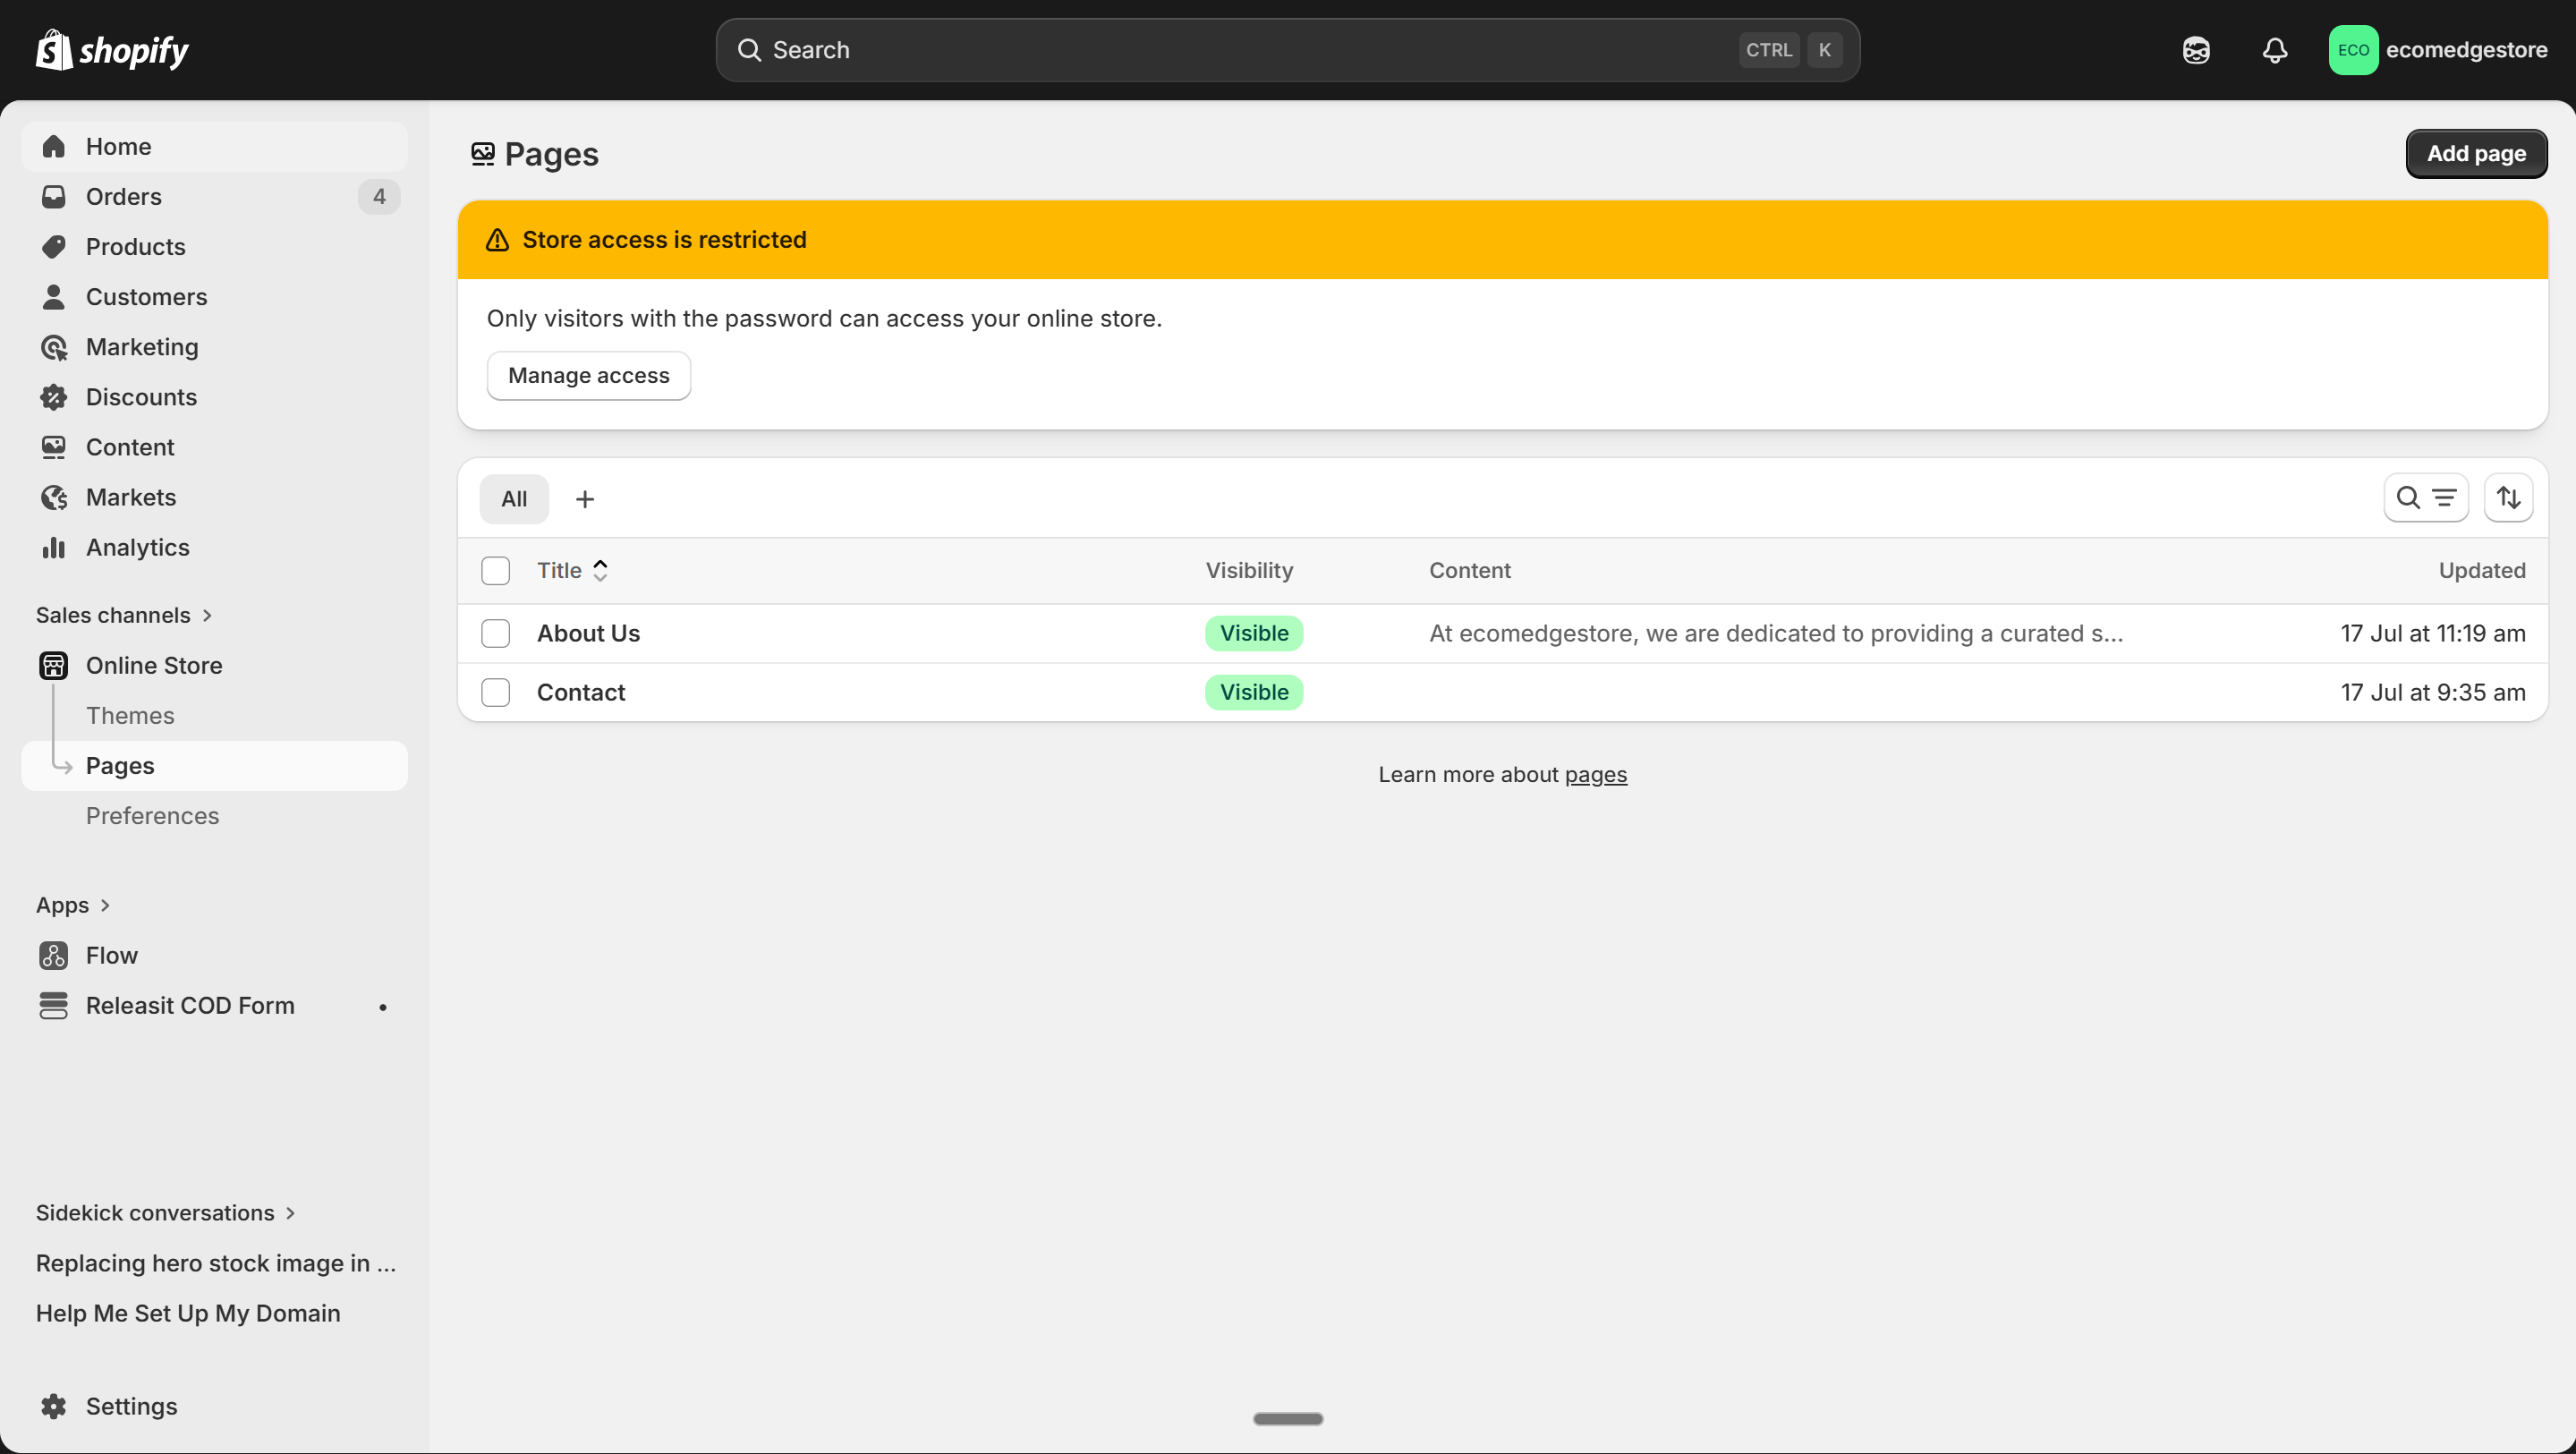
Online Store > Pages — create About Us, Contact, and any other standalone pages here
Shopify Admin
6
Essential Apps
- Go to Apps in your Shopify sidebar — or visit the Shopify App Store directly
- You need 3 types of apps to start. Search for each in the App Store, click "Add app" or "Install", and approve the permissions.
1. COD Form App
Replaces the default checkout for COD orders with a simpler form. Reduces fake orders. Examples: Releasit COD Form, EasySell COD Form.
2. Supplier / Dropshipping App
Connects you to suppliers who ship products directly to your customers. Examples: Roposo Cloud, Dropdash, or any Indian supplier platform.
3. Review App
Displays customer reviews on your product pages. Social proof is critical for conversion. Examples: Loox, Judge.me.
- To find an app: go to the Shopify App Store, search by name, and click "Add app"
- Shopify will redirect you to your admin — click "Install app"
- Each app asks for permissions (access to customer data, store data, etc.) — review and approve
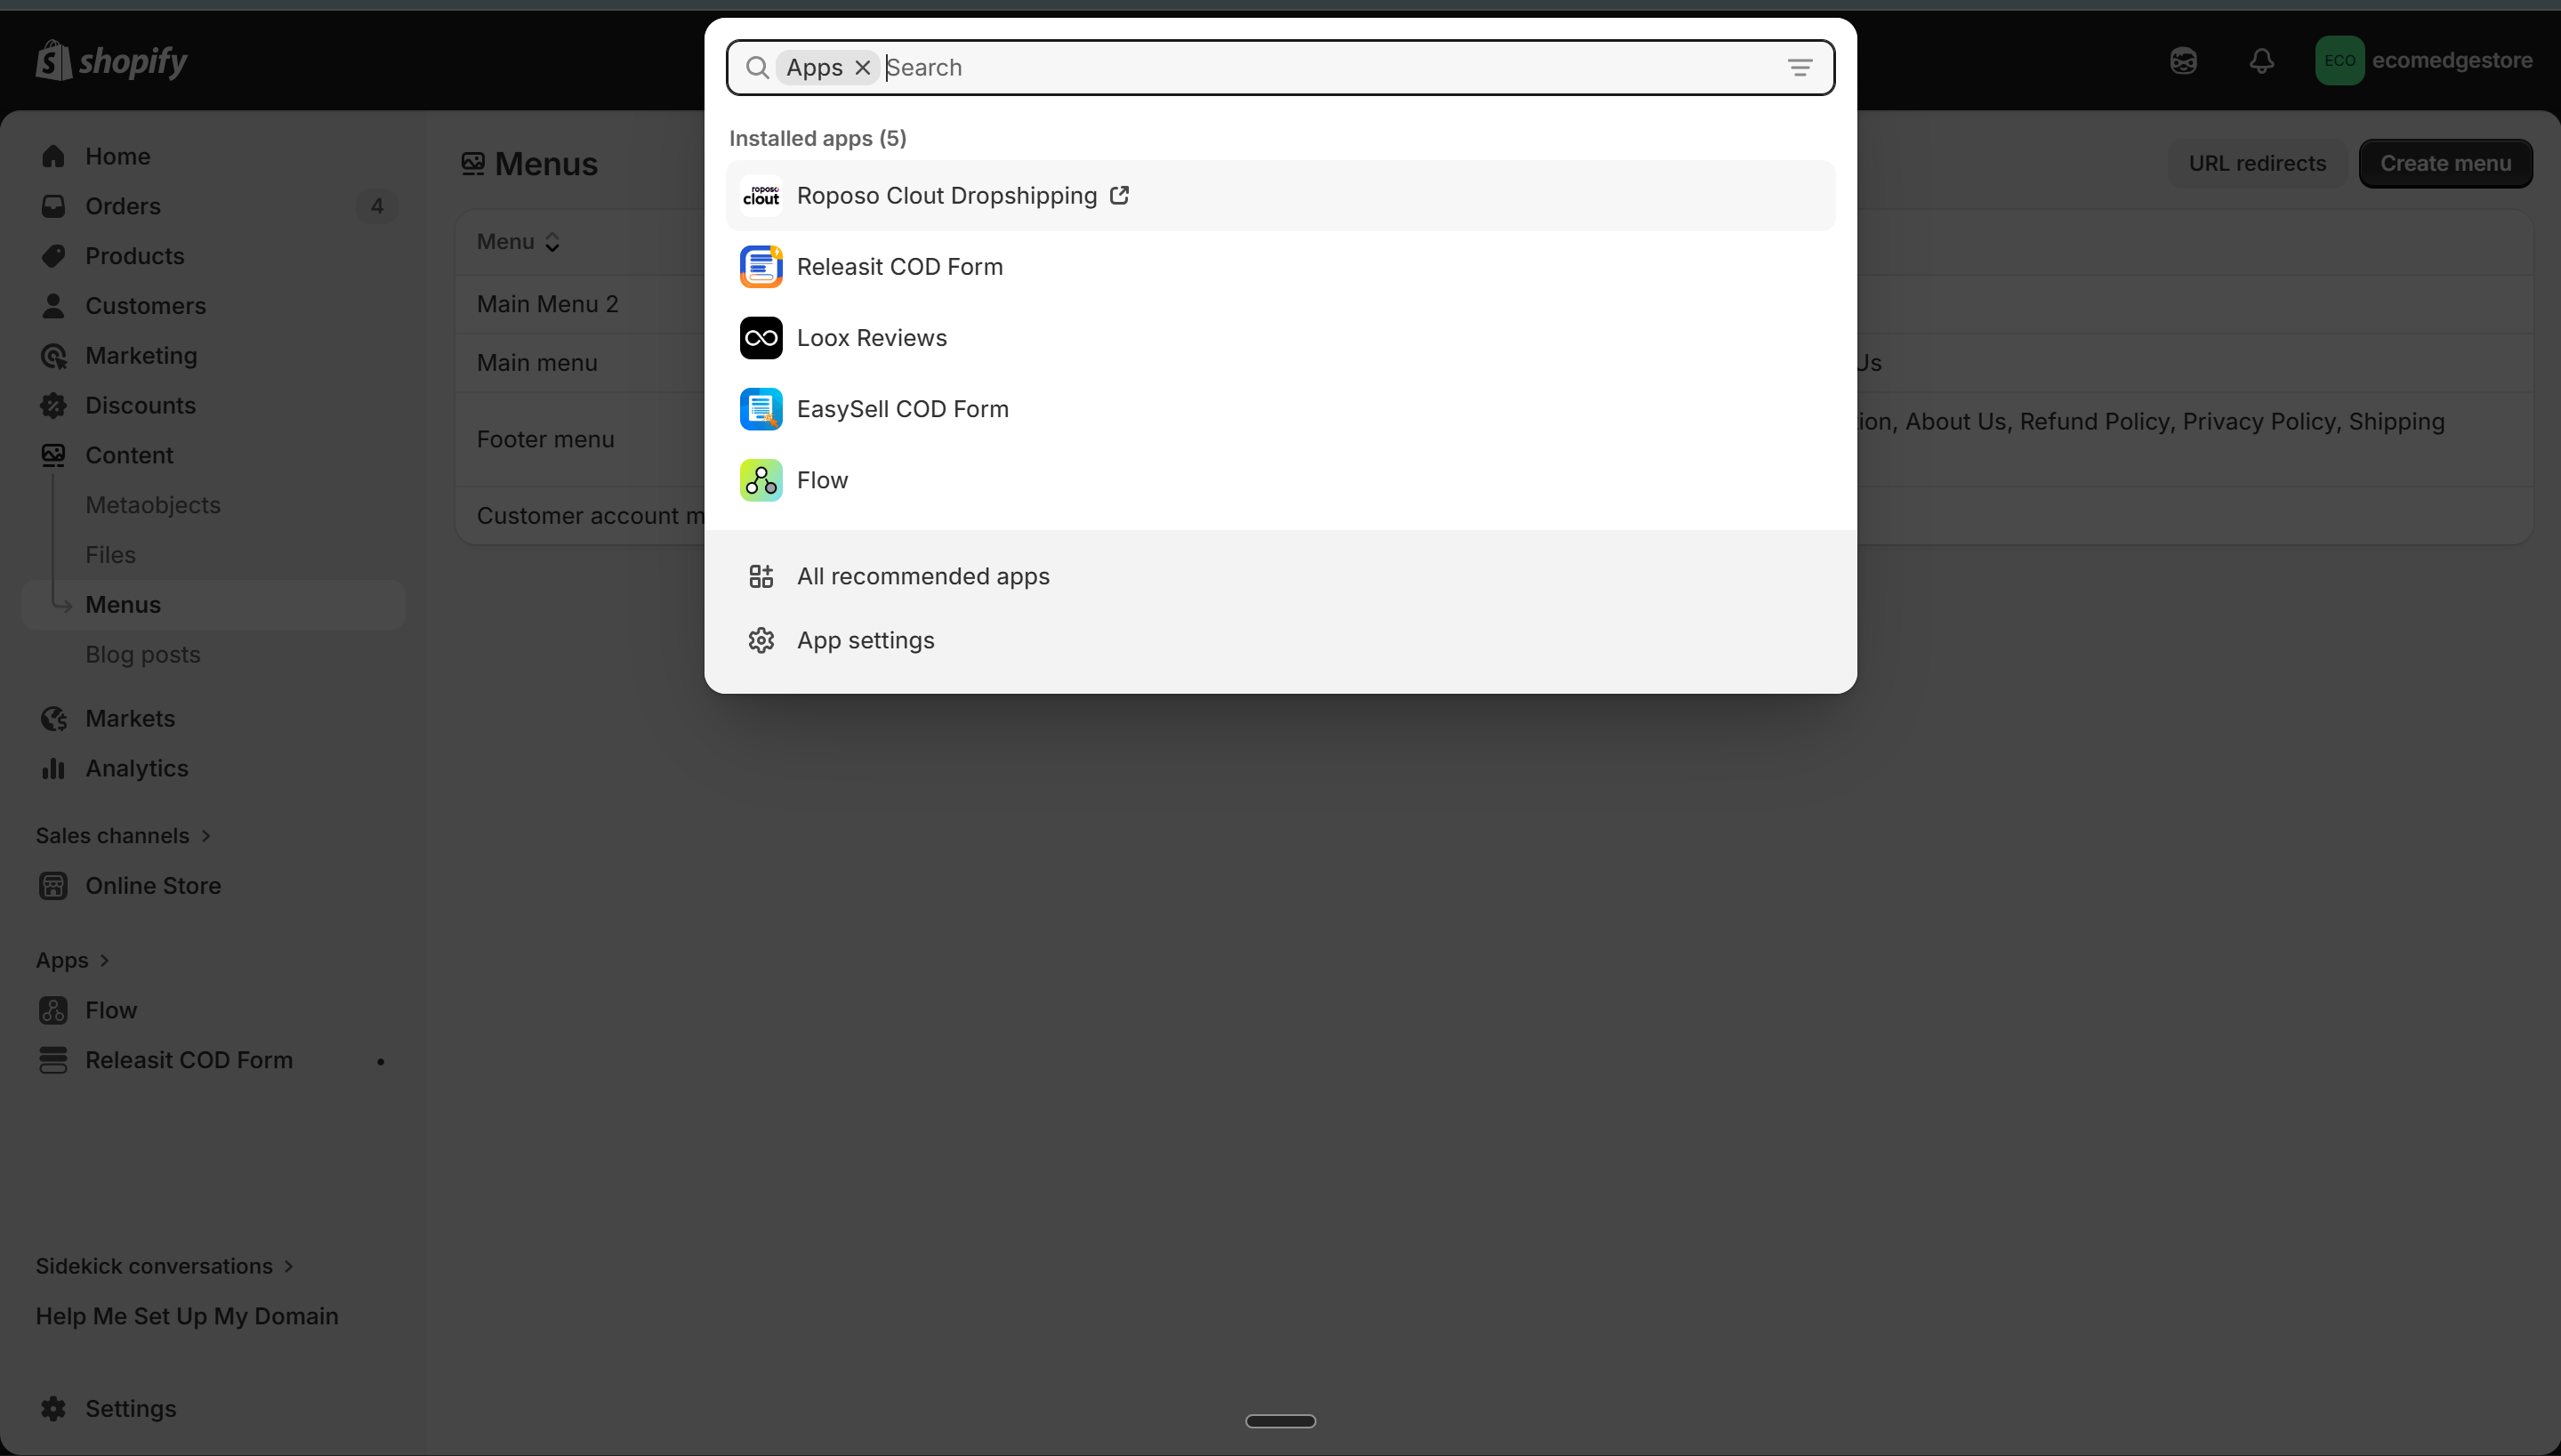
Your installed apps — search the App Store for each app type, then install
Shopify Admin
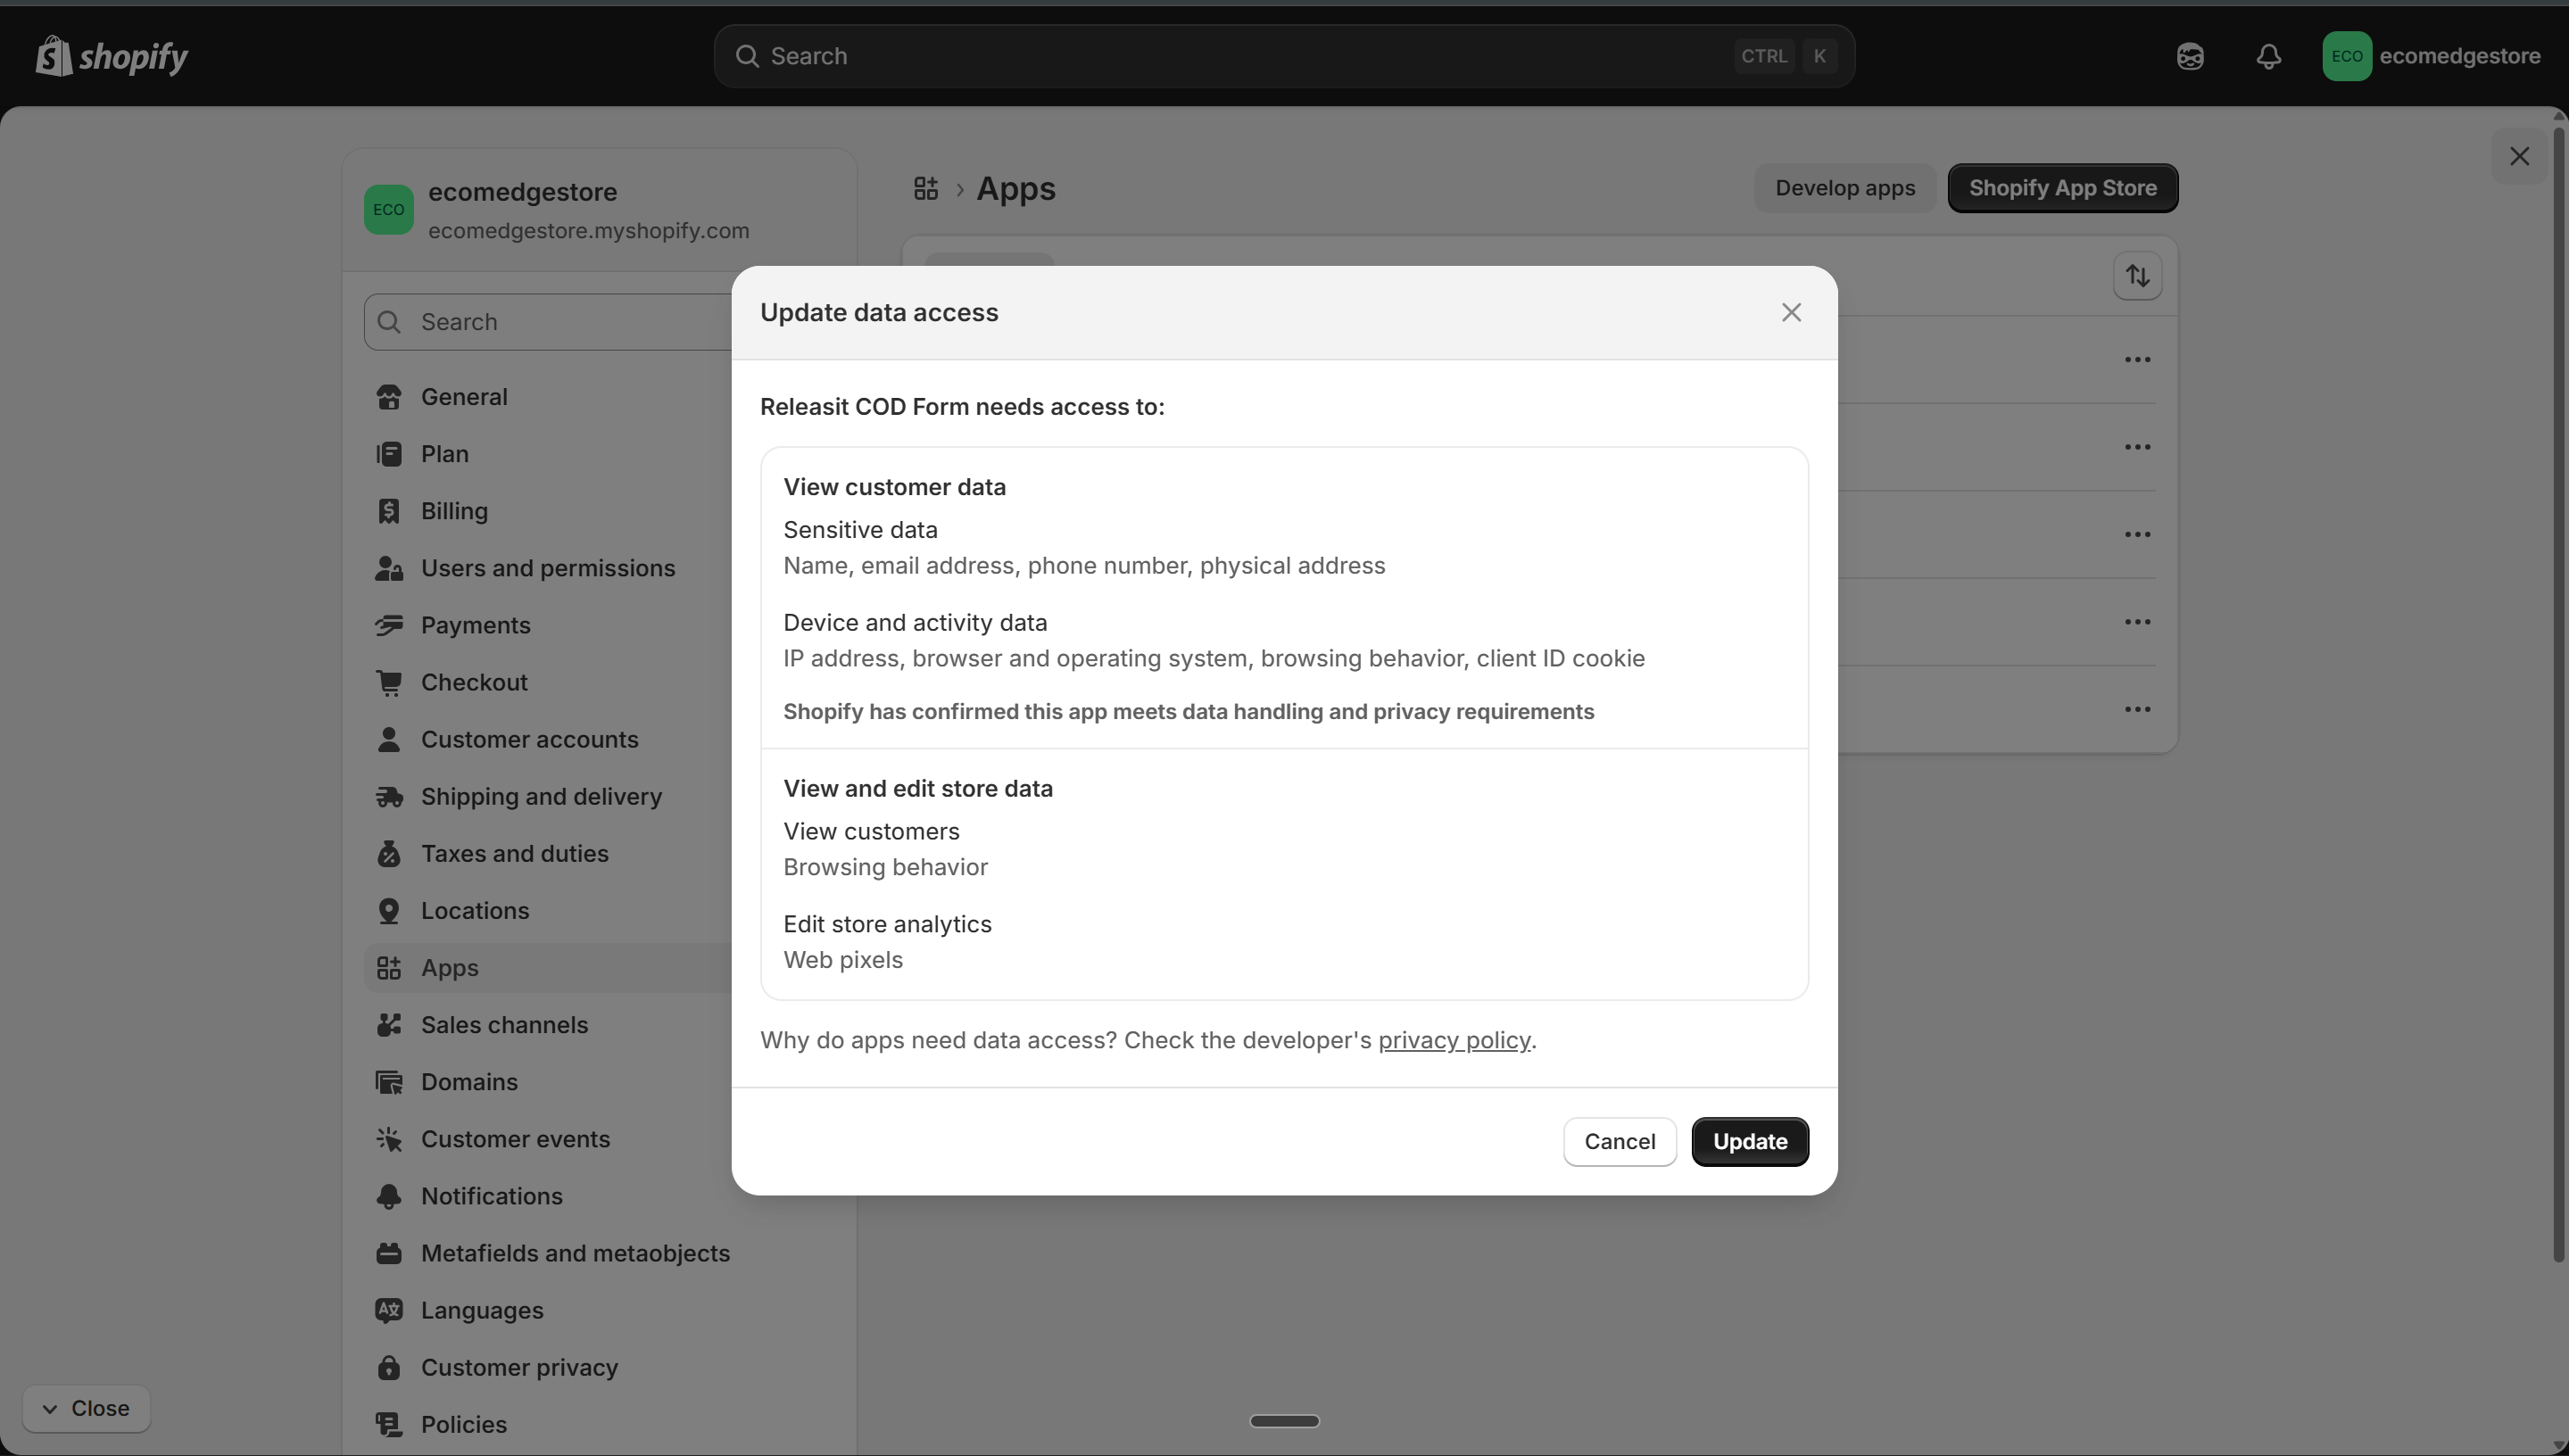
When you install an app, it asks for permissions — review the list and approve
Shopify Admin
Every extra app slows your store down
Each app adds code that loads on every page — more apps = slower store = lower conversion. Don't install 15 apps on day one. Start with these 3. Add more only when you have a specific problem to solve, not because it looks useful.
Infrastructure Checklist
Settings > Policies — all 4 policies should have content. Then check your footer menu (Online Store > Navigation > Footer menu) to make sure each policy is linked.
Settings > Checkout — "Customer contact method" should be "Phone number or email" and shipping address phone should be "Required." Without this, your delivery partner can't reach the customer.
Settings > Shipping and delivery > General profile. You should see at least one zone (India) with at least one rate (Free or flat). No zone = checkout is blocked for all customers.
Settings > Payments > Manual payment methods. "Cash On Delivery" should be listed and active. For prepaid, contact your payment provider (Razorpay, PhonePe) to set up integration.
Online Store > Navigation (or Content > Menus). Main menu should have your key pages. Footer menu should link all policy pages. If you can't find Navigation — Shopify may have moved it. Search "menus" in the admin search bar.
Check Apps in your sidebar. You should have: (1) a COD form app, (2) a supplier/dropshipping app, (3) a review app. That's the minimum. Don't forget to enable them in Theme Settings > App Embeds if they require it.